Table of Contents >> Show >> Hide
- What Is a Tie Dimple, Exactly?
- Why a Tie Dimple Matters
- Before You Start: Choose the Right Tie
- Way #1: The Classic Pinch Method
- Way #2: The Finger-Under-the-Knot Method
- Way #3: The Side-Fold Method
- Which Tie Knots Work Best for a Dimple?
- Common Mistakes That Ruin the Dimple
- How to Make a Tie Dimple Last All Day
- When You Should Skip the Dimple
- Final Thoughts
- Real-World Experiences With Learning to Tie a Dimple
If you have ever looked in the mirror, nailed the shirt, picked the right tie, and then wondered why the whole thing still looked a little… flat, welcome to the club. The missing detail is often the dimple. That small fold right under the knot may seem like a tiny flourish, but in men’s style, tiny flourishes do a lot of heavy lifting. A good tie dimple adds texture, shape, and a little confidence. It tells the world you did not just throw on a tie five seconds before the meeting started, even if that is exactly what happened.
In this guide, you will learn 3 easy ways to tie a dimple, how to make the look stay put, which knots work best, and which common mistakes turn a polished tie into a sad strip of fabric. We will also cover real-world experiences people have when learning this skill, because no one talks enough about the first few crooked attempts. A tie dimple is simple, but like parallel parking or folding a fitted sheet, simple does not always mean automatic.
What Is a Tie Dimple, Exactly?
A tie dimple is the intentional crease or indentation formed just below the tie knot. It creates depth and gives the knot a more elegant, dimensional look. Without a dimple, a tie can look stiff or unfinished. With one, even an ordinary knot looks sharper. It is the neckwear version of good lighting.
The best part is that you do not need a special tie, a secret gadget, or the hands of a tailor raised by monks in Milan. You just need the right motion at the right moment. Most dimples are created during the final tightening of the knot. That timing matters. Try to force one in after the knot is already locked down, and your tie will usually fight back like a grumpy cat being introduced to bath time.
Why a Tie Dimple Matters
The dimple is one of those small style details that makes a big visual difference. It breaks up the flat surface of the tie, gives the knot more personality, and can make your whole outfit look more intentional. Whether you are dressing for work, a wedding, a dinner, or a formal event, a neat dimple can elevate your appearance without making you look like you are trying too hard.
It also works across several classic tie knots. You are not locked into one style forever. A four-in-hand knot often creates a subtle, relaxed dimple. A half-Windsor can give you balance and symmetry. A full Windsor can make the dimple look more structured and formal. In other words, there is a dimple method for nearly every collar, occasion, and level of fashion bravery.
Before You Start: Choose the Right Tie
Before learning the three methods, it helps to know that some ties behave better than others. Silk ties are popular because they drape well and usually respond nicely to shaping. Textured ties, such as grenadine or shantung-style fabrics, can also hold a dimple beautifully. Very stiff or very slippery ties can be more difficult. Thick winter ties may create bulk, while ultra-thin synthetic ties may refuse to cooperate like a teenager asked to clean the garage.
If you are just starting out, practice with a medium-width silk tie and a classic knot. That combination gives you the best shot at success without a wrestling match in front of the mirror.
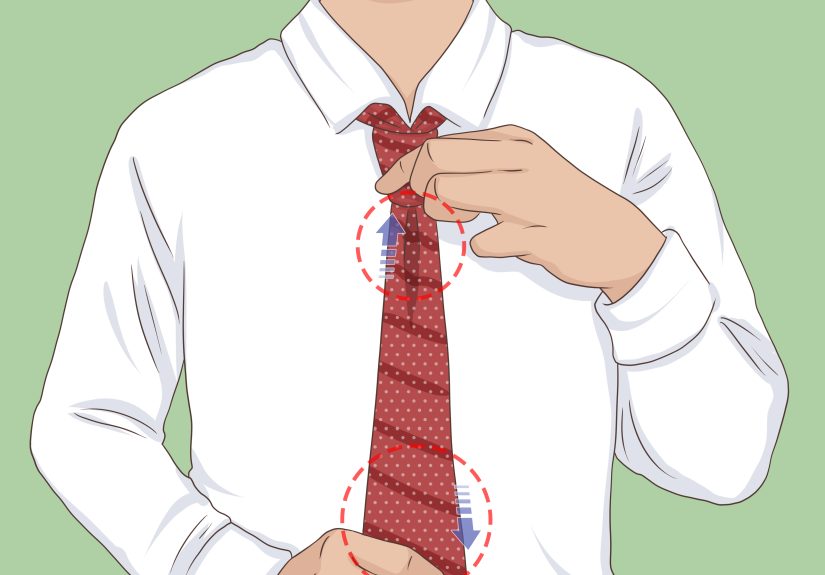
Way #1: The Classic Pinch Method
Best for beginners and everyday wear
The classic pinch method is the easiest and most reliable way to create a tie dimple. It works with most knots, especially the four-in-hand and half-Windsor. This is the method many style guides recommend because it is quick, repeatable, and does not require much fuss.
How to do it
- Tie your necktie as usual, but do not fully tighten the knot yet.
- As the wide blade comes through the front loop of the knot, stop while it is still slightly loose.
- Use your thumb and index finger to pinch the tie fabric about an inch below the knot.
- Create a small fold in the center by pressing the sides inward.
- Hold that pinch while gently sliding the knot upward.
- Adjust until the dimple sits centered beneath the knot.
This method works because you are shaping the fabric while the knot still has just enough flexibility to accept the crease. Pull too fast and the dimple disappears. Pull too hard and the tie bunches up like it lost a fight. Gentle tension is the secret.
Why it works
The pinch method gives you control right where the dimple forms. It is especially useful if you want a clean, centered crease that looks polished but not overly dramatic. For business attire, interviews, weddings, and standard office wear, this is usually the safest and smartest option.
Way #2: The Finger-Under-the-Knot Method
Best for a deeper, more pronounced dimple
If the pinch method gives you a subtle crease, the finger-under-the-knot method can give you a stronger, more visible dimple. This is a favorite for people who want a bit more shape in the tie without changing the knot itself.
How to do it
- Tie your tie until the knot is nearly finished, leaving some slack.
- Place your index finger horizontally just under the loose knot.
- Let the tie fabric fold naturally over your finger.
- While keeping your finger in place, tighten the knot gradually.
- Once the fold forms, slide your finger out and continue tightening.
- Smooth the sides of the tie so the dimple remains clean and centered.
This technique acts like a temporary mold. Your finger creates space and shape at the same time, allowing the tie to settle into a more dramatic indentation. Think of it as giving the fabric a suggestion it cannot ignore.
When to use it
This method is great when your tie fabric is soft or when the dimple keeps flattening out. It also works well for dressier looks, especially if you like a more sculpted knot. Use it with a half-Windsor or full Windsor if you want your tie to look especially crisp.
Way #3: The Side-Fold Method
Best for style enthusiasts who want more character
The side-fold method is a slightly more advanced take on the tie dimple. Instead of making the crease by pinching dead center, you create a fold from one side, which can produce a slightly off-center or more naturally shaped dimple. It feels less mechanical and a bit more expressive.
How to do it
- Tie the knot until the wide blade is ready to be tightened through the front.
- Use one hand to create a small fold from either the left or right side just below the knot.
- Guide that fold inward so it forms a crease toward the center.
- Pull the wide end through gently while holding the fold in place.
- Slide the knot upward and fine-tune the dimple shape.
- Adjust the tie so the result looks intentional rather than accidental.
This method can create a slightly more relaxed, rakish look. It is not sloppy when done well. It simply looks less rigid than a perfectly centered crease. If the classic pinch is the clean-cut banker, the side-fold is the stylish friend who somehow looks amazing with his sleeves rolled up.
Why people like it
The side-fold method gives a tie more character, especially with textured fabrics. It is a good choice when you want your outfit to feel polished but not overly formal. Creative workplaces, dinner parties, and dressy social events are all fair game here.
Which Tie Knots Work Best for a Dimple?
Four-in-Hand
This is often the easiest knot for a natural-looking dimple. It is slightly asymmetrical, relaxed, and forgiving. If you are new to neckties, start here.
Half-Windsor
This knot offers a nice middle ground. It is more balanced than the four-in-hand but not as bulky as the full Windsor. It is excellent for business wear and medium spread collars.
Full Windsor
This is the bold, formal option. It can support a sharp dimple, but it requires more precision. If you over-tighten it, the dimple can vanish. If you get it right, though, it looks fantastic.
Common Mistakes That Ruin the Dimple
Tightening too fast
Speed is the enemy of finesse. If you yank the tie tight in one dramatic move, the dimple will flatten before it has a chance to settle.
Using the wrong fabric
Some fabrics simply do not hold shape well. If your tie keeps going flat, it may not be your technique. It may be the tie itself.
Forcing the dimple after the knot is finished
Once the knot is fully set, it is much harder to create a clean crease. Build the dimple during the tying process, not after.
Making it too deep
A dimple should look elegant, not like your tie got thumb-printed by a cartoon giant. Subtlety usually wins.
Ignoring the collar
A beautiful dimple can still look odd if the knot is wrong for the shirt collar. Narrower knots tend to pair well with smaller collars, while broader knots suit wider spreads.
How to Make a Tie Dimple Last All Day
Once you have created a good dimple, the next challenge is keeping it there. Start by choosing a tie with enough body to hold shape. Tighten the knot firmly but not aggressively. Smooth the tie blade so the crease remains clean. Avoid fidgeting with the knot every ten minutes. Yes, we all do it. No, it does not help.
It also helps to untie your tie properly at the end of the day instead of yanking the narrow end through like you are starting a lawn mower. Good tie care keeps the fabric in better condition, and better fabric responds more predictably the next time you tie it.
When You Should Skip the Dimple
Not every tie needs a pronounced dimple. Very chunky ties, heavily patterned novelty ties, or extremely formal looks may sometimes work better with a more understated finish. The point is not to worship the dimple like it is a sacred relic. The point is to use it when it improves the overall look. Style is about judgment, not just technique.
Final Thoughts
Learning 3 easy ways to tie a dimple is one of the simplest upgrades you can make to your wardrobe. The classic pinch method is dependable, the finger-under-the-knot method adds depth, and the side-fold method brings personality. Once you understand when to use each one, tying a tie feels less like a routine and more like a finishing touch.
The funny thing about great style is that people rarely notice it piece by piece. They just notice the overall effect. A clean shirt, a good knot, the right tie length, and that tiny crease under the knot all work together. The dimple is not the whole show, but it is a very good supporting actor. And sometimes the supporting actor steals the scene.
Real-World Experiences With Learning to Tie a Dimple
One of the most common experiences beginners have is assuming the dimple is supposed to happen automatically. They tie a knot, look down, and wait for magic. No magic arrives. That is usually the first lesson: a good dimple is often intentional. It comes from timing, touch, and a little patience. Many people discover that once they stop rushing the last step, their results improve almost immediately.
Another common experience is realizing that not all ties behave the same way. Someone might practice with a slick synthetic tie and feel like they have suddenly forgotten how fingers work. Then they switch to a silk tie or a textured tie and the dimple appears much more easily. This can be surprisingly encouraging. The problem was not always the person in the mirror. Sometimes the tie was just being difficult.
There is also the experience of learning that symmetry is trickier than expected. A beginner often creates a dimple that leans to one side, sits too low, or looks more like a wrinkle than a style choice. That is normal. Most people need a few attempts before they understand how lightly to pinch, where to place the fold, and how much pressure the knot can take before the crease collapses.
Office workers and professionals often say that once they master the dimple, their whole outfit feels sharper even when nothing else changes. The same suit looks better. The same shirt looks more polished. The tie stops looking like an obligation and starts looking like part of the look. This is why small menswear details matter so much. They create the difference between “dressed” and “well dressed.”
Some people also discover that the dimple changes how they feel, not just how they look. There is a subtle confidence boost that comes from getting a detail right. It is the same satisfaction as straightening a pocket square or polishing dress shoes. Nobody may compliment the dimple directly, but the wearer knows it is there, and that awareness can change posture, attitude, and self-presentation in a surprisingly positive way.
Then there is the wedding or event experience. Many men who rarely wear ties do not think about the dimple until a formal occasion forces the issue. Suddenly there are photos, relatives, speeches, and a level of wardrobe scrutiny that normally does not exist. In those moments, the dimple becomes more than a style extra. It becomes part of looking finished in pictures that may live on for years. That is when many people finally decide it is worth learning properly.
Perhaps the most relatable experience is this: after you finally learn to make a good dimple, you start noticing when other people do not have one. You do not become insufferable about it, hopefully, but you do start seeing ties differently. The flat knot jumps out. The over-tightened knot looks harsher. The neat little crease under a well-shaped knot suddenly seems like a mark of competence. Once you see it, you cannot unsee it.
And that is really the charm of the whole thing. A tie dimple is small, practical, and a little old-school, but it still matters. It rewards practice. It reflects care. It adds style without shouting. For many people, learning it becomes one of those tiny grooming and dressing habits that sticks for life. Not bad for a fold of fabric smaller than a potato chip.


