Table of Contents >> Show >> Hide
- How to Pick the Right Projects (So You Don’t “Half-Renovate” Your Wallet)
- Curb Appeal Wins (Big “Before/After” Energy for Small Money)
- 1) Paint the Front Door
- 2) Swap Old House Numbers for Modern Ones
- 3) Upgrade the Mailbox and/or Door Hardware
- 4) Add Two Big Planters (or Window Boxes) Near the Entry
- 5) Mulch and Edge Your Beds
- 6) Power Wash the “Grime Belt”
- 7) Replace or Refresh Porch Lighting
- 8) Add Solar Path Lights
- 9) Re-caulk Exterior Gaps and Touch Up Trim Paint
- 10) Clean Windows and Screens (Then Upgrade the Doormat)
- Interior Upgrades That Make Your Home Feel New
- 11) Paint One Room (or One Accent Wall)
- 12) Replace Outdated Light Fixtures (If You Can Do It Safely)
- 13) Swap Yellowed Switch Plates and Outlet Covers
- 14) Update Cabinet Hardware
- 15) Add a Peel-and-Stick Backsplash
- 16) Install Under-Cabinet Lighting
- 17) Upgrade the Kitchen Faucet (or At Least the Aerator)
- 18) Create Pantry Order with Clear Bins and Labels
- 19) Re-caulk and Refresh Grout in the Bathroom
- 20) Replace the Showerhead (Choose a WaterSense-Labeled Option if Possible)
- 21) Add a Curved Shower Curtain Rod (or a New, Crisp Curtain)
- 22) Frame the Bathroom Mirror (or Swap It)
- 23) Upgrade Hooks, Towel Bars, and Tiny Accessories
- 24) Replace a Worn Toilet Seat (Yes, Really)
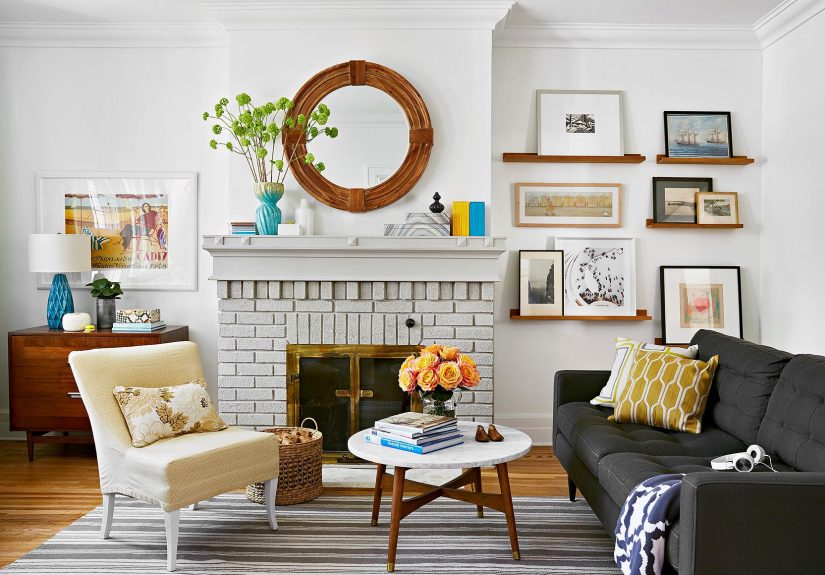
- 25) Add a Large Area Rug (or Layer Rugs for Texture)
- 26) Upgrade Window Treatments
- Comfort + Energy Efficiency (Savings That Keep Paying You Back)
- Experience Notes: What Real-Life DIY Teaches You (The Extra )
- Conclusion
Want your home to feel newer, cleaner, brighter, and more “how is this place so put-together?”without taking out a second mortgage
or selling a kidney on Facebook Marketplace? Good. Because the highest-impact upgrades are often the cheapest ones.
They’re the projects that fix visual “noise” (scuffs, clutter, dated finishes), reduce daily friction (where did I put my keys?!),
and quietly stop your house from leaking money (hello, drafts and old bulbs).
This list focuses on low-cost, high-impact home improvement ideas you can tackle in a weekend (sometimes in an hour),
with cost ranges that generally stay modest. A quick safety noteespecially important if you’re new to DIY:
anything involving electricity, ladders, or plumbing shutoffs is worth extra caution. When in doubt, ask a qualified adult
for help or hire a licensed pro. A bargain isn’t a bargain if it ends with an ER visit or a soggy ceiling.
How to Pick the Right Projects (So You Don’t “Half-Renovate” Your Wallet)
Here’s the secret sauce: the best budget-friendly upgrades don’t try to impress everywhere. They focus on:
(1) first impressions (entry, curb appeal, lighting), (2) touch points (handles, switches, faucets),
and (3) comfort leaks (drafts, harsh lighting, messy storage).
Do a quick walkthrough with your phone camera onyour camera will snitch on every crooked frame and scuffed baseboard.
Curb Appeal Wins (Big “Before/After” Energy for Small Money)
1) Paint the Front Door
Cost: Often $25–$75 in paint and supplies.
Your front door is your home’s handshake. A fresh color (even classic black) makes the whole exterior look sharper.
Bonus points if you clean the door, sand lightly, and use paint designed for exterior surfaces.
2) Swap Old House Numbers for Modern Ones
Cost: Usually $15–$60.
Tiny detail, huge effect. New numbers read “maintained” and help delivery drivers, guests, and emergency responders.
Go larger than you think you needvisibility is curb appeal’s practical cousin.
3) Upgrade the Mailbox and/or Door Hardware
Cost: About $20–$120 depending on choices.
Wobbly, faded hardware screams “we’ve been meaning to.” Matching finishes (mailbox, door handle, knocker, kick plate)
instantly makes the entry feel intentionallike a good outfit with the right shoes.
4) Add Two Big Planters (or Window Boxes) Near the Entry
Cost: $30–$150 (less if you reuse containers).
Symmetry is a cheat code. Two planters frame the door and create a “finished” look.
Choose hardy, low-maintenance plants so your curb appeal doesn’t become a weekly guilt appointment.
5) Mulch and Edge Your Beds
Cost: Often $20–$80.
Fresh mulch is basically makeup for landscapingfast, dramatic, and surprisingly forgiving.
Clean bed lines (with an edging tool or spade) make the entire yard look more expensive than it was.
6) Power Wash the “Grime Belt”
Cost: $0–$60 (DIY rental or borrow) or $100+ pro.
Driveways, walkways, porch steps, siding spotspower washing is one of the most satisfying upgrades per minute.
If you’re renting a washer, start with a gentle setting so you don’t carve your initials into the concrete.
7) Replace or Refresh Porch Lighting
Cost: $10–$150.
Lighting changes the vibe instantly. Even just swapping to a warmer LED bulb can make your entry feel more welcoming.
If you replace a fixture, shut off power at the breaker and get help if you’re inexperienced.
8) Add Solar Path Lights
Cost: Typically $20–$80 per set.
Solar lights add “movie set” ambiance without trenching wires. Use them to define a walkway or highlight landscaping.
Spacing matters: a few well-placed lights look intentional; a runway looks… like a runway.
9) Re-caulk Exterior Gaps and Touch Up Trim Paint
Cost: Often $10–$40.
Clean caulk lines and crisp trim make your home look maintained. It also helps block air and water where they shouldn’t be.
Choose paintable exterior caulk and don’t rush the smoothingslow hands, smooth lines.
10) Clean Windows and Screens (Then Upgrade the Doormat)
Cost: $5–$40.
Clean glass boosts light and makes interiors look brighter from outside. A new doormat is the cherry on top
and it’s the only “renovation” that politely tells people to wipe their shoes.
Interior Upgrades That Make Your Home Feel New
11) Paint One Room (or One Accent Wall)
Cost: Often $40–$150.
Paint is the MVP of low-cost home improvement. Choose a color that works with your fixed elements (flooring, counters),
and don’t skip prep. The best paint job is 30% paint and 70% “why did I spend so long taping?”
12) Replace Outdated Light Fixtures (If You Can Do It Safely)
Cost: $40–$200.
The right fixture modernizes a room instantly. Pick something proportionaltiny fixtures look accidental, oversized can look dramatic (in a good way).
If wiring makes you nervous, hire an electrician and enjoy your peace of mind as a luxury upgrade.
13) Swap Yellowed Switch Plates and Outlet Covers
Cost: $10–$40 for multiple rooms.
This is the house equivalent of whitening sneakers. Clean, bright plates make walls look fresher.
Turn off power if you’re working around outlets and use a non-metal tool if you’re unsure.
14) Update Cabinet Hardware
Cost: $25–$150 depending on quantity.
New pulls and knobs make cabinets feel upgraded even if they’re older than your favorite sitcom.
Bring one knob to the store to match sizing, and use a template or jig so everything lines up neatly.
15) Add a Peel-and-Stick Backsplash
Cost: $30–$150.
In kitchens and bathrooms, backsplash space is a high-visibility “style zone.”
Peel-and-stick options can look surprisingly convincing when edges are trimmed cleanly and surfaces are properly degreased first.
16) Install Under-Cabinet Lighting
Cost: $20–$120.
Kitchens look more upscale with layered lighting. Battery-operated or plug-in LED strips are budget-friendly and renter-friendly.
Aim for warm-white light so your countertops don’t look like a science lab.
17) Upgrade the Kitchen Faucet (or At Least the Aerator)
Cost: $5–$60 for an aerator; $60–$200+ for a faucet.
A new faucet is a “touch point” upgradeyou feel it every day. If a faucet swap is too big, a new aerator can improve flow and efficiency
while costing less than a fancy sandwich.
18) Create Pantry Order with Clear Bins and Labels
Cost: $20–$120.
This isn’t just for pretty photos. When you can see what you have, you waste less food and buy fewer duplicates.
Start with one shelf. The rest will follow once you experience the joy of finding paprika on the first try.
19) Re-caulk and Refresh Grout in the Bathroom
Cost: $15–$60.
Bathrooms can look dated simply because of stained grout and failing caulk. A careful refresh makes tile look newer without replacing anything.
Use mildew-resistant caulk and let it cure properlypatience is cheaper than redoing it.
20) Replace the Showerhead (Choose a WaterSense-Labeled Option if Possible)
Cost: $20–$80.
A better showerhead upgrades your daily routine and can reduce water use. Installation is usually straightforward,
but don’t overtightenyour plumbing should not have to prove its strength to you.
21) Add a Curved Shower Curtain Rod (or a New, Crisp Curtain)
Cost: $15–$60.
A curved rod makes small bathrooms feel less cramped. A fresh curtain and liner instantly reads “clean.”
Pair with matching towels, and suddenly your bathroom is giving “hotel,” not “college apartment.”
22) Frame the Bathroom Mirror (or Swap It)
Cost: $20–$150.
Big builder-grade mirrors are fine, but they can look flat. A simple frame kit or a new mirror adds depth and style.
It’s a visual upgrade that feels far more expensive than it is.
23) Upgrade Hooks, Towel Bars, and Tiny Accessories
Cost: $20–$120.
Mismatched accessories create visual clutter. A coordinated set (hooks, towel bar, toilet paper holder) makes the space look “designed.”
It’s the small stuff that makes people assume the big stuff is also handled.
24) Replace a Worn Toilet Seat (Yes, Really)
Cost: $20–$60.
Not glamorous, but deeply effective. A new soft-close seat feels modern and cleaner.
This is one of the quickest “why didn’t I do this sooner?” upgrades in the whole house.
25) Add a Large Area Rug (or Layer Rugs for Texture)
Cost: $60–$250+ (often less on sale).
Rugs anchor furniture and make rooms feel finished. The key is size: too small looks like a floating postage stamp.
A properly sized rug can make even older flooring feel more intentional.
26) Upgrade Window Treatments
Cost: $30–$200 depending on windows.
Curtains or shades add softness, privacy, and polish. Hang curtain rods wider and higher than the window to make ceilings feel taller.
It’s a design trick that costs nothing extrajust a tape measure and a little confidence.
Comfort + Energy Efficiency (Savings That Keep Paying You Back)
27) Switch to LED Bulbs (Room by Room)
Cost: $10–$60 for a starter set.
LEDs use less energy and last longer than old-school bulbs. Start with the lights you use most (kitchen, living room).
Choose warm color temperatures for cozy spaces and brighter neutrals for task areas.
28) Seal Drafts with Weatherstripping and Door Sweeps
Cost: $10–$50.
Drafts are sneaky budget thieves. Weatherstripping doors and windows can improve comfort fast and reduce heating/cooling waste.
You’ll notice the difference on the next windy daywhen your curtains stop doing interpretive dance.
29) Use a Programmable or Smart Thermostat (and Smarter Settings)
Cost: $0 if you already have one; $50–$250+ for a new thermostat.
ENERGY STAR notes that certified smart thermostats can reduce heating and cooling costs and save money annually (results vary).
Even without a new device, adjusting settingslike keeping it cooler in winter when asleep and warmer in summer when awaycan cut energy use.
If HVAC settings are a household battleground, a schedule can be the peace treaty.
30) Insulate Hot Water Where You Can (Safely): Water Heater Jacket + Pipe Insulation
Cost: $20–$80.
If your setup allows, insulating hot water pipes (and the heater, when appropriate) can help reduce heat loss.
Follow manufacturer guidance and safety rules; if anything looks complicated, call a pro. This is a “quiet upgrade”you’ll feel it in the bills.
Experience Notes: What Real-Life DIY Teaches You (The Extra )
People don’t usually regret doing low-cost improvementswhat they regret is doing them in the wrong order or with “close enough” prep.
One common experience: paint reveals everything. The first time someone rolls a wall without patching nail holes or sanding rough spots,
they learn that paint isn’t a magic eraserit’s a spotlight. The good news? That lesson comes with a cheap fix: spackle, sandpaper, and patience.
Another pattern: small upgrades have a weird emotional payoff. Homeowners often expect a new faucet or cabinet pulls to feel minor,
then realize they touch those items multiple times a day. Suddenly the kitchen feels more “current” even though the cabinets stayed the same.
It’s like changing the watchband and somehow feeling like you got a new watch. The same thing happens with light bulbs.
Switch harsh, cool bulbs for warm LEDs in a living room and people report the space feels calmerlike the room stopped yelling.
Curb appeal projects also tend to snowballin a good way. Someone paints the front door, then notices the house numbers look tired,
then realizes the porch light is dated, and before you know it the entire entry is upgraded for the cost of one fancy dinner out.
The trick is controlling “scope creep.” A helpful rule people share is: pick one weekend theme (entry refresh, bathroom cleanup, pantry organization),
buy supplies once, and stop when the theme is done. You can always come back next weekend without turning your home into a permanent construction zone.
Organization upgrades are where expectations get real. Clear bins and labels look cute online, but the best systems match how you live.
Families who snack a lot do better when snacks are in one grab-and-go bin. Coffee drinkers love a “coffee zone.”
People who try to copy someone else’s perfect pantry often end up annoyed. The win is making your house easier for younot auditioning for a catalog.
Finally, the most repeated “wish I knew this earlier” tip: always do the free fixes first. Tighten loose handles. Clean before you paint.
Declutter before you buy storage. Move furniture around before you buy new furniture. Homes can feel dramatically better when the
clutter and grime are gonebecause then the upgrades you add can actually shine. And when you stand back at the end of the day,
tired but proud, you realize the best part wasn’t just the improved space. It was the feeling of control:
your home got better because you decided it would.
Conclusion
High-impact, low-cost home improvement ideas work because they target what people see and feel every day: lighting, cleanliness, comfort,
and those little “touch points” that either delight you or quietly annoy you. If you start with curb appeal and one interior room,
you’ll get a visible transformation fast. Then sprinkle in energy-efficiency upgradeslike sealing drafts and improving thermostat habits
to keep the savings rolling in long after the paint dries.


