Table of Contents >> Show >> Hide
- Before You Build: A Few Design Rules That Save Regret
- 32 Raised Garden Bed Design Ideas
- 1) The Classic 4×8 Rectangle
- 2) The 4×4 “Starter” Bed
- 3) Modular Stackable Beds
- 4) The Extra-Tall Accessible Bed
- 5) Fence-Line Half-Width Bed
- 6) L-Shaped Corner Bed
- 7) Triangular Corner Wedge
- 8) U-Shaped “Courtyard” Bed
- 9) Keyhole Bed With a Compost Basket
- 10) Circular or Mandala Garden
- 11) Curved “Serpentine” Beds
- 12) Tiered Beds for Slopes
- 13) Terraced Retaining-Wall Beds
- 14) Hugelkultur Raised Bed
- 15) Straw Bale Beds
- 16) Cinder Block Bed With Herb Pockets
- 17) Stone or Brick Raised Beds
- 18) Composite “No-Rot” Beds
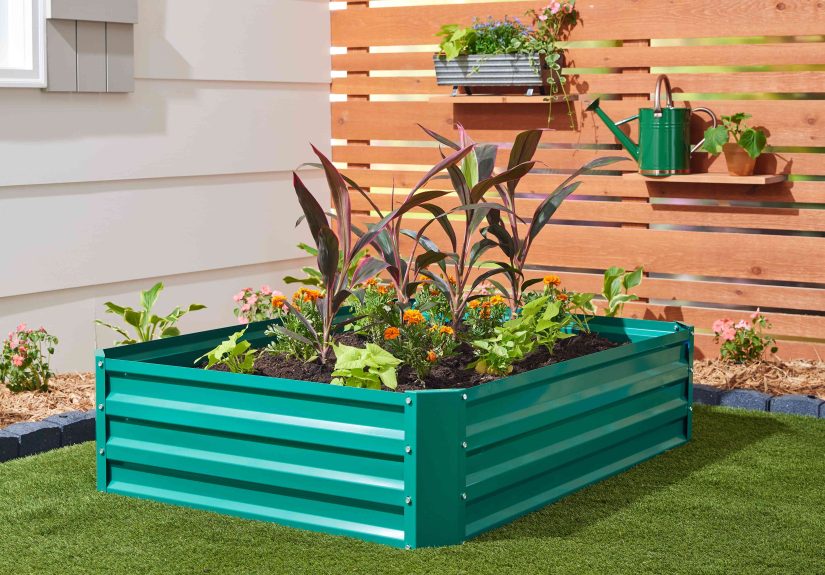
- 19) Corrugated Metal + Wood Cap
- 20) Galvanized Stock Tank Bed
- 21) IBC Tote Planter (Food-Grade Only)
- 22) Fabric Grow-Bag “Bed Rows”
- 23) Wicking (Self-Watering) Raised Bed
- 24) Elevated Tabletop Bed
- 25) Rolling Raised Bed on Casters
- 26) Twin Beds With a Cattle-Panel Arch
- 27) Bed With an Integrated Fence Trellis
- 28) A-Frame Trellis Endcap
- 29) Hoop-House Ready Bed
- 30) Cold-Frame Lid Bed
- 31) Square-Foot Grid Bed
- 32) Themed Beds: Salsa, Pizza, or Pollinator Power
- Make the Designs Work: Layout, Soil, and Add-Ons
- of Real-World Experience: What Gardeners Learn After Building Raised Beds
- Conclusion: Build Beds That Match Your Life
Raised beds are the MVP of “I want a garden, but I also want my back to survive.” They warm up faster in spring, drain better in heavy rain, and let you build the soil you wish you had instead of the clay you were born into. Best of all? They can look intentionallike a garden destinationnot a “where did I put that shovel?” zone.
Below are 32 raised garden bed design ideas you can copy, mix, and shamelessly improve. Some are beginner-friendly weekend builds. Some are “I watched three DIY videos and now I own a miter saw” builds. All are meant to help you grow more with less frustration (and fewer surprise kneeling sessions).
Before You Build: A Few Design Rules That Save Regret
1) Size it for arms, not optimism
A classic guideline: keep beds about 3–4 feet wide if you can reach from both sides. Wider beds look great on paper… until you’re doing a plank over your lettuce to pull one heroic weed. If a bed is only accessible from one side (against a fence or wall), keep it roughly half-width so you can reach the center.
2) Height is about roots and comfort
Many vegetable roots are happy with about 6–12 inches of good growing medium, but deeper is betterespecially for carrots, potatoes, tomatoes, and anyone gardening in poor native soil. Taller beds (10–18 inches) are a sweet spot for many home gardens, while extra-tall beds can be great for accessibility and easier tending.
3) Don’t skimp on pathways
You need room to stand, turn, and occasionally haul a wheelbarrow like you’re in a very wholesome action movie. Tight paths can work in small spaces, but 18–24 inches feels much more comfortable for daily use, and wider paths are helpful for carts and accessibility.
4) Choose bed materials like you choose kitchen cutting boards
Translation: pick materials you trust around food. Many gardeners use decay-resistant woods (like cedar or redwood), masonry, or metal. Avoid materials treated with products not meant for food gardens (like old railroad ties). If you’re using any treated lumber, confirm what treatment it has and consider lining the inside wall with a barrier if that helps you sleep at night.
5) Plan for water on day one
Raised beds can dry out faster than in-ground plots, especially in hot, windy weather. Designs that include mulch, drip irrigation, or self-watering features can turn “daily watering panic” into “weekly check-in confidence.”
32 Raised Garden Bed Design Ideas
Think of these as a menu. Pick one style, or combine a few to match your yard, budget, and how much you enjoy building things on a Saturday.
1) The Classic 4×8 Rectangle
The dependable crowd-pleaser: easy lumber cuts, simple corners, and enough space to grow a meaningful amount of food. Add corner braces if you’re going long and want the sides to stay straight instead of doing “modern art.”
2) The 4×4 “Starter” Bed
Perfect for first-timers, renters (if it’s a drop-in frame), or anyone testing sun patterns. One small bed can teach you more than five gardening booksmainly about how fast basil can take over a zip code.
3) Modular Stackable Beds
Build with stacked boards so you can raise the height over time. Start low for leafy greens, then add another layer later if you switch to deeper-rooted crops. It’s the “level up” system for gardening.
4) The Extra-Tall Accessible Bed
A taller bed reduces bending and can be designed for seated or wheelchair access. Consider a narrower width and a sturdy structure (tall beds hold a lot of soil weight). Add a wide, stable path so it’s genuinely easy to use.
5) Fence-Line Half-Width Bed
Put beds against a fence to save yard space, then keep them narrow enough to reach the back row. Great for herbs, greens, strawberries, and anything you want close to the house for quick harvesting.
6) L-Shaped Corner Bed
Turn awkward corners into productive space. Use one “leg” for herbs and the other for veggies, or dedicate each side to a season (cool-weather crops on one side, summer crops on the other).
7) Triangular Corner Wedge
A triangle bed looks sharp (literally and visually) and fits neatly into corners where rectangles don’t. It’s also a great spot for flowers that attract pollinators into your vegetable beds nearby.
8) U-Shaped “Courtyard” Bed
This design surrounds you with plants, keeping everything within reach. Make the center wide enough to stand and turn comfortably. If you want a “garden room” vibe, this is it.
9) Keyhole Bed With a Compost Basket
A keyhole bed has a notch path that lets you step into the center access pointwithout stepping on soil. Some versions add a compost basket in the middle to feed the bed over time. Practical and kind of magical.
10) Circular or Mandala Garden
Arrange wedge-shaped beds around a central point, with paths radiating like spokes. It’s efficient, beautiful, and makes your backyard look like you host garden tours (even if it’s just your neighbor peeking over the fence).
11) Curved “Serpentine” Beds
If your landscape is more flowing than grid-based, curve the bed edges. Use flexible edging (metal or bendable wood strips) and keep the interior reach manageable. Curves also soften hardscapes beautifully.
12) Tiered Beds for Slopes
Got a yard that leans? Build stepping, tiered beds like a staircase. Each level becomes its own microclimate and planting zone, and you’ll stop losing soil to gravity’s daily prank.
13) Terraced Retaining-Wall Beds
Take the slope solution further by building terraces with retaining walls. These are sturdier, more permanent, and can create flat growing platforms where none existed. Great for maximizing tricky yards.
14) Hugelkultur Raised Bed
Fill the base with logs, branches, and woody debris, then top with soil and compost. As the wood breaks down, it can hold moisture and feed soil life. It’s a compost pile that moonlights as a garden bed.
15) Straw Bale Beds
Straw bales can form the “walls” of your bed, or become the planting medium themselves. They’re quick to set up and handy for temporary gardens. Bonus: they can be composted later.
16) Cinder Block Bed With Herb Pockets
Build the frame with concrete blocks, then plant herbs or flowers in the side holes. This design is sturdy, affordable, and turns the bed walls into extra growing space (because why waste a perfectly good pocket?).
17) Stone or Brick Raised Beds
For a more permanent, polished look, match your beds to your patio or walkway materials. Masonry beds also hold heat, which can benefit some crops in cooler shoulder seasons.
18) Composite “No-Rot” Beds
Recycled composite or synthetic lumber can last a long time with minimal maintenance. The look is clean and modern, and you won’t be replacing boards as quickly as with softer woods.
19) Corrugated Metal + Wood Cap
A popular modern farmhouse style: corrugated metal sides with sturdy wood posts and a smooth top cap. The cap is great as a handrest (or a place to set seeds while you pretend you’re organized).
20) Galvanized Stock Tank Bed
Stock tanks are fast, durable, and look fantastic. Drill drainage holes if needed and consider a slightly deeper soil layer for crops with longer roots. Great for patios and compact yards.
21) IBC Tote Planter (Food-Grade Only)
Cut down a food-grade IBC tote and create a deep, sturdy planter. This is a “know your materials” project: only use containers with a safe history (no mystery chemicals, no regrets).
22) Fabric Grow-Bag “Bed Rows”
Line up large fabric beds like raised rows. They’re lightweight, easy to move, and great for renters. They also air-prune roots, which many plants love. Add drip irrigation and you’ll feel unstoppable.
23) Wicking (Self-Watering) Raised Bed
Add a water reservoir at the bottom with a wicking layer above it. Plants pull water up as needed, reducing how often you water. This design shines in hot climates or for gardeners who travel.
24) Elevated Tabletop Bed
A table-height bed is fantastic for herbs, salad greens, and small flowers. It keeps pests like rabbits at bay and makes harvesting feel like browsing a farmers marketone that you own.
25) Rolling Raised Bed on Casters
Put an elevated bed on heavy-duty wheels so you can chase the sun (or escape the afternoon scorch). Great for patios, balconies, and experimenting with microclimates.
26) Twin Beds With a Cattle-Panel Arch
Place two beds parallel and bend a cattle panel between them to form an arch trellis. Grow cucumbers, beans, or squash overhead for a living tunneland a harvest you can spot from space.
27) Bed With an Integrated Fence Trellis
Attach a trellis directly to the bed frame so vining plants grow up, not out. This increases airflow, keeps fruit cleaner, and frees soil surface area for companion plants.
28) A-Frame Trellis Endcap
Add an A-frame trellis on the north end (or whichever side won’t shade your bed too much). It’s sturdy for peas, beans, and flowering vines that make the bed look like it has a PR team.
29) Hoop-House Ready Bed
Build beds with internal or external hoops so you can throw on frost cloth, insect netting, or plastic as needed. It’s a simple way to extend your season and protect tender plants.
30) Cold-Frame Lid Bed
Create a raised bed with a hinged clear lid (old windows can work if safe and intact). This becomes a mini greenhouse for early greens and late-season herbslike a cozy blanket for your garden.
31) Square-Foot Grid Bed
Add a visible 1-foot grid to the top of the bed frame. This makes spacing easy, reduces over-planting chaos, and helps beginners plan crops without needing a spreadsheet (unless you enjoy spreadsheets, which is also valid).
32) Themed Beds: Salsa, Pizza, or Pollinator Power
Design beds around how you actually eat: tomatoes + peppers + cilantro for salsa; basil + oregano + cherry tomatoes for “pizza garden” vibes; or a pollinator bed loaded with nectar-rich flowers at the edge of your veggie zone. It’s functional, fun, and oddly motivating on days you’d rather nap.
Make the Designs Work: Layout, Soil, and Add-Ons
Layout tricks that feel like cheating (in a good way)
- Group by water needs: Put thirsty crops (cucumbers, basil) together and drought-tolerant crops (rosemary, thyme) elsewhere.
- Keep tall stuff from shading everything: Place trellises and tall crops on the north side in most of the U.S. to reduce shade on shorter plants.
- Think in “harvest zones”: Put daily pickers (greens, herbs) close to the door; put “once a week” crops farther out.
Soil that doesn’t disappoint
Raised beds thrive with a loose, fertile mixoften a blend of quality topsoil and compost. Avoid filling with heavy clay or pure bagged “potting mix” unless it’s designed for raised beds. After the first season, expect soil to settle; top it off with compost annually to keep things fluffy and productive.
Low-drama watering
If you can, run drip lines or soaker hoses under mulch. Mulch (straw, shredded leaves, or wood chips) reduces evaporation, keeps soil temperatures steadier, and helps suppress weedsso you spend more time harvesting and less time muttering.
Pest barriers that don’t ruin the vibe
- Hardware cloth under the bed helps deter burrowing pests.
- Insect netting over hoops can protect brassicas from cabbage worms and squash from vine borers (timing matters).
- Border flowers can attract beneficial insects and make the whole space feel alive.
of Real-World Experience: What Gardeners Learn After Building Raised Beds
Here’s the part nobody tells you when you’re admiring raised beds on the internet: the first season is basically a friendly negotiation between you, your soil, your weather, and every creature with legs. And that’s not a bad thing it’s how you end up with a setup that actually works for you.
First lesson: soil settles. A freshly filled bed looks tall and triumphant in April, then quietly shrinks by June. Gardeners almost always end up adding compost or extra soil after the first few heavy rains and waterings. It’s normal. Consider it your bed “moving in” and unpacking. A thin top-dressing of compost each season keeps the soil level healthy and the biology thriving.
Second lesson: watering is the make-or-break habit. Raised beds drain well, which is wonderfuluntil a hot week rolls in and you realize your lettuce has turned into crunchy confetti. Many gardeners eventually adopt mulch as their best friend, and a simple drip line as their second-best friend. The combination turns raised beds from “high-maintenance” to “predictable,” especially during summer. If you travel or just prefer not to water daily, self-watering or wicking designs can feel like upgrading from manual windows to power windows.
Third lesson: paths matter more than you think. In the planning phase, it’s tempting to squeeze in “one more bed.” Then you try to harvest a tomato jungle while balancing a bucket and avoiding stepping on basil, and suddenly you become a passionate believer in comfortable pathways. Gardeners with wheelbarrows, garden carts, or mobility needs often end up widening paths after the fact. If your garden is meant to be used often, give yourself room to move. Your knees will send thank-you notes.
Fourth lesson: edges are valuable real estate. People quickly learn that the bed rim can be a handhold, a place to sit, and the most convenient spot to set tools (and, mysteriously, where plant labels go to disappear). Adding a smooth top cap or choosing blocks with flat edges can make daily tending easier. Many gardeners also use bed corners for sturdy supports: trellises, hoops, and netting become easier when you plan anchor points from the start.
Final lesson: your “perfect layout” evolves. After a season, gardeners often rearrange crops based on what they actually eat and what actually thrived. Maybe the herb bed moves closer to the kitchen door because you grab basil five times a week. Maybe the trellis shifts because afternoon shade is stronger than expected. The win isn’t building the bed once it’s building a system you can tweak. Raised beds shine because they’re structured, but they’re also forgiving: you can adjust soil, spacing, supports, and planting plans year after year until your garden feels like it was designed by someone who knows you. (Which, plot twist, is you.)
Conclusion: Build Beds That Match Your Life
The best raised garden bed design isn’t the fanciest oneit’s the one you’ll actually use. Start with smart dimensions, comfortable access, and materials you trust. Then choose a design style that fits your space: tidy rectangles, dramatic arches, terraced slopes, or a themed bed that makes dinner feel like a victory lap.
Build one bed this season. Learn what it teaches you. Next season, build the bed you wish you had the first time. That’s not a mistakethat’s gardening.


