Table of Contents >> Show >> Hide
- Why Faux Wood Tile on Stairs Makes Sense
- The Budget Game Plan (Before You Touch a Single Tile)
- What You’ll Need (Materials + Tools)
- Step-by-Step: How to Install Faux Wood Tile on Stairs
- Step 1: Check the structure and stop squeaks now
- Step 2: Plan stair thickness and code consistency
- Step 3: Demo and surface prep
- Step 4: Install underlayment (wood stairs usually need it)
- Step 5: Dry layout like you mean it
- Step 6: Start with risers (often easier) and work up
- Step 7: Handle the nosing/edge (the make-or-break detail)
- Step 8: Install tread tiles with proper coverage
- Step 9: Let it cure, then grout
- Step 10: Caulk movement joints and finish details
- Budget Breakdown: Where You Can Save (and Where You Shouldn’t)
- Design Tricks That Make Budget Stairs Look High-End
- Safety and Durability Tips (Because Stairs Are Not the Place to Be Experimental)
- Common DIY Mistakes (and How to Dodge Them)
- Mini Example: Budgeting a 12-Step Staircase
- Conclusion
- Real-World Lessons from Budget Faux Wood Tile Stair Projects (About )
Your staircase is basically your home’s runway. People see it. Pets sprint up it like it’s a track meet. Kids treat it like a jungle gym. And yet, most stairs are dressed in one of two outfits:
sad carpet or “we meant to paint that” wood. If you want the warm look of hardwood without the dents, scratches, and “why is this stair sticky?” mysteries, faux wood (wood-look) porcelain tile can be a surprisingly smart upgradeespecially when you do it yourself and keep the budget on a leash.
This guide walks you through planning, prep, materials, installation, and the budget tricks that make wood-look tile stairs feel high-end without the high-end invoice. Expect practical steps, reality checks,
and a few gentle jokesbecause grout haze is a lot easier to handle when you’re laughing.
Why Faux Wood Tile on Stairs Makes Sense
1) You get the wood vibe without the wood drama
Wood-look porcelain tile mimics grain, knots, and plank variation, but it doesn’t need refinishing, doesn’t mind muddy shoes, and won’t warp if your entryway gets humid. It’s also a great option if your stairs
connect to tile floors nearby and you want a seamless, intentional look.
2) It’s tough where stairs need to be tough
Stair treads take concentrated impact (heels, dog claws, dropped objects, that one relative who stomps like they’re making a point). Porcelain tile is fired at high temperatures and is generally very hard-wearing,
which is why it’s popular for floors that see heavy traffic.
3) It can be budget-friendly if you plan like a grown-up
Wood-look tile ranges from bargain to boutique. If you shop smart, choose standard sizes, and avoid “specialty stair pieces” unless you truly need them, you can keep costs reasonable and still end up with stairs
that look like a design decisionnot a financial accident.
The Budget Game Plan (Before You Touch a Single Tile)
Decide what you’re tiling
- Full tile stairs (treads + risers): Most cohesive, most durable, typically the most work.
- Tile risers only: Cheaper, easier, lots of style impactkeep wood treads if they’re in good shape.
- Tile “tread caps” + painted risers: Middle ground that can look custom if the edges are handled well.
Pick a tile that’s “stair-friendly”
- Finish: Matte or textured is usually safer than glossy.
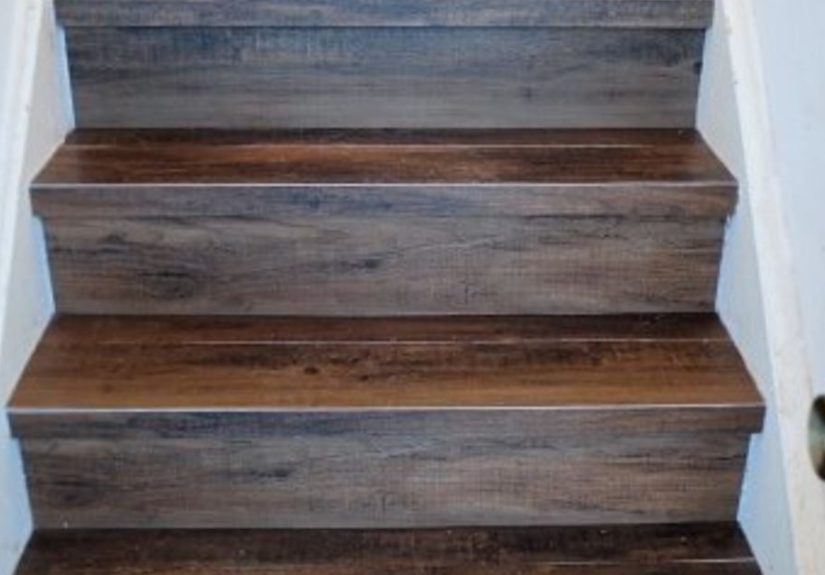
- Size: 6×24 and 8×48 planks are common. For stairs, fewer seams can look cleaner, but longer planks can be trickier to cut accurately.
- Consistency: Mix boxes while installing so the color variation looks natural, not like you ran out of the “good batch.”
Choose your edge strategy (this is where budgets go to cry)
Stair edges matter because they’re the most abused and the most visible. You’ve got a few common options:
- Metal stair-nosing profiles: Durable, safe, often easier than trying to “make tile behave” on an edge.
- Bullnose or specialty stair tiles: Can look great, but often cost more and may limit design choices.
- Mitered tile edge: Clean and modern, but requires precision cuts and chip-free corners (a.k.a. patience and a decent saw blade).
What You’ll Need (Materials + Tools)
Materials
- Wood-look porcelain tile: Add 10–15% for cuts and mistakes (stairs love mistakes).
- Stair nosing/edge trim: Profile system or bullnose solution.
- Underlayment for wood stairs: Cement backer board or an uncoupling membrane (depending on your stair construction and height constraints).
- Thin-set mortar: Use the right mortar for porcelain and your substrate (often polymer-modified; check the bag and the tile specs).
- Backer board screws + alkali-resistant mesh tape: If using cement board.
- Grout: Sanded vs. unsanded depends on grout joint width; many DIYers prefer a high-performance grout for durability.
- Color-matched caulk: For movement joints (corners, transitions), because grout in corners eventually cracks like a bad promise.
Tools
- Measuring tape, pencil, speed square
- Level and straightedge
- Notched trowel (size depends on tile), margin trowel
- Tile spacers or leveling clips (optional, but helpful)
- Wet saw (recommended) or high-quality snap cutter for some planks
- Grout float, sponges, buckets, microfiber towels
- Oscillating multi-tool (great for trimming and weird corners)
- Knee pads (your knees will send a thank-you note)
Step-by-Step: How to Install Faux Wood Tile on Stairs
Step 1: Check the structure and stop squeaks now
Tile doesn’t forgive flex. If your stairs bounce, creak, or feel loose, fix that first. Tighten fasteners, add construction adhesive where appropriate, and reinforce any weak treads.
Many staircases use multiple stringers; make sure your treads feel solid across the full width.
Reality check: If the stairs are structurally questionable, bring in a pro. Tile is a finish layer, not a miracle cure.
Step 2: Plan stair thickness and code consistency
Adding tile + mortar + underlayment changes stair height. Even small differences can create trip hazards because humans trust stairs way too much.
Your goal is consistent riser height and tread depth across the whole flight. If your new finish changes the first or last step height noticeably, you may need to adjust elsewhere.
Always check local building codes (and if you’re in a multi-family building, rules can be stricter).
Step 3: Demo and surface prep
- Remove carpet, staples, tack strips, and any trim that’s in the way.
- Scrape off old adhesive and sand down high spots.
- Vacuum thoroughlydust is basically “bond breaker confetti.”
- Fill dips or damage so the surface is flat and stable.
Step 4: Install underlayment (wood stairs usually need it)
For wood stairs, many installers use cement backer board or an uncoupling membrane to create a more tile-friendly surface.
If using cement board, you’ll typically bed it in mortar, fasten it properly, and tape the seams with alkali-resistant mesh tape.
Keep an eye on total build-up thickness so you don’t create awkward transitions at landings.
Step 5: Dry layout like you mean it
Stairs magnify tiny mistakes. Dry-fit (or at least dry-measure) each tread and riser.
Decide where plank seams will land so you don’t end up with skinny “oops strips” at the most visible edge.
- Most common look: Planks running left-to-right across the tread.
- More custom look: A consistent offset pattern (like a stagger) across multiple steps.
- Pro tip: Keep the front edges aligned and clean. That’s where eyes go first.
Step 6: Start with risers (often easier) and work up
Many DIYers install the riser tile first so the tread tile can overlap the top edge cleanly. Use a level and spacers to keep grout lines uniform.
If your stairs have open sides or skirts, you may need to plan cuts to meet trim cleanly.
Step 7: Handle the nosing/edge (the make-or-break detail)
If you’re using a stair-nosing profile, follow the manufacturer’s instructions carefully. Profiles are designed to protect tile edges and improve safety,
but only if they’re installed correctly and supported by mortar.
If you’re going for a mitered edge, do test cuts and confirm the angle before committing. Nothing says “DIY” like a miter that looks like it’s slowly trying to escape.
Step 8: Install tread tiles with proper coverage
Comb mortar in one direction, press tile into place, and check coverage occasionally by lifting a tile (yes, it’s annoying; yes, it matters).
Stairs are high-impact, so you want solid supportnot hollow spots that crack later.
Step 9: Let it cure, then grout
Respect cure times on the mortar bag. Grout too soon and you’re basically asking the universe for cracks.
When you grout, clean as you go. Grout haze loves to become a permanent roommate if you ignore it.
Step 10: Caulk movement joints and finish details
Use color-matched caulk where planes meet (like riser-to-tread corners or stair-to-wall transitions). Grout is rigid; stairs move; physics wins.
Budget Breakdown: Where You Can Save (and Where You Shouldn’t)
Save here
- Tile selection: Watch for sales on standard wood-look planks. Mid-range porcelain can look fantastic once installed.
- Risers: If you’re tiling everything, choose a simpler riser design (or even a coordinating solid-color tile) to reduce cuts and cost.
- Layout: Straight lay is faster and wastes less tile than complex patterns.
- DIY labor: The biggest savings is doing the work yourselfcarefully.
Don’t cheap out here
- Mortar: Cheap, wrong mortar can cause bond failure. Buy the one that matches porcelain + your substrate.
- Edge protection: Stair edges take abuse. A quality nosing/profile is worth it.
- Prep: The prettiest tile in the world won’t survive a flexy, uneven stair base.
Design Tricks That Make Budget Stairs Look High-End
Pick the right grout color
Want the “real wood” illusion? Choose grout close to the tile tone so lines blend. Want a more graphic, modern look? Go slightly darker for definition.
Either way, keep grout lines consistent and modestwood-look tile looks best when grout doesn’t shout.
Use a nosing that looks intentional
A metal profile can look sleek and modern, especially in brushed finishes. If your home leans traditional, consider profiles that visually “disappear” or coordinate
with other metal finishes (like door hardware).
Paint what you’re not tiling
Crisp, durable paint on stair skirts/stringers and trim can make the tile look more expensive. It’s the framing effectlike a good haircut for your staircase.
Safety and Durability Tips (Because Stairs Are Not the Place to Be Experimental)
- Prioritize slip resistance: Choose tile marketed for floors, and favor matte/textured finishes. Consider additional grip solutions if the stairs will get wet often.
- Protect the leading edge: Use a proper stair-nosing profile or a proven edge detail.
- Keep risers consistent: Avoid creating a “surprise step” at the top or bottom by miscalculating thickness.
- Lighting matters: A beautiful stair is great; a visible stair is better.
- Clean with the right products: Gentle cleaners and microfiber are your friends. Avoid harsh acids that can damage grout over time.
Common DIY Mistakes (and How to Dodge Them)
Using premixed adhesive where it doesn’t belong
Premixed “mastic” has its place for certain walls, but stairs and floors typically call for thin-set mortar designed for tile. Follow product guidance and match materials to the job.
Skipping the “boring” prep work
If your stairs are uneven, you’ll fight lippage (uneven tile edges). If they flex, you’ll fight cracks. If they’re dusty, you’ll fight poor bond.
The universe rewards prep with fewer regrets.
Forgetting movement joints
Grout in corners is not a long-term relationship. Use appropriate caulk where surfaces meet so normal movement doesn’t create cracks.
Mini Example: Budgeting a 12-Step Staircase
Let’s say you have 12 steps, each about 36 inches wide. If your treads are ~10 inches deep and risers ~7 inches tall, your total tiled area (treads + risers)
can land roughly in the 35–45 square foot range depending on exact measurements, overhang, and waste.
- Tile: If you find wood-look porcelain around the low-to-mid range per square foot, you’re often looking at a few hundred dollars for tile.
- Underlayment + screws/tape: Commonly another chunk of change, but it’s the foundation.
- Mortar + grout + caulk: Think “the boring bags” that quietly make the whole thing work.
- Nosing/profiles: This can be the “why is metal so expensive?” line itemplan for it early.
Your exact cost depends on region, stair size, and what you already own (like a wet saw). But the big takeaway: smart material choices and a clean edge detail
do more for the final look than chasing the priciest tile.
Conclusion
DIY faux wood tile stairs are one of those projects that look intimidating until you break them into steps (yes, I did that on purpose). The keys are simple:
choose stair-appropriate tile, plan your thickness and edges, prep the substrate like it matters (because it does), and install with patience.
Do it right, and you’ll get the warmth of “wood” with the durability of porcelainwithout paying someone else to suffer through the tricky parts.
Real-World Lessons from Budget Faux Wood Tile Stair Projects (About )
If you ask a handful of DIYers what surprised them most about tiling stairs, the answers are weirdly consistent: it’s not the tile that’s hardit’s the stairs.
Stairs are never perfectly square, never perfectly level, and somehow manage to be both “standard size” and “custom chaos” at the same time. One common experience is discovering that the left side of a tread is
slightly deeper than the right, which means a plank that fit beautifully on a dry run suddenly needs a micro-trim after mortar is down. The fix most people end up loving is a simple routine:
measure every tread, label every cut, and keep a running “stair notebook” so you don’t rely on memory when your brain is already full of grout math.
Another frequent lesson is that edges create emotions. A wood-look tile surface can look amazing on day one, but if the nosing detail feels flimsy, sharp, or visually “off,” the whole staircase reads as unfinished.
DIYers who stay happiest usually pick one of two paths: (1) a dependable stair-nosing profile that’s engineered for abuse, or (2) a clean, modern miter only if they have the saw setup and practice time to get it right.
Budget projects often win by choosing “durable and intentional” over “fancy and fragile.” That’s not settling; that’s strategy.
People also talk about the moment they realize tile thickness changes everything. Add underlayment, mortar, and porcelain, and suddenly your first step feels slightly tallerlike your staircase is trying to prank you.
The best outcomes happen when DIYers test-build a sample stack (underlayment + mortar + tile) before committing, then confirm transitions at the top landing and bottom floor. This small “mock-up habit” prevents
a big percentage of the regret stories.
Then there’s the grout reality: grout color is basically a mood filter for your entire staircase. DIYers who want a “real wood” illusion nearly always prefer grout that blends with the tile, because high contrast grout
makes the planks look more like… tile. On the other hand, those going for a modern vibe love a slightly darker grout because it outlines each tread and looks crisp with painted trim.
The shared wisdom is to test grout color with a spare tile (even a small sample) under your actual lighting. Big box store lighting lies. Your hallway lighting tells the truth.
Finally, almost everyone has a “tools saved me” moment. Sometimes it’s upgrading from a dull blade to a porcelain-rated blade and instantly getting cleaner cuts. Sometimes it’s discovering that a cheap set of knee pads
was a terrible bargain because comfort affects patience, and patience affects craftsmanship. Most budget-friendly success stories aren’t about doing everything the cheapest waythey’re about spending a little money
on the things that prevent expensive mistakes. In other words: buy the mortar that matches the job, protect the edges, measure twice, and let the stairs be stairs… without letting them be the boss of you.


