Table of Contents >> Show >> Hide
- What You’ll Learn
- What Are DIY Stained-Glass Cookies?
- Ingredients: The Good, the Great, and the “Please Don’t”
- Tools That Make This Easier (and Prettier)
- DIY Stained-Glass Cookies Recipe
- Design Ideas and Color Tricks
- Troubleshooting: When the “Glass” Gets Moody
- Make-Ahead, Storage, and Gifting Tips
- Real-Life Experience Notes: What Making DIY Stained-Glass Cookies Feels Like (Extra Section)
- Conclusion
If you’ve ever wanted your dessert to look like it belongs in a cathedral window and on a cookie platter,
you’re in the right place. DIY stained-glass cookies are buttery cut-out sugar cookies with sparkling candy
“windows” that melt in the oven and re-harden into jewel-toned panes. They’re festive, shockingly achievable,
and guaranteed to make people say, “Wait… you made those?”
This guide walks you through a reliable method, explains the “why” behind the technique (so you can troubleshoot
like a pro), and shares design ideas for holidays, birthdays, showers, and any day that needs a little edible
stained-glass drama.
What Are DIY Stained-Glass Cookies?
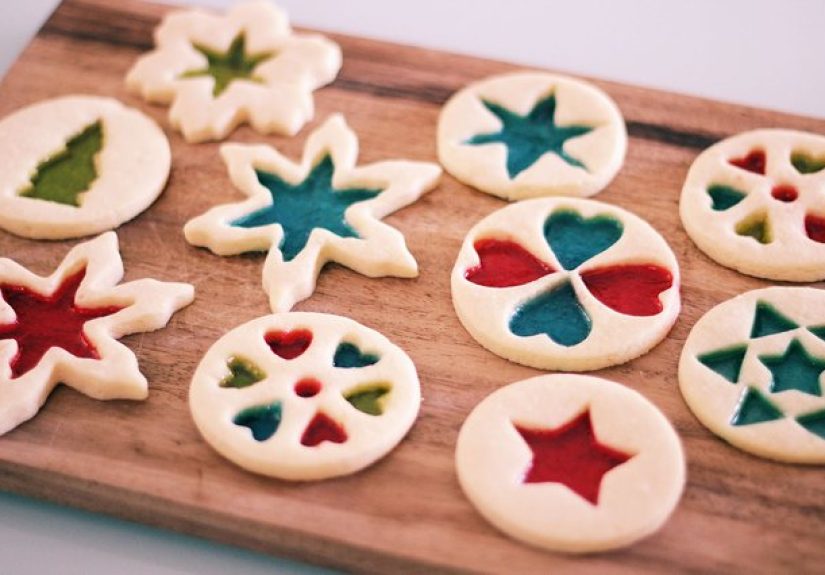
Stained-glass cookies (also called “windowpane cookies” or “stained-glass window cookies”) start with a sturdy
cut-out cookie doughusually a classic sugar cookiethen get a smaller cut-out in the center. That empty space
is filled with crushed hard candy. In the oven, the candy melts into a glossy window; once cooled, it becomes
hard candy again, fused to the cookie frame like edible art.
Important note, because the internet loves confusion: “church window cookies” can also refer to a no-bake
chocolate-and-marshmallow slice-and-serve treat. Delicious, yes. The same thing, no. This article is about the
baked, candy-window kindthe ones that look like ornaments and catch the light like tiny sugar skylights.
Why This Works (Quick Kitchen Science)
Hard candy is basically a cooked sugar syrup that’s been cooled into a glassy, non-crystalline solid. When you
heat it again, it softens and melts. In a cookie cut-out, melted candy spreads to fill the cavity; as it cools,
it sets into a translucent “glass” sheet. Your goal is to melt it evenly without burning it, while keeping the
cookie edges tender and just lightly golden.
Ingredients: The Good, the Great, and the “Please Don’t”
For the Cookie Frame
- Unsalted butter: Flavor and structure. Softened, not melted.
- Granulated sugar: Crisp edges, classic sweetness.
- Egg (or egg yolks): Binding and richness. Yolk-heavy doughs can be especially tender.
- Vanilla extract: The baseline “cookie shop” aroma.
- All-purpose flour: Reliable structure for clean cut-outs.
- Salt: Makes everything taste like more of itself.
- Leavener (optional): A small amount of baking powder can add lift, but too much encourages spread.
For the “Stained Glass” Window
- Hard candies: Think fruit-flavored, clear, brightly colored candies.
Many bakers use Jolly Rancher-style candies for vibrant color. Choose candies that melt clearly and don’t have soft centers. - Optional upgrade: Isomalt (a sugar substitute used in sugar art) can create very clear, jewel-like windows and tends to resist humidity better than candy.
It’s not required, but it’s a fun “Level Up” option if you like candy chemistry.
Please Don’t Use These (Unless You Enjoy Chaos)
- Chewy candy: It doesn’t melt into a smooth pane.
- Chocolate: It melts, sure, but you won’t get the translucent window effect.
- Gummy candy: Sticky, unpredictable, and not the vibe.
Tools That Make This Easier (and Prettier)
- Two cookie cutters per shape: One larger outer cutter + one smaller inner cutter.
- Parchment paper or a silicone baking mat: Helps prevent candy from sticking.
- Rolling pin + spacer bands (optional): For consistent thickness (about 1/4-inch is ideal).
- Zip-top bags + rolling pin/mallet: For crushing candy without turning your kitchen into a sugar snow globe.
- Small spoon (1/8 tsp–1/2 tsp range): For clean candy placement and color control.
- Cooling rack: Lets cookies cool evenly (and keeps you from “testing” them all while they’re still warm).
One Safety Note
Melted sugar is lava with a sweet tooth. Let cookies cool fully before moving them around or sampling the center.
If you’re baking with kids, assign them the fun jobs (cutting shapes, sorting colors) and keep the hot-candy part
firmly in the grown-up lane.
DIY Stained-Glass Cookies Recipe
This is a classic, sturdy sugar-cookie approach designed to hold sharp edges and support a candy window. It’s
reliable for holidays (snowflakes! stars!), but also works year-round for hearts, flowers, and geometric shapes.
Ingredients (Makes About 18–24 Cookies, Depending on Size)
- 1 cup (2 sticks) unsalted butter, softened
- 1 cup granulated sugar
- 1 large egg
- 2 teaspoons vanilla extract
- 3 cups all-purpose flour, plus more for dusting
- 1/2 teaspoon fine salt
- 1/2 teaspoon baking powder (optional, for a slight lift)
- 1/2 to 1 cup assorted hard candies, crushed and sorted by color
Step-by-Step Instructions
-
Cream butter and sugar.
Beat softened butter and sugar until light and fluffy, about 2–3 minutes. This builds structure and helps the cookies bake evenly. -
Add egg and vanilla.
Mix in the egg and vanilla until combined. Scrape the bowl so everything plays nicely together. -
Mix dry ingredients.
In a separate bowl, whisk flour, salt, and baking powder (if using). Add to the wet ingredients and mix just until the dough comes together.
Overmixing can make cookies toughsave that energy for your candy-crushing workout. -
Chill the dough.
Shape dough into a disk (or two), wrap, and chill at least 1 hour. Chilling helps the cookies keep their shape and reduces spreading. -
Crush and sort candy.
Place candies in zip-top bags and crush with a rolling pin or mallet. Aim for small, even piecesthink coarse sand to mini-chocolate-chip size.
If you make a mix of powder and chunks, the powder can melt faster and bubble or cloud. Sort colors into bowls for cleaner “glass.” -
Roll and cut.
Preheat oven to 350°F. Roll dough on a lightly floured surface to about 1/4-inch thick.
Cut outer shapes, then cut a smaller “window” in the center. Transfer to parchment-lined baking sheets, spacing cookies about 1 inch apart. -
Fill the windows.
Spoon crushed candy into each cut-out, filling about 1/2 to 3/4 of the cavity.
Avoid overfillingmelted candy spreads and can escape the frame if it’s piled too high. -
Bake.
Bake for 10–12 minutes, rotating the pan halfway through, until the cookie edges are just turning pale golden and the candy is fully melted.
Ovens vary: some batches finish closer to 9 minutes, others closer to 14–15 depending on thickness, candy type, and pan color. -
Cool completely.
Let cookies cool on the baking sheet until the candy is fully set (10–15 minutes). Moving them too early is how you get “stained-glass shards,”
which is a different craft project entirely.
Optional: Turn Them into Cookie Ornaments
Before baking, use a skewer or straw to poke a small hole near the top of the cookie frame (not in the candy window).
After cooling, thread with ribbon. They’re edible decorations that double as party favorsbasically the cookie equivalent of multitasking.
Design Ideas and Color Tricks
Pick Shapes That Show Off the Window
Wide shapes with a roomy center cut-out work best: stars, hearts, circles, ornaments, simple trees, large flowers.
Super-thin shapes (like delicate reindeer legs) can bake unevenly or brown before candy is fully melted.
Color Strategy: Clean vs. Marbled
- Clean glass look: Use one color per window and keep candy pieces similar in size.
- Marbled look: Mix two colors lightly (don’t fully blend) so they melt into swirls.
- Ombre look: Add one color on one side of the cut-out and another on the other sidegravity and melt will do the rest.
Flavor Pairings That Make Sense
- Vanilla cookie + cherry/red candy: Classic holiday vibes.
- Lemon zest in dough + yellow candy: Bright, citrusy, spring-ready.
- Almond extract + green candy: “Fancy bakery cookie” energy.
- Spiced dough (cinnamon/ginger) + warm-toned candy: Cozy, wintery, and surprisingly grown-up.
Troubleshooting: When the “Glass” Gets Moody
Problem: The Candy Center Is Cloudy or Bubbly
- Cause: Candy pieces were too powdery or uneven; candy overheated; moisture/humidity got involved.
- Fix: Crush to small, even pieces (not dust). Bake just until melteddon’t leave it to boil aggressively.
Cool in a dry area. If you live somewhere humid, consider isomalt for clearer windows or store cookies with a desiccant packet (food-safe).
Problem: Candy Leaks Out of the Window
- Cause: Overfilled cut-outs or gaps where candy can escape.
- Fix: Fill only 1/2 to 3/4 full. Make sure the inner cut-out edges are clean and not ragged.
If your design has thin bridges, underfill slightly.
Problem: Cookies Spread and Lose Their Shape
- Cause: Dough too warm, not enough chilling, too much leavener, or butter too soft.
- Fix: Chill dough and even the cut-outs on the baking sheet for 10–15 minutes before baking.
Keep thickness at ~1/4 inch and use a trusted cut-out dough ratio (more flour structure, less liquid).
Problem: Candy Sticks to Parchment
- Cause: Trying to lift cookies before candy fully sets; candy seeped under the frame.
- Fix: Let them cool completely on the pan first. A silicone baking mat can help.
If a cookie is stubborn, chill the whole tray for a few minutescold candy releases more easily.
Problem: Edges Brown Too Fast, Candy Isn’t Fully Melted
- Cause: Oven running hot; cookies rolled too thin; dark pans.
- Fix: Use an oven thermometer if possible. Roll a touch thicker. Try 325°F with an extra minute or two,
especially on dark sheets, and rotate pans halfway.
Make-Ahead, Storage, and Gifting Tips
Make-Ahead Options
- Dough: Make and chill up to 2 days ahead. Freeze longer (well-wrapped) for up to a month.
- Cut-outs: Cut shapes and refrigerate on trays for several hours before baking for extra crisp edges.
- Candy: Crush and sort a day ahead. Keep tightly sealed so it doesn’t absorb moisture.
Storage
Stained-glass cookie centers are sugar, and sugar loves humidity the way cats love ignoring you. Store cookies in an airtight container
at room temperature, layered with parchment. Avoid the fridge if you canrefrigerators are humid and can make the candy tacky.
If you’re in a humid climate, add a food-safe desiccant packet in the container (not touching cookies directly).
Gifting
For cookie boxes, separate layers carefully and avoid stacking heavy cookies on top of candy windows. If shipping, choose sturdy shapes,
underfill candy slightly (to reduce brittleness), and cushion well. A cracked window still tastes greatcall it “artisan mosaic.”
Real-Life Experience Notes: What Making DIY Stained-Glass Cookies Feels Like (Extra Section)
The first time you make DIY stained-glass cookies, the process feels a little like running a tiny edible art studio.
There’s the calm, classic rhythm of cookie-makingcream butter, mix dough, roll, cutand then suddenly you’re sorting candy
colors like you’re about to build a sugar kaleidoscope. It’s part baking, part craft, and part “why is there a lime-green
shard in my sock?” (Spoiler: candy-crushing has opinions.)
What surprises many home bakers is how much the “window” outcome depends on the candy texture. When the pieces are mostly even,
the melt looks smooth and glossy, like a tiny candy pond that sets into glass. When pieces are too powdery, you can get extra bubbles
or a slightly hazier lookstill pretty, just more “sea glass” than “cathedral.” This is why the candy step is worth slowing down for:
the cookie dough is forgiving; the candy is the dramatic lead actor who insists on the perfect lighting.
The most satisfying moment is the oven reveal. Around minute nine or ten, you can watch the crushed candy soften, slump, and then
suddenly go translucent. It’s like your cookies are developing film in real time. (If you have AIM: Artistic Impatience Mode, this
is where you press your face to the oven door and whisper encouragement.) The trick is resisting the urge to pull them early.
The cookie edges can look “done” before the candy is fully melted. Give it the extra minute if the window still looks pebbly.
Cooling is the second magic act. Fresh out of the oven, the candy is molten and the windows can look slightly wavy. As they cool,
they tighten up and become crisp, shiny panes. If you try to lift them too soon, the candy can stretch or stick; if you wait until
the candy is fully set, the cookies lift cleanly and you get that satisfying “tap” sound when you gently knock a window with a fingernail.
Yes, you will do this. No, you are not alone.
These cookies are also a social experience in the best way. If you’re baking with kids, they love choosing colors and making patterns:
one-color windows for bold “gem” effects, two-color swirls for a marbled look, or layered gradients that melt into accidental art.
Adults tend to get more competitive about symmetry and clean linesbecause nothing says “relaxing holiday activity” like debating whether
the red window is more “ruby” or “cranberry.” If you’re hosting, setting up a “candy palette” station with small bowls and tiny spoons
turns this into a build-your-own-cookie project that feels festive without requiring piping bags or royal icing patience.
The final, real-world detail: stained-glass cookies teach you a lot about your kitchen environment. On a dry day, the windows stay crisp
and shiny for days. On a humid day, they can soften slightly and become tacky, especially if stored loosely. This doesn’t ruin themit just
changes the texture. If you want that perfect snap, airtight storage matters. And if you’re gifting them, the best “pro” move is packing
them once they’re fully cool, with parchment separators, in a container that closes like it means it.
Most of all, making these cookies feels like a small win: you start with plain dough and a pile of candies, and you end with something that
looks genuinely impressive. They’re the kind of treat that gets photographed before it gets eaten. Which is fair. If you made edible stained glass,
you deserve your moment.
Conclusion
DIY stained-glass cookies are the sweet spot between “simple sugar cookies” and “how did you pull that off?” With a sturdy cut-out dough,
evenly crushed hard candy, and a little patience during cooling, you can create bright, glassy windows that look like edible ornaments.
Pick bold shapes, keep your candy pieces consistent, and store them airtight to protect that signature snap. Whether you’re baking for a holiday,
a party, or just because you want your dessert to sparkle, these cookies deliver maximum wow-factor with totally doable effort.


