Table of Contents >> Show >> Hide
- What Is a Hopper in Minecraft?
- Materials Needed to Craft a Hopper
- How to Craft a Hopper in Minecraft: 12 Steps
- Step 1: Collect Wood
- Step 2: Craft a Crafting Table
- Step 3: Craft a Chest
- Step 4: Mine Iron Ore
- Step 5: Smelt Raw Iron Into Iron Ingots
- Step 6: Open the Crafting Table
- Step 7: Place the Chest in the Center Slot
- Step 8: Place Iron Ingots on the Top Left and Top Right
- Step 9: Place Iron Ingots on the Middle Left and Middle Right
- Step 10: Place One Iron Ingot in the Bottom Center Slot
- Step 11: Move the Hopper to Your Inventory
- Step 12: Place the Hopper Where You Need It
- Minecraft Hopper Crafting Recipe
- How to Use a Hopper in Minecraft
- Best Uses for Hoppers in Survival Mode
- Common Hopper Mistakes and How to Fix Them
- Hopper vs. Hopper Minecart: What Is the Difference?
- Simple Hopper Build Example: Automatic Furnace
- Do Hoppers Work the Same in Java and Bedrock?
- SEO-Friendly Quick Answer
- Extra Experience: Practical Lessons From Crafting and Using Hoppers
- Conclusion
In Minecraft, few blocks look as humble as the hopper and behave as dramatically useful. It is not shiny like a diamond sword, not explosive like TNT, and not as glamorous as an enchantment table. But the moment you learn how to craft a hopper in Minecraft, your world changes from “I manually pick up everything like a tired goblin” to “my items move themselves while I stand nearby feeling like a redstone engineer.”
A hopper is a utility block that collects, stores, and transfers items between containers. It can pull items from above, push items into the block it faces, feed furnaces, sort drops, collect mob loot, and serve as the backbone of automatic farms. Whether you play Minecraft Java Edition or Bedrock Edition, the basic crafting recipe is simple: you need 5 iron ingots and 1 chest. The real magic begins when you place it correctly.
This guide explains how to craft a hopper in Minecraft in 12 clear steps, then shows you how to use it in practical builds such as item collectors, furnace loaders, crop farms, and storage systems. Grab your pickaxe, warm up your crafting table, and let’s give your inventory a tiny conveyor belt.
What Is a Hopper in Minecraft?
A hopper is a block that moves items automatically. It has five inventory slots and a small funnel-like output tube. That tube shows where the hopper will send items. If the hopper points into a chest, items go into the chest. If it points into a furnace, it can feed materials into the furnace. If it sits under another container, it can pull items down from that container.
Think of a hopper as Minecraft’s version of a very loyal kitchen assistant. It does not complain, it does not ask for diamonds, and it keeps moving items until there is no space left. For survival players, hoppers save time. For redstone players, hoppers are essential. For anyone who has ever watched wheat, bones, arrows, or rotten flesh scatter everywhere, hoppers are a blessing in block form.
Materials Needed to Craft a Hopper
Before crafting a hopper, collect these materials:
- 5 iron ingots
- 1 chest
- 1 crafting table
The crafting table is required because the hopper recipe uses a 3×3 crafting grid. You cannot make a hopper in the small 2×2 inventory crafting grid. Minecraft is generous, but not that generous.
How to Get Iron Ingots
Iron ingots usually come from smelting raw iron in a furnace or blast furnace. Mine iron ore underground, collect raw iron, then smelt it with fuel such as coal, charcoal, wood, or lava. You can also sometimes find iron ingots in loot chests in villages, mineshafts, shipwrecks, strongholds, and other generated structures.
For one hopper, you need five iron ingots. If you plan to build automatic farms or item sorters, gather much more iron. Hoppers are useful, but they are not cheap in the early game. One hopper may feel affordable; twenty hoppers may make your iron supply file a complaint.
How to Make a Chest
To craft a chest, place 8 wooden planks around the edges of the crafting grid, leaving the center slot empty. Any type of plank works: oak, spruce, birch, jungle, acacia, dark oak, mangrove, cherry, bamboo planks, or other available wood types depending on your game version.
Once you have a chest and five iron ingots, you are ready to craft your hopper.
How to Craft a Hopper in Minecraft: 12 Steps
Step 1: Collect Wood
Start by punching or chopping down a tree. Convert logs into wooden planks. You will need planks for both a crafting table and a chest. If this is a new survival world, wood should always be one of your first resources. Minecraft may be a sandbox, but without wood, it quickly becomes a “stand around and regret things” simulator.
Step 2: Craft a Crafting Table
Open your inventory crafting grid and place four wooden planks in a 2×2 square. This creates a crafting table. Place it on the ground and open it to access the full 3×3 crafting grid. The hopper recipe requires this larger grid.
Step 3: Craft a Chest
Place eight wooden planks around the outside slots of the 3×3 crafting grid. Leave the center slot empty. Move the chest into your inventory. The chest becomes the center of the hopper recipe, which makes sense because a hopper is basically a chest with ambition and plumbing.
Step 4: Mine Iron Ore
Go underground and look for iron ore. You will need a stone pickaxe or better to mine it. Iron can appear in caves, cliffs, and underground tunnels. Bring torches, food, and a weapon if you are playing survival mode, because caves have a habit of turning peaceful mining trips into surprise skeleton concerts.
Step 5: Smelt Raw Iron Into Iron Ingots
Place raw iron in a furnace with fuel. Wait for it to smelt into iron ingots. You need exactly five iron ingots for one hopper. A blast furnace can smelt ores faster, but a regular furnace works perfectly fine.
Step 6: Open the Crafting Table
Once you have your chest and five iron ingots, open your crafting table. Make sure you are using the full 3×3 grid, not your inventory grid. The placement matters, so do not toss the materials randomly unless you enjoy crafting absolutely nothing.
Step 7: Place the Chest in the Center Slot
Put the chest in the middle slot of the crafting grid. This is the heart of the recipe. The chest represents the storage part of the hopper, while the iron ingots form the funnel shape around it.
Step 8: Place Iron Ingots on the Top Left and Top Right
Place one iron ingot in the top-left slot and one iron ingot in the top-right slot. Leave the top-center slot empty. This creates the upper sides of the hopper shape.
Step 9: Place Iron Ingots on the Middle Left and Middle Right
Place one iron ingot directly to the left of the chest and one directly to the right of the chest. The chest should remain in the center. At this point, the recipe should look like a wide iron frame surrounding the chest.
Step 10: Place One Iron Ingot in the Bottom Center Slot
Place the final iron ingot in the bottom-center slot. This completes the funnel shape. The final pattern should be: iron in the top-left and top-right, iron in the middle-left and middle-right, chest in the center, and iron in the bottom-center.
Step 11: Move the Hopper to Your Inventory
If the pattern is correct, a hopper will appear in the result slot. Drag it into your inventory. Congratulations: you have crafted one of the most useful automation blocks in Minecraft.
Step 12: Place the Hopper Where You Need It
Select the hopper and place it in the world. Pay close attention to the direction of the small output tube. That tube determines where items will go. If you want the hopper to feed into a chest, aim at the chest while placing it. If the chest opens when you try to place the hopper, sneak while placing. On keyboard controls, this usually means holding Shift. On console or mobile, use the sneak/crouch control.
Minecraft Hopper Crafting Recipe
Here is the hopper recipe in simple form:
The recipe creates 1 hopper. You can stack hoppers in your inventory, but each crafted hopper requires its own five iron ingots and one chest.
How to Use a Hopper in Minecraft
Crafting a hopper is only the beginning. To use it well, you need to understand how items move through it. A hopper can collect dropped items from above, pull items from a container above it, and push items into the container it points toward.
Using a Hopper With a Chest
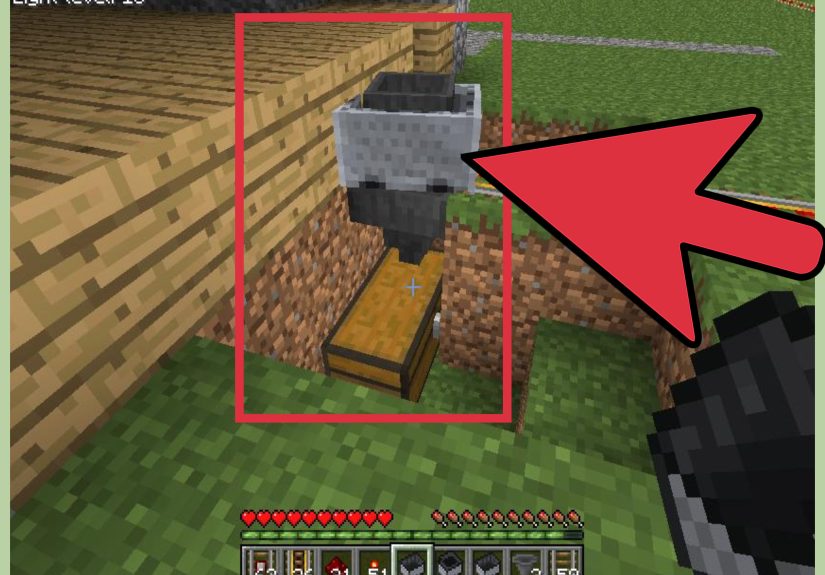
The most common setup is a hopper feeding into a chest. Place a chest first. Then crouch and place the hopper while aiming at the chest. The hopper’s tube should connect to the chest. Drop items on top of the hopper, and they will move into the chest automatically.
This is perfect for mob farms, crop farms, chicken farms, and mining areas. Instead of running around collecting every dropped item, you can let the hopper do the boring work. It is the Minecraft equivalent of hiring a tiny warehouse employee who never needs lunch.
Using a Hopper Under a Chest
If you place a hopper underneath a chest, the hopper can pull items from that chest and send them into another block. This is useful for automatic smelting systems. For example, a chest above a hopper can feed raw materials into a furnace.
Using a Hopper With a Furnace
Hoppers interact with furnaces in different ways depending on where they connect:
- Top hopper: Feeds smeltable items into the furnace input slot.
- Side hopper: Feeds fuel into the furnace fuel slot.
- Bottom hopper: Pulls finished items out of the furnace output slot.
With three hoppers and a few chests, you can build an automatic furnace system. Put ores or food in the top chest, fuel in the side chest, and collect finished items from the bottom chest. It is simple, reliable, and deeply satisfying.
Best Uses for Hoppers in Survival Mode
Automatic Item Collection
Place hoppers under areas where items drop. This works well in mob farms, cactus farms, sugar cane farms, bamboo farms, and egg farms. Add chests at the end, and you have an automatic collection system.
Sorting Systems
Hoppers can be used with redstone comparators to build item sorters. These systems filter specific items into specific chests. Item sorting is more advanced than basic hopper use, but it becomes extremely helpful once your storage room grows from “cute little chest corner” into “unlabeled wooden chaos museum.”
Automatic Smelting
A hopper-based furnace array can save huge amounts of time. Feed items into the top, fuel into the side, and collect outputs below. Players often use this for smelting iron, copper, gold, glass, stone, food, and other bulk materials.
Composter Automation
Hoppers can feed compostable items into composters and collect bone meal from below. This is useful if you have extra seeds, crops, or plant materials. A composter setup turns farm leftovers into bone meal, which can then help grow more crops. Minecraft calls this recycling; your wheat farm calls it job security.
Brewing Stand Support
Hoppers can interact with brewing stands, helping load ingredients and bottles. Brewing automation can be trickier than furnace automation, but hoppers are still part of many potion-making systems.
Common Hopper Mistakes and How to Fix Them
The Hopper Is Facing the Wrong Direction
If items are not going where you expect, check the output tube. A hopper only pushes items in the direction it faces. Break the hopper and place it again while aiming at the correct container.
The Chest Opens Instead of Placing the Hopper
When placing a hopper onto a chest, crouch or sneak first. This prevents the chest from opening and lets you attach the hopper properly.
The Hopper Is Locked by Redstone
A powered hopper stops moving items. This is useful in redstone builds, but confusing if you did it by accident. Check for redstone dust, levers, buttons, powered rails, redstone blocks, or other nearby power sources. Remove the power source or turn it off to unlock the hopper.
The Destination Container Is Full
If the chest, furnace, barrel, or other container is full, the hopper cannot push more items into it. Add more storage, empty the container, or connect the hopper line to additional chests.
Items Are Missing the Hopper
Dropped items must land where the hopper can collect them. If items bounce away, use water streams, blocks, trapdoors, or hopper minecarts to guide them into the collection area.
Hopper vs. Hopper Minecart: What Is the Difference?
A regular hopper is a placeable block. It collects items above it and moves items into containers. A hopper minecart is a minecart combined with a hopper. It can travel on rails and collect items through certain blocks above it, making it especially useful for farms.
For example, in an automatic crop farm, a hopper minecart can move under farmland and collect harvested crops. A normal hopper would only collect items directly above itself, while a hopper minecart can cover a larger area if rails are arranged properly.
Use a regular hopper for compact storage, furnace systems, and item transfer. Use a hopper minecart when you need moving collection, especially under farms.
Simple Hopper Build Example: Automatic Furnace
Here is a beginner-friendly automatic furnace setup:
- Place a furnace.
- Place a chest above the furnace.
- Crouch-place a hopper between the top chest and the furnace.
- Place another chest on the side for fuel.
- Crouch-place a hopper pointing from the fuel chest into the side of the furnace.
- Place a hopper under the furnace.
- Place a chest connected to the bottom hopper.
Now put raw food, ore, sand, cobblestone, or other smeltable items in the top chest. Put coal, charcoal, bamboo, lava buckets, or another fuel source in the side chest. Finished items will appear in the bottom chest.
This setup is one of the best early uses for hoppers because it saves time and teaches you how item direction works. Once you understand this, bigger hopper systems become much easier.
Do Hoppers Work the Same in Java and Bedrock?
The basic hopper recipe is the same in Minecraft Java Edition and Bedrock Edition: five iron ingots plus one chest. Hoppers also transfer items, connect to containers, and work with furnaces in both editions. However, some advanced redstone behavior can differ between Java and Bedrock, especially in highly technical builds.
For normal survival use, you can follow the same crafting and placement steps in either edition. If you are building a complicated item sorter, super smelter, or redstone machine from a tutorial, make sure the tutorial matches your edition.
SEO-Friendly Quick Answer
To craft a hopper in Minecraft, open a crafting table and place a chest in the center slot. Then place iron ingots in the top-left, top-right, middle-left, middle-right, and bottom-center slots. This recipe uses 5 iron ingots and 1 chest to create 1 hopper. Use hoppers to move items automatically into chests, furnaces, barrels, composters, brewing stands, and other compatible blocks.
Extra Experience: Practical Lessons From Crafting and Using Hoppers
The first time many players craft a hopper, they expect it to be simple: make the block, place the block, become a genius. Then they place it facing the wrong way, drop items on it, and wonder why nothing is entering the chest. This is practically a Minecraft rite of passage. Hoppers are easy to craft, but they reward careful placement. The tiny output tube matters more than it looks. Before building any system, always pause and check where the hopper is pointing.
One useful habit is to build hopper systems slowly. Instead of placing ten hoppers at once and hoping the whole machine works, place one hopper, test it with a few items, then continue. Drop a piece of dirt or cobblestone into the system and watch where it goes. If it reaches the correct chest, you are on track. If it vanishes into the wrong container, congratulations: you found the problem before filling the machine with all your diamonds, cooked beef, and emotional stability.
Another lesson is to plan storage before building farms. A simple mob farm or sugar cane farm can produce more items than expected. One chest may fill quickly, especially if you leave the farm running while you build nearby. Connect hoppers to double chests, or create a chain of chests if you expect lots of drops. Overflow storage is not glamorous, but it prevents messes.
Iron management also matters. In early survival, hoppers can feel expensive because each one costs five iron ingots. If your base needs armor, tools, buckets, rails, anvils, and shields, do not spend all your iron on hoppers immediately. Start with one or two important systems, such as an automatic furnace or a mob farm collector. Later, when you have better mining tools or an iron farm, you can build larger hopper networks without wincing every time you open the crafting table.
For farms, water streams and hoppers make an excellent team. Water can push dropped items into a single hopper, reducing the number of hoppers you need. This is especially helpful in early game builds where iron is limited. Instead of covering an entire floor with hoppers, guide items to one collection point. It is cheaper, cleaner, and easier to repair.
When working with furnaces, remember that hopper position controls the slot it fills. Items from the top go into the input slot. Fuel from the side goes into the fuel slot. Finished products are removed from the bottom. Many players accidentally place fuel into the top hopper and wonder why their furnace refuses to cooperate. The furnace is not being dramatic; it is just following rules.
Redstone locking is another feature worth learning. A powered hopper stops transferring items. This can be used to create item sorters, timed release systems, and controlled storage. However, accidental redstone power can break a simple setup. If a hopper suddenly stops working, check nearby levers, redstone torches, dust, blocks, and powered components. Sometimes the culprit is one tiny redstone signal hiding behind a block like a mischievous pixel gremlin.
In larger bases, labeling and access are important. Hoppers can hide behind walls, under floors, and inside farms, which makes troubleshooting harder. Leave access tunnels or removable blocks near important hopper lines. Future you will appreciate it. Future you may also wonder why past you built a storage system inside a wall with no entrance. Be kind to future you.
Finally, do not underestimate the satisfaction of automation. Crafting one hopper teaches you a recipe. Using one hopper teaches you item flow. Building with many hoppers teaches you systems thinking: inputs, outputs, storage, overflow, timing, and troubleshooting. That is why the hopper is one of the best utility blocks in Minecraft. It turns scattered drops into organized resources and turns ordinary survival bases into clever machines.
Conclusion
Learning how to craft a hopper in Minecraft is a small step that unlocks a huge amount of automation. With only five iron ingots and one chest, you can create a block that collects items, feeds furnaces, supports farms, powers storage systems, and saves you from endless manual cleanup. The recipe is simple, but the possibilities are enormous.
Start with a basic hopper-and-chest setup. Then try an automatic furnace. After that, experiment with farms, composters, hopper minecarts, and item sorters. Before long, you will stop thinking of hoppers as “that iron funnel thing” and start seeing them as the quiet engine behind your best Minecraft builds.
Note: This article is written in standard American English for web publishing and is based on real Minecraft crafting mechanics, hopper behavior, and practical survival-mode usage.


