Table of Contents >> Show >> Hide
- What Is a UDID Number?
- Before You Start: What You Need
- Method 1: Find the UDID Using Finder or iTunes
- Method 2: Find the UDID Using Apple Configurator
- Can You Find the UDID Directly in iPhone or iPad Settings?
- UDID vs. Serial Number vs. IMEI: What Is the Difference?
- Is It Safe to Share Your UDID?
- Troubleshooting: What If Your iPhone or iPad Does Not Show Up?
- Common Mistakes When Copying a UDID
- Which Method Should You Choose?
- Practical Example: Sending Your UDID to a Developer
- Experience Notes: What It Is Really Like Finding a UDID
- Conclusion
Finding the UDID number on an iPhone or iPad sounds like one of those mysterious tech chores that should require a lab coat, a developer badge, and possibly a tiny screwdriver. Good news: it does not. Your UDID, short for Unique Device Identifier, is simply a device-specific code used mostly for app testing, developer registration, device management, and certain beta installation workflows.
The slightly annoying part is that Apple does not place the UDID front and center in the Settings app next to the serial number, IMEI, EID, or model name. That would be too easy, and apparently our devices enjoy a little drama. Instead, you usually need to connect your iPhone or iPad to a computer or use a trusted Apple tool to reveal it.
This guide explains how to find the UDID number on iPhone or iPad using two easy, reliable methods: Finder or iTunes, and Apple Configurator. You will also learn what a UDID is, when you need it, what not to confuse it with, and how to avoid common mistakes when copying or sharing it.
What Is a UDID Number?
A UDID is a unique identifier connected to a specific Apple device. Think of it as a backstage pass for your iPhone or iPad. It is not the same thing as your phone number, Apple ID, serial number, IMEI, or iCloud email address. It is used most often by app developers, IT administrators, mobile testing teams, and organizations that need to register a physical device for development or ad hoc app distribution.
For example, if a developer wants to send you a test version of an iOS app before it is available in the App Store, they may ask for your device name and UDID. They can then register that device in an Apple Developer account and include it in a provisioning profile. Without the correct UDID, the app may refuse to install, leaving everyone staring at the screen like it just insulted their Wi-Fi.
Common Reasons You May Need Your UDID
You may need to find your iPhone UDID or iPad UDID if you are:
- Testing a private iOS or iPadOS app before public release
- Joining a developer’s ad hoc testing program
- Registering a device in an Apple Developer account
- Working with a company IT or mobile device management team
- Helping a developer troubleshoot app installation issues
- Exporting device details for internal app deployment
Most everyday iPhone users never need their UDID. If someone randomly asks you for it and cannot explain why, pause before sharing. Your UDID is not a password, but it is still a device identifier, so it should be handled carefully.
Before You Start: What You Need
Before using either method, gather the basics:
- Your iPhone or iPad
- A USB or USB-C cable that supports data transfer, not just charging
- A Mac or Windows PC, depending on the method
- Your device passcode, because you may need to unlock the device
- Permission to tap Trust This Computer if prompted
A quick warning about cables: some cheap cables are “charge-only.” They can refill your battery but will not let the computer see your iPhone or iPad. If your device does not appear, do not panic. The cable may be the tiny villain in this story.
Method 1: Find the UDID Using Finder or iTunes
This is the best method for most people. It is simple, secure, and does not require installing developer tools. If you use a Mac with macOS Catalina or later, you will use Finder. If you use an older Mac or a Windows PC, you may use iTunes. On newer Windows setups, Apple’s device-management apps may also help you view connected device information, but iTunes remains a familiar option for many users.
How to Find UDID on a Mac Using Finder
- Connect your iPhone or iPad to your Mac with a USB or USB-C cable.
- Unlock your device.
- If you see the Trust This Computer message, tap Trust and enter your passcode.
- Open Finder on your Mac.
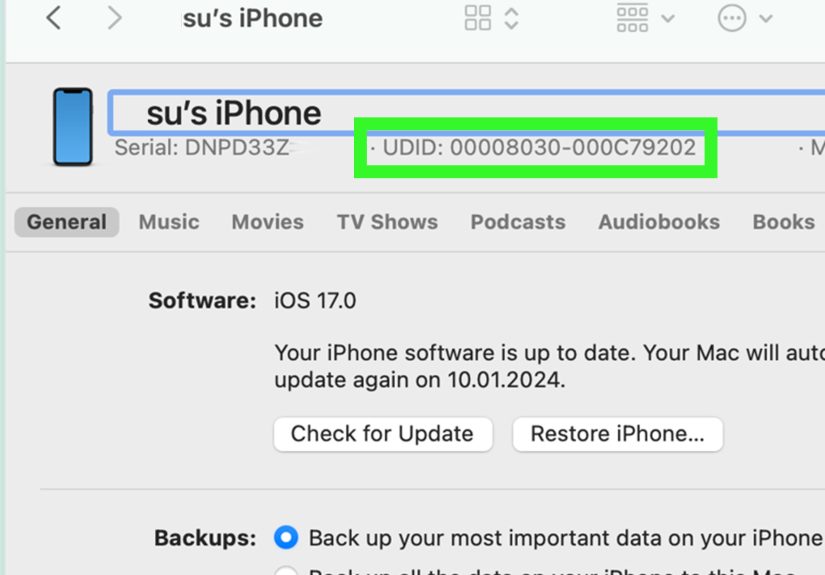
- Look in the left sidebar under Locations and click your iPhone or iPad.
- On the device summary screen, look for the line showing the serial number.
- Click the serial number. It should cycle through other identifiers until the UDID appears.
- Copy the UDID carefully. On many Macs, you can press Command + C after selecting or revealing it.
That is the whole process. The key step is clicking the serial number. Many people miss it because it does not look like a button. It just sits there politely, pretending it has no secrets. Click it, and the hidden identifier appears.
How to Find UDID Using iTunes
- Install or open iTunes on your computer.
- Connect your iPhone or iPad with a data-capable cable.
- Unlock the device and tap Trust if prompted.
- Click the small device icon near the top of the iTunes window.
- Open the device summary page.
- Click the serial number field until it changes to the UDID or identifier.
- Copy the UDID and paste it where needed.
If you are using iTunes, be careful not to start a backup, restore, or sync unless you actually want to. You are here to collect an identifier, not accidentally reorganize your media library like it is 2012.
Why Finder or iTunes Is Usually the Best Option
Finder and iTunes are good choices because they use a direct connection between your device and computer. You do not need to install a random profile from a website, upload sensitive device details, or rely on a third-party page that may or may not be trustworthy. For personal devices, app testing, and one-off developer requests, this method is usually enough.
Method 2: Find the UDID Using Apple Configurator
Apple Configurator is a free Apple app for Mac that helps view, prepare, and manage Apple devices. It is especially useful if you work with several iPhones or iPads, manage devices for a school or business, or need to export hardware information for a developer or IT team.
This method is slightly more “professional,” but still easy. You do not need to be a programmer. You just need a Mac, the Apple Configurator app, and the device you want to identify.
How to Find UDID with Apple Configurator
- Install Apple Configurator from the Mac App Store if it is not already installed.
- Connect your iPhone or iPad to the Mac using a data-capable cable.
- Unlock the device and tap Trust if asked.
- Open Apple Configurator.
- Select your connected iPhone or iPad from the device window.
- Open the device information panel.
- Look for the UDID or identifier field.
- Copy the value exactly, or export device information if your workflow requires it.
Apple Configurator is helpful when you need more than one device detail. It can show hardware information, operating system version, serial number, capacity, addresses, and other management-related data. For organizations, that is much more convenient than clicking around each device one at a time while everyone waits for the “tech person” to perform digital magic.
When Apple Configurator Makes More Sense
Use Apple Configurator if you are handling multiple devices, preparing devices for internal testing, supporting a business app, or collecting information for an IT department. It is also a cleaner option if a developer asks for several identifiers and you want to export them in a structured way.
Can You Find the UDID Directly in iPhone or iPad Settings?
Usually, no. The Settings app is great for finding your serial number, IMEI, EID, model name, Wi-Fi address, and other device details. To check those, you can go to Settings > General > About. However, the UDID is generally not displayed there as a simple copy-ready field.
This is where many users get confused. They open Settings, see several official-looking numbers, and assume one of them must be the UDID. That is understandable. Apple gives you enough identifiers to make the About screen look like a small airport departure board. But the UDID is different, and for most users, it must be revealed through a computer connection or Apple device-management tool.
UDID vs. Serial Number vs. IMEI: What Is the Difference?
These identifiers are often mixed up, so here is the simple version:
UDID
The UDID is used mainly for development, testing, provisioning, and device-management workflows. It identifies a specific Apple device for certain Apple ecosystem processes.
Serial Number
The serial number identifies your Apple product for support, repair, warranty, service, and product lookup purposes. Apple Support commonly asks for this number when you need help with your device.
IMEI
The IMEI is tied to cellular devices. Carriers use it to identify phones and cellular iPads on mobile networks. Wi-Fi-only iPads do not have the same cellular identifiers as iPhones or cellular iPad models.
Apple ID
Your Apple ID is your account, not your device. It is the email or phone number-based login you use for iCloud, App Store purchases, subscriptions, and Apple services. Please do not send your Apple ID password to anyone asking for a UDID. That is not “tech support”; that is a red flag wearing a fake mustache.
Is It Safe to Share Your UDID?
Sharing your UDID with a trusted developer, employer, school, or app testing team is common when there is a legitimate need. Still, you should avoid posting it publicly or sending it to unknown people. A UDID does not give someone direct access to your photos, messages, or bank account, but it is still a unique device identifier. Treat it like information you share only when there is a good reason.
If you are joining a beta test, ask why the UDID is needed. A professional developer should be able to explain that it is for device registration, provisioning, or app installation. If the answer is vague, push back. Your iPhone may be smart, but it cannot roll its eyes on your behalf.
Troubleshooting: What If Your iPhone or iPad Does Not Show Up?
If Finder, iTunes, or Apple Configurator does not recognize your device, try these fixes:
- Unlock your iPhone or iPad before connecting.
- Tap Trust This Computer when prompted.
- Use a different USB or USB-C cable.
- Try a different port on your computer.
- Restart both the computer and the iPhone or iPad.
- Update macOS, iTunes, or Apple device software.
- Check whether the cable supports data transfer.
- Disconnect accessories such as hubs or adapters and connect directly.
If you accidentally tapped Don’t Trust, you may need to reset location and privacy settings on the iPhone or iPad, then reconnect it and choose Trust again. Do this only when you understand the change, because it resets trusted-computer permissions and certain privacy prompts.
Common Mistakes When Copying a UDID
The most common mistake is copying the serial number instead of the UDID. The second most common mistake is missing a character. The third is sending a screenshot so blurry it looks like it was taken during an earthquake. To avoid problems, copy and paste the UDID as text whenever possible.
Also, do not “fix” the UDID unless the developer specifically tells you to. Some newer device identifiers may include a dash or use a different length than older 40-character UDIDs. If you change the format incorrectly, the registration may fail. Copy exactly what the tool shows.
Which Method Should You Choose?
If you are a regular user who needs to send one UDID to a developer, use Finder or iTunes. It is fast and familiar. If you manage several devices or need a more organized export, use Apple Configurator. Both methods are safer than relying on unknown third-party websites that ask you to install profiles just to reveal your device information.
Online UDID-finding tools exist, and some use configuration profiles to display device identifiers. However, because those tools require trust and may collect device information, they are not the first recommendation for privacy-conscious users. Use official Apple tools whenever possible.
Practical Example: Sending Your UDID to a Developer
Imagine a developer says, “Please send your iPhone UDID so we can add you to the test build.” Here is what you should send:
- Your device name, such as “Mary’s iPhone 15 Pro”
- Your device model, if requested
- Your UDID copied as plain text
- Your email address used for testing, if required by the developer
A clean message might look like this:
Hi, here is my test device information: Device name: Mary’s iPhone 15 Pro. UDID: XXXXXXXX-XXXXXXXXXXXXXXXX. Please let me know when the build is ready.
Do not include your passcode, Apple ID password, iCloud recovery key, or private account details. A real developer does not need those to register a device for testing.
Experience Notes: What It Is Really Like Finding a UDID
The first time you try to find a UDID, the process can feel oddly hidden. You may open the Settings app, tap through General, About, Legal, Certificates, and whatever else looks official, only to discover that the one number you need is not sitting there with a friendly label. That is normal. Apple exposes many identifiers in Settings, but the UDID is usually retrieved through a connected computer or device-management tool.
In real-world app testing, the most frequent delay is not the UDID itself. It is the tiny chain of small steps around it. The phone is locked. The cable only charges. The Trust prompt appears behind another notification. Finder does not show the device because the user tapped “Don’t Trust” three months ago and forgot. Someone copies the serial number instead. Someone else sends a photo of the About screen. By the time the developer receives the right identifier, everyone has become emotionally attached to the troubleshooting process.
The easiest habit is to prepare the device before connecting it. Unlock the iPhone or iPad first, keep it on the Home Screen, and use a cable you know can transfer data. When the trust prompt appears, read it and tap Trust only if it is your own computer or a computer you are comfortable allowing to access the device. Then open Finder, iTunes, or Apple Configurator and look for the device details.
Another useful experience-based tip: paste the UDID into a plain text note before sending it. This gives you a chance to make sure it copied correctly. If the developer says the UDID does not work, do not manually retype it from memory. Go back to the tool, copy it again, and resend it. Manual typing is where tiny errors sneak in wearing ninja shoes.
If you support a team, school, or small business, Apple Configurator is often the calmer path. Instead of asking five people to follow instructions separately, you can connect devices one by one and collect consistent information. This is especially useful for internal app testing, device enrollment projects, or situations where a developer needs a list of approved test devices.
For personal users, the Finder method is usually the sweet spot. It avoids questionable websites, it uses Apple’s built-in Mac workflow, and it takes less than a minute once you know that the serial number line can be clicked. That one hidden click is the trick. After you learn it, finding a UDID goes from “Why is this so secret?” to “Oh, that was it?”
Conclusion
Finding the UDID number on an iPhone or iPad is not difficult once you know where Apple hides it. For most users, the fastest method is connecting the device to a computer and using Finder or iTunes to reveal the identifier by clicking the serial number field. For users managing multiple devices, Apple Configurator offers a more organized and professional way to view and export device information.
The most important thing is to copy the UDID exactly and share it only with trusted people or organizations that have a legitimate reason to request it. Do not confuse it with your serial number, IMEI, Apple ID, or password. Your UDID may be just a string of characters, but in app testing and device registration, one missing character can turn a simple task into a tiny tech soap opera.


