Table of Contents >> Show >> Hide
- What You Need Before You Start
- Before You Open the Case
- How to Install a PCI Card: 11 Steps
- Step 1: Shut Down the Computer Completely
- Step 2: Unplug the Power Cable and Peripherals
- Step 3: Discharge Residual Power and Ground Yourself
- Step 4: Open the Case
- Step 5: Find the Correct PCI or PCIe Slot
- Step 6: Remove the Rear Slot Cover
- Step 7: Remove the Old Card if You Are Replacing One
- Step 8: Prepare the New Card
- Step 9: Insert the Card Firmly and Evenly
- Step 10: Secure the Card and Connect Any Required Cables
- Step 11: Close the Case, Boot Up, and Install Drivers
- Common Problems After Installing a PCI Card
- Best Practices for a Smooth PCI Card Installation
- Real-World Experiences Installing a PCI Card
- Conclusion
Installing a PCI card sounds like one of those jobs that should require a lab coat, a flashlight clenched between your teeth, and a dramatic soundtrack in the background. In reality, it is usually much simpler than people expect. If you can remove a side panel, line up a connector, and resist the urge to force anything, you are already halfway there.
Before we go further, let’s clear up one small but important detail. When many people say PCI card, they actually mean a modern PCIe card, also called a PCI Express card. That includes graphics cards, Wi-Fi cards, sound cards, USB expansion cards, capture cards, and Ethernet adapters. True legacy PCI slots still exist in a few older systems, but most desktop PCs today use PCIe slots in different sizes such as x1, x4, x8, and x16.
This guide walks you through how to install a PCI card in 11 steps, with practical tips for first-timers, common mistakes to avoid, and a few real-world lessons learned from people who discovered that “quick upgrade” sometimes means “why is this bracket upside down?” By the end, you should be ready to install your expansion card without turning your desktop into an expensive metal puzzle.
What You Need Before You Start
Most PCI card installations do not require a huge toolkit. In many cases, all you need is a Phillips screwdriver, a clean workspace, and a little patience. If you have an anti-static wrist strap, great. If not, you can still work safely by grounding yourself properly and handling the card by its edges.
You should also have the card itself, any included bracket accessories, and the driver installer if the manufacturer recommends one. Some cards work immediately with Windows, while others perform better after you install updated drivers from the card maker. If your card needs additional power or a front-panel connection, keep those cables nearby so you are not rummaging through a drawer halfway through the job like a raccoon looking for snacks.
Before You Open the Case
Compatibility matters. Check your motherboard or PC manual to confirm you have the right slot type and enough physical clearance. A short PCIe x1 card often fits in a longer PCIe slot, but the exact behavior depends on the motherboard layout and lane sharing. Also check whether the card is full-height or low-profile, whether it blocks adjacent slots, and whether your power supply can support it if it is a larger card such as a high-end GPU.
Once that looks good, you are ready for the actual installation.
How to Install a PCI Card: 11 Steps
Step 1: Shut Down the Computer Completely
Start with a full shutdown, not sleep mode and not “I think the screen is black so it must be off.” Save your work, shut down the operating system properly, and wait until all fans stop spinning. If your PC has a switch on the back of the power supply, flip it off after shutdown.
This step protects both your hardware and your sanity. Working inside a system that still has standby power is a terrific way to create problems you did not have five minutes earlier.
Step 2: Unplug the Power Cable and Peripherals
Disconnect the power cable from the wall or power supply. Then unplug your monitor, Ethernet cable, USB devices, and anything else attached to the tower. This gives you room to work and reduces the chance of tugging on a cable while the case is open.
If you are upgrading an older desktop that has been living under a desk since the last presidential administration, this is also the moment when a small tumbleweed of dust may reveal itself. Try not to judge the computer. It has been through a lot.
Step 3: Discharge Residual Power and Ground Yourself
With the system unplugged, press and hold the power button for several seconds. This helps discharge leftover electrical energy. Next, reduce the risk of electrostatic discharge by touching an unpainted metal part of the chassis before handling components. If you have an anti-static wrist strap, attach it according to the instructions.
Static electricity is sneaky. You may not feel a zap, but that does not mean your components are thrilled about the experience. Handle the PCI card by the edges and avoid touching the gold contacts.
Step 4: Open the Case
Move the computer onto a stable surface with good lighting. Remove the side panel, which is usually secured by thumbscrews or standard case screws at the back. Slide or swing the panel off according to your case design.
Once inside, take a moment to locate the motherboard, the expansion slots, and the rear slot covers. If your case has a retention bracket, latch, or plastic guide, notice how it works before you start yanking on anything like you are opening a jar of pickles.
Step 5: Find the Correct PCI or PCIe Slot
Now identify the slot that matches your card. Small cards such as Wi-Fi or USB expansion cards often use a PCIe x1 slot. Larger cards, especially graphics cards, usually require a PCIe x16 slot. Some specialty cards use x4 or x8 slots. Check the motherboard manual if there is any doubt, especially on boards where certain slots share bandwidth or become disabled depending on what else is installed.
Make sure there is enough room around the slot for the card and its cooler, heatsink, antenna connectors, or breakout cables. Clearance issues are common in compact desktop cases, and the hardware usually wins that argument.
Step 6: Remove the Rear Slot Cover
At the back of the case, remove the metal slot cover that lines up with the motherboard slot you plan to use. Depending on the case, this may involve removing a screw, opening a latch, or taking off a retaining bracket. Keep the screw nearby because you will likely need it to secure the new card.
If your card is dual-slot, such as some capture cards or GPUs, remove two adjacent covers. Do not remove more covers than necessary. Your computer is not a convertible, and it does not need extra ventilation by accident.
Step 7: Remove the Old Card if You Are Replacing One
If there is already a card installed in that slot, disconnect any attached power or internal cables first. Then remove the bracket screw and release any motherboard slot latch before lifting the card out. Pull it straight up and out with steady pressure.
Do not twist the card side to side like you are trying to start a stubborn lawn mower. Expansion slots are durable, but they are not begging for drama.
Step 8: Prepare the New Card
Take the new PCI card out of its anti-static packaging only when you are ready to install it. Check whether it uses a full-height or low-profile bracket, and swap brackets if needed. Some USB cards, capture cards, and network adapters include both bracket sizes.
While you are holding the card, inspect the connector and bracket orientation. The gold edge connector should line up with the slot, and the rear bracket should line up with the opening at the back of the case. This is the best time to notice if you are upside down, backwards, or trying to install the card in a way that would impress nobody.
Step 9: Insert the Card Firmly and Evenly
Align the card with the slot and the rear opening, then press straight down until the card is fully seated. Apply even pressure to the top edge or reinforced areas of the card, not to delicate chips or heatsinks. On many motherboards, the slot latch will click or lock automatically when the card is seated correctly.
This is the most important physical step. A card that looks installed but is not fully seated can cause all kinds of weird behavior: no display, no network connection, random detection failures, or a wonderful new hobby called troubleshooting for three hours.
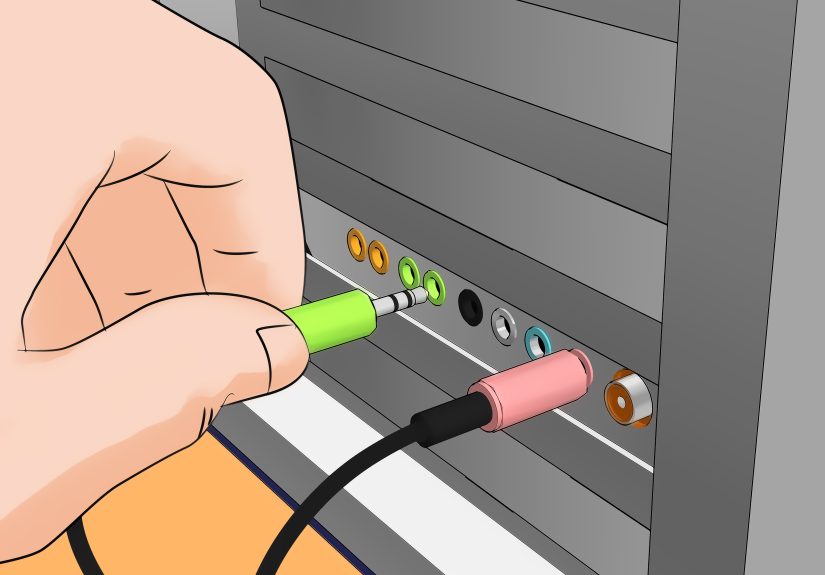
Step 10: Secure the Card and Connect Any Required Cables
Use the screw or case retention latch to secure the card bracket to the chassis. The card should sit straight and feel stable, not wobbly. If the card requires extra connections, attach them now. That might include PCIe power connectors for a GPU, internal USB headers, SATA power for certain expansion cards, antenna leads for a Wi-Fi card, or breakout cables for audio and capture devices.
Make sure internal cables are not pressing into fans or bending sharply against the card. A clean cable path helps airflow and keeps future you from opening the case later and saying, “Who did this?”
Step 11: Close the Case, Boot Up, and Install Drivers
Reattach the side panel, reconnect your cables, and power the system back on. Once the PC boots into Windows, check whether the new hardware is detected automatically. Many cards will work right away with built-in drivers, but you should still install the latest recommended driver package from the device manufacturer when appropriate.
Open Device Manager to verify the card appears correctly. If it shows a warning icon, install or update the driver. For graphics cards, also install the proper AMD, NVIDIA, or Intel software package if needed. Then test the device in the real world: connect to Wi-Fi, plug in Ethernet, attach a monitor, record a video source, or open the sound settings and make sure the new hardware actually does something useful.
Common Problems After Installing a PCI Card
The Card Is Not Detected
The most common cause is poor seating. Power down, unplug the PC, open the case again, and reseat the card firmly. Also check whether the correct slot was used and whether a slot-sharing limitation in the motherboard manual applies to your configuration.
The Computer Will Not Boot
This can happen if the card is not fully seated, the power connectors are missing, or the power supply cannot handle the added load. Remove the card and see whether the system boots normally without it. That quick test tells you whether the new card is the problem or merely the current suspect.
No Signal After Installing a Graphics Card
Make sure your display cable is connected to the new graphics card output, not the motherboard video port. This catches more people than anyone likes to admit. Also verify that any required supplemental PCIe power cables are connected.
Windows Sees the Card but It Does Not Work Right
Install the latest driver, restart the system, and check Device Manager for status messages. Some devices also need companion software or firmware tools. If the card is an older model, confirm that the operating system still supports it.
Best Practices for a Smooth PCI Card Installation
Read the motherboard manual and the card manual together before you begin. That one habit saves an amazing amount of time. It helps you choose the right slot, understand lane-sharing rules, confirm bracket size, and identify special cable requirements before the case is open.
It also helps to install one card at a time if you are doing several upgrades. When you add three things at once and the system suddenly stops cooperating, troubleshooting becomes a detective novel with too many suspects.
Finally, never force a PCI card into a slot. If it does not seat easily with firm, even pressure, something is misaligned. Stop, check the bracket position, confirm the slot type, and try again. Computers reward patience much more than brute force.
Real-World Experiences Installing a PCI Card
One of the most common first-time upgrades is adding a USB expansion card to an older desktop. People usually expect it to be a five-minute job, and physically, it often is. The surprise comes later when they realize some high-speed USB cards also need SATA power from the power supply. Without that connection, the card may appear in Windows but deliver flaky performance or fail to power certain devices. The lesson is simple: if a card includes a power connector, it is not decorative.
Wi-Fi cards create another classic learning moment. A lot of users install the card perfectly, boot into Windows, see the adapter appear, and then wonder why the connection is weak. The answer is often embarrassingly practical: the external antennas were never screwed onto the rear connectors. It turns out radio hardware works better when you actually attach the parts meant to catch radio signals. Shocking, I know.
Graphics card installs tend to be the most dramatic because the parts are larger, heavier, and more expensive. Many people do everything right except one detail: they plug the monitor back into the motherboard video output instead of the new GPU. Then they conclude the card is dead, the PC is cursed, or modern technology is a prank. Once the cable is moved to the graphics card itself, everything magically works and confidence returns.
Sound cards are usually easier physically, but they can teach a different lesson. After the install, users sometimes forget to select the new audio device in Windows or in their recording software. The card is there, the drivers are installed, and the hardware is fine, but audio is still coming from the default motherboard output. That is not a failed install; it is just software doing what software does best: assuming you meant something else.
Capture cards have their own personality. They are usually simple to seat in a PCIe slot, but cable routing and software setup can take longer than the actual hardware installation. Users often discover that the hard part is not getting the card into the PC. The hard part is figuring out signal paths, refresh rates, passthrough limits, and the exact menu setting hidden in streaming software like it was designed by a puzzle enthusiast.
Another real-world theme is low-profile versus full-height brackets. Small form factor desktops love to humble people here. The card works, the slot is correct, and the motherboard is compatible, but the standard bracket is too tall for the case. Luckily, many expansion cards include both bracket sizes. The experience teaches a valuable rule: measure first, celebrate later.
Perhaps the biggest takeaway from all these installs is that most PCI card upgrades are not difficult; they are just detail-sensitive. The difference between a smooth success and a frustrating evening usually comes down to four things: choosing the right slot, seating the card fully, connecting every required cable, and installing the proper drivers afterward. Miss one of those, and the system gets moody. Get all four right, and you will feel like a hardware wizard, even if you still have one mystery screw left on the desk.
Conclusion
If you have been putting off an upgrade because installing a PCI card sounded intimidating, the good news is that it is mostly a matter of preparation and patience. Shut the PC down properly, ground yourself, use the correct slot, seat the card firmly, secure it well, and finish with the right driver setup. That is the whole game.
Whether you are adding faster networking, better audio, extra USB ports, a capture device, or a shiny new graphics card, learning how to install a PCI card is one of the most useful desktop PC skills you can pick up. It saves money, makes upgrades easier, and gives you the deeply satisfying feeling of fixing or improving your own machine with your own hands. And honestly, that is a lot more fun than waiting on hold with support.


