Table of Contents >> Show >> Hide
- Safety and Legality First (Seriously)
- What Is a Clutch Wheelie, Exactly?
- The 10 Steps to a Safer Clutch Wheelie
- Step 1: Master Basic Riding and Braking First
- Step 2: Choose the Right Practice Spot
- Step 3: Gear Up and Check Your Bike
- Step 4: Train Your Rear-Brake “Reflex”
- Step 5: Dial In Your Body Position
- Step 6: Start with Small Clutch-Ups in Second Gear
- Step 7: Work Toward the Balance Point (Very Slowly)
- Step 8: Use the Rear Brake to Control Height
- Step 9: Smooth the Landing
- Step 10: Build Consistency, Not Ego
- Common Beginner Mistakes with Clutch Wheelies
- Does the Type of Motorcycle Matter?
- Real-World Experiences and Lessons from Riders
- Final Thoughts
Let’s get one thing out of the way right now: clutch wheelies look cool,
but they’re also risky, hard on your bike, and often illegal on public roads.
This guide is for informational purposes and assumes you’re practicing on a closed course,
track day, or private property where it’s legal and permitted. If you’re not sure whether
wheelies are legal where you live, assume they aren’t and check your local laws first.
With that big neon warning sign flashing, we can talk technique. A
clutch wheelie (or “clutch-up”) is a wheelie where you use the clutch to
lift the front wheel instead of relying only on throttle. Done correctly, a clutch wheelie
gives you more control over when the front end comes up and how quickly it rises. Done badly,
it can loop the bike, destroy bodywork, or worse – injure you. So we’ll focus on
control, safety, and gradual progress.
Safety and Legality First (Seriously)
Before you even think about lofting that front wheel, you need a safety plan:
- Only practice in a safe, controlled environment. Think: stunt lot, track, riding school, or supervised training area. Never on public streets, highways, or with traffic around you.
- Wear full protective gear every time. At minimum: a DOT-compliant full-face helmet, armored jacket and pants, gloves, and over-the-ankle boots. A back protector and chest protector are a smart idea.
- Know your limits. If your basic braking, cornering, and throttle skills aren’t solid, you are not ready for wheelies yet.
- Expect crashes. Many riders drop the bike while learning stunts, even in parking lots. If you can’t afford to damage it, don’t wheelie it.
Also remember: in many U.S. states, intentionally raising the front wheel on public roads
can be treated as reckless or dangerous driving, with fines, license suspension,
and bike impound on the table. Treat clutch wheelies as a motorsport skill,
not a show-off move for traffic.
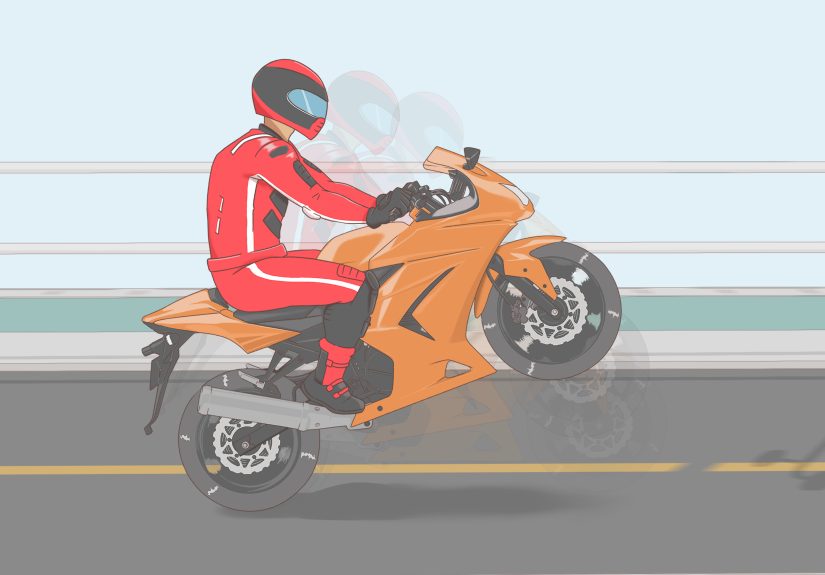
What Is a Clutch Wheelie, Exactly?
A motorcycle wheelie is when the front wheel lifts off the ground while the rear wheel stays
in contact, driving the bike forward. With a power wheelie, you simply use
engine power and throttle to yank the front end up. With a clutch wheelie,
you briefly slip the clutch and release it while adding throttle, delivering a sharper hit of
torque to the rear wheel and popping the front up more predictably.
Riders often prefer clutch wheelies because:
- You can choose your exact speed and gear for the lift.
- The front comes up more consistently compared with pure-throttle attempts.
- It teaches better clutch control, which helps in other riding skills too.
The 10 Steps to a Safer Clutch Wheelie
These steps assume a typical modern sport or naked bike with a manual clutch and decent power.
Your specific gear, speeds, and revs will vary by motorcycle; when in doubt, keep it slower
and softer than you think you need.
-
Step 1: Master Basic Riding and Braking First
If you’re still stalling in traffic or panic-grabbing the front brake, you’re not ready
for clutch wheelies. You should already be comfortable with:- Smooth takeoffs and stops
- Emergency braking using both front and rear brakes
- Cornering at moderate speeds
- Precise clutch control in low-speed maneuvers
Wheelies are like riding in “hard mode.” Make sure you’ve beaten the game on “normal” first.
-
Step 2: Choose the Right Practice Spot
Look for a flat, open, legal space with good pavement and no traffic:
a closed training lot, an empty industrial area with permission, or a private track.
You want:- No cars, pedestrians, or obstacles
- Plenty of run-off room in front of you
- No loose gravel, potholes, or big cracks in the surface
Never practice wheelies around other riders who aren’t expecting it – a failed wheelie can
slide your bike right into them. -
Step 3: Gear Up and Check Your Bike
Suit up in full gear, then give your motorcycle a quick pre-flight check:
- Brakes: Front and rear both firm and responsive.
- Tires: Healthy tread and correct pressure; no cords, no cuts.
- Controls: No sticky throttle, clutch engages smoothly, levers adjusted to fit your hands.
- Chain and sprockets: Proper tension and lubrication.
If your bike already has issues, wheelies will multiply them in the worst way.
-
Step 4: Train Your Rear-Brake “Reflex”
The rear brake is your emergency “oh no” button in a wheelie. Tapping it gently
brings the front wheel down. Before you clutch anything up, practice:- Riding at low speed and using only the rear brake to slow smoothly.
- Covering the rear brake pedal with your foot without stomping on it.
- Building the habit of tapping, not jamming, the pedal.
When things go wrong in a wheelie, you won’t have time to think – you’ll react how you trained.
-
Step 5: Dial In Your Body Position
For beginner clutch wheelies, sit slightly toward the back of the seat,
but not all the way on the tail. Keep:- Knees lightly gripping the tank
- Arms bent, not locked straight
- Core engaged so you’re not hanging off the bars
- One or two fingers on the clutch lever, right foot covering the rear brake
Your body should feel balanced and ready to move with the bike, not rigid or tense.
-
Step 6: Start with Small Clutch-Ups in Second Gear
Many riders find second gear smoother and less jerky for learning clutch wheelies.
A generic pattern looks like this:- Roll along in second gear at a moderate, steady speed – not crawling, not racing.
- Cover the clutch with 1–2 fingers and the rear brake with your right foot.
- Give a small throttle blip to get the engine into its torquey mid-range.
- Pull the clutch in just enough that the engine revs freely (not all the way to the bar).
- Let the revs rise a bit, then release the clutch quickly but smoothly while adding a bit more throttle.
Your first goal is not a perfect wheelie. Your goal is a tiny hop of the
front wheel or just a feeling of it getting light. Repeat this many times until you can
lift the front a few inches on command and set it down calmly. -
Step 7: Work Toward the Balance Point (Very Slowly)
The balance point is where the bike feels almost weightless, and you can
hold a wheelie with minimal throttle. Getting there takes time. Gradually:- Increase the revs slightly before you let the clutch out.
- Add a touch more throttle during release.
- Focus on smoothness rather than height.
If the front wheel shoots up faster than you expect, tap the rear brake and roll off the throttle. Live to try again.
-
Step 8: Use the Rear Brake to Control Height
Once the front wheel is consistently coming up, the rear brake becomes your best friend.
In a controlled clutch wheelie:- Increase height slightly with gentle throttle adjustments.
- If the front feels like it’s going past your comfort zone, tap the rear brake to bring it down.
- Learn to coordinate small brake taps while keeping your body relaxed.
Think of the rear brake as a volume knob for your wheelie height, not a panic switch.
-
Step 9: Smooth the Landing
Slamming the front wheel down can bend forks, stress head bearings, and hurt your wrists.
To land more gently:- As you bring the front down, ease off the throttle gradually instead of chopping it shut.
- Keep your arms slightly bent so they can absorb the impact.
- Stay light on the bars; don’t death-grip and yank them.
A smooth landing might not look as dramatic, but your motorcycle will thank you.
-
Step 10: Build Consistency, Not Ego
Once you can lift the front wheel and set it down smoothly, the temptation is to go higher,
faster, and farther. Resist the urge to rush. Instead:- Work on doing small, controlled clutch-ups that look boring but feel smooth.
- Increase height in tiny increments over many sessions.
- Stop when you’re tired; most dumb mistakes happen when riders are fatigued or frustrated.
Your goal is to be the rider who can do ten identical, controlled wheelies in a row – not the
rider who gets one epic wheelie and three expensive crashes.
Common Beginner Mistakes with Clutch Wheelies
As you practice, watch out for these classic errors:
- Ignoring the rear brake. If you never touch it, you won’t use it when you need it most.
- Too much clutch, too fast. Dumping the clutch at high revs is a great way to loop the bike.
- Death grip on the bars. You end up steering with your arms instead of your body, making the bike unstable.
- Looking down. Staring at the front wheel makes it harder to balance; keep your eyes up and ahead.
- Practicing on the street. It might feel convenient, but the mix of traffic, police, and surprise potholes is a terrible combo.
Does the Type of Motorcycle Matter?
Some bikes are much easier to clutch wheelie than others:
- Middleweight and liter sport bikes / naked bikes: Plenty of power and responsive clutches; they come up easily, which is both a blessing and a curse.
- Motards and dual sports: Light weight and upright seating make them favorite wheelie machines; they’re generally more forgiving.
- Heavy cruisers or touring bikes: It’s possible, but the extra weight and long wheelbases make them trickier and riskier.
- Low-power small bikes: You might need more revs and clutch slip; the upside is they’re less likely to rocket out from under you.
Whatever you ride, always adapt the technique to your specific machine. Start small and work up slowly.
Real-World Experiences and Lessons from Riders
Spend a little time listening to experienced riders and you’ll notice a pattern: almost everyone
who’s good at clutch wheelies went through a long, awkward phase full of tiny hops, stalled
engines, and near misses before they got comfortable. The best stunters often sound more cautious
than the beginners watching them.
Many riders describe their early attempts as “light-switch moments.” Either nothing happened,
or the front wheel rocketed skyward. The breakthrough usually came when they stopped
chasing big wheelies and focused on consistency instead. They picked one quiet spot,
one gear, one speed, and repeated the same tiny clutch-ups over and over until their hands and
feet started working together automatically.
Another common story involves the rear brake. New learners tend to forget it exists the second
the front wheel leaves the ground. Experienced riders talk about spending whole sessions just
practicing low wheelies and deliberately using the rear brake to modulate height. By the time
they were ready for higher balance-point wheelies, their foot was already trained to tap the
brake if things went too far.
Riders also quickly learn that ego is expensive. The classic mistake is showing off for friends
or cameras before you’re ready. Maybe you’ve had a few clean clutch wheelies, and now everyone’s
watching. You give it a bit more throttle than usual, the front comes up faster than expected,
and you freeze instead of tapping the brake. At best, you slam the front end down hard. At worst,
you loop the bike and slide across the asphalt in front of your audience. It’s a painful reminder
that stunt riding is still riding – the rules about gradual progression and
respecting your limits don’t suddenly disappear.
A lot of more seasoned riders end up building little routines for their wheelie practice. They
might start with normal warm-up laps to check the bike and tires, then do a few low clutch-ups
just to feel out the surface. Only when everything feels right – body, bike, and brain – do
they push a bit higher. The minute the session starts to feel “off” or clumsy, they call it a
day instead of “sending it” one more time.
The biggest shared lesson is simple: treat clutch wheelies like a skill, not a party
trick. Skills need structure, patience, and respect. If you approach them with a plan,
the right gear, and a realistic sense of the risks, you’ll have a much better chance of walking
away with your motorcycle – and your body – in one piece.
Final Thoughts
Learning how to perform clutch wheelies on a motorcycle is a mix of mechanical understanding,
body control, and self-discipline. The 10 steps in this guide are designed to help you build
that control gradually, from rear-brake reflexes and body position to small clutch-ups and
smooth landings.
But even perfect technique doesn’t erase the risks. Wheelies strain components, reduce your
ability to react to unexpected hazards, and can get you into serious legal trouble if you do
them on public roads. If you decide to pursue clutch wheelies, keep them in a safe, legal
environment, wear full gear, and accept that broken parts – and bruised egos – are part of
the territory.
Ride smart, respect the physics, and remember: the most impressive stunt is still coming home
in one piece.


