Table of Contents >> Show >> Hide
- Why Vacuum Flasks Start Smelling Musty
- How to Remove Musty Odors from Vacuum Flasks: 11 Steps
- Step 1: Empty the Flask and Check for the Real Problem
- Step 2: Disassemble Every Removable Part
- Step 3: Wash Everything with Warm Water and Mild Dish Soap
- Step 4: Scrub Narrow Areas with the Right Tools
- Step 5: Use a Baking Soda Soak for Everyday Mustiness
- Step 6: Try White Vinegar for Stubborn Odor and Mineral Film
- Step 7: Use Cleaning Tablets for Coffee, Tea, and Mystery Stains
- Step 8: Sanitize Only When Needed, and Do It Safely
- Step 9: Rinse Until There Is No Cleaner Smell Left
- Step 10: Dry the Flask Completely with the Lid Off
- Step 11: Replace Worn Seals or Damaged Parts if the Smell Keeps Coming Back
- How to Keep Musty Odors from Coming Back
- Common Mistakes That Make Flask Odors Worse
- What This Looks Like in Real Life: Musty Flask Experiences and Lessons Learned
- Conclusion
- SEO Tags
Few kitchen betrayals feel as personal as opening your favorite vacuum flask and getting hit with a smell that suggests “forgotten gym locker” rather than “fresh coffee.” One day your flask is a hydration hero. The next, it smells like it took a mysterious weekend trip and made bad decisions.
The good news is that musty odors in vacuum flasks are usually fixable. In most cases, the smell comes from trapped moisture, leftover drink residue, grime hiding in the lid, or a rubber gasket that has quietly become the villain of the story. Whether you use your flask for coffee, tea, soup, lemon water, or that protein shake you absolutely meant to wash out sooner, a deep cleaning routine can usually bring it back from the brink.
This guide walks you through 11 practical steps to remove musty odors from vacuum flasks, plus smart prevention tips and real-life experiences that make the advice easier to remember. No gimmicks, no weird internet wizardry, and no need to pretend the smell will somehow “air itself out.” Spoiler: it will not.
Why Vacuum Flasks Start Smelling Musty
Before you attack the stink, it helps to know what you are fighting. A musty odor usually appears when moisture gets trapped inside the flask or lid for too long. Add leftover coffee oils, tea tannins, soup residue, milk, sweeteners, or smoothie remnants, and you have the perfect setup for funky smells. The lid, spout, straw, and silicone seal are often worse than the stainless steel body, because those parts trap grime in tiny hidden spaces.
That is why simply rinsing the inside and calling it a day often does not work. The odor source is usually not “the flask” in a broad, dramatic sense. It is a narrow ring under the lid gasket plotting against your nose.
How to Remove Musty Odors from Vacuum Flasks: 11 Steps
-
Step 1: Empty the Flask and Check for the Real Problem
Pour out any old liquid and inspect the flask right away. Look inside with a flashlight if needed. Check for cloudy residue, dark spots, stuck-on film, or buildup around the mouth. Then inspect the lid, threads, mouthpiece, straw, stopper, and gasket. If the smell is strong but the interior looks clean, the culprit is often the seal or lid assembly rather than the steel body.
This first inspection matters because you do not want to spend 20 minutes deodorizing the inside of the flask while the smell is actually living rent-free inside a rubber ring.
-
Step 2: Disassemble Every Removable Part
Take the flask apart as much as the manufacturer allows. Remove the lid insert, straw, sipping spout, and rubber or silicone gasket if those parts are designed to come out. Hidden moisture and residue collect in these areas more often than people realize, and that is exactly where musty odors like to set up camp.
If your flask has a complicated lid, go slow and keep track of the pieces. You are cleaning a bottle, not auditioning for a puzzle competition.
-
Step 3: Wash Everything with Warm Water and Mild Dish Soap
Start with the least dramatic fix: warm water and mild dish soap. Wash the flask body, lid, and all removable parts thoroughly. Use a non-abrasive sponge or soft cloth for the outside and a bottle brush for the inside. Focus on the shoulder of the flask, the bottom corners, the threading, and the underside of the cap.
This basic wash removes the oils and residues that often feed bad smells. If your flask only has a mild odor, this step alone may solve the problem.
-
Step 4: Scrub Narrow Areas with the Right Tools
A proper brush makes a huge difference. Use a long bottle brush for the interior and a small detail brush, straw brush, or even a soft toothbrush for the lid grooves and gasket channel. Odors often linger because the dirtiest parts are also the hardest to reach.
Avoid steel wool, harsh scouring pads, or anything abrasive. Stainless steel is durable, but scratches can create little hangout spots for residue and future odors. In other words, do not punish your flask for having a bad week.
-
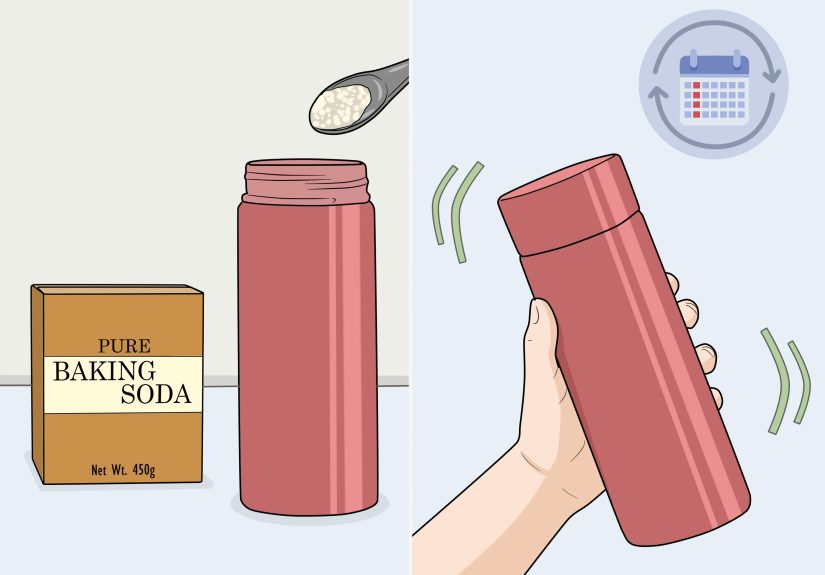
Step 5: Use a Baking Soda Soak for Everyday Mustiness
If soap and water do not fully fix the smell, move on to baking soda. Add 1 to 2 teaspoons of baking soda to the flask, fill it with warm water, and let it sit for several hours or overnight. For the lid and gasket, make a paste with baking soda and a few drops of water, then scrub gently.
Baking soda is helpful because it tackles odor without being overly harsh. It is especially useful when your flask smells stale rather than visibly dirty. Think of it as the peacekeeping diplomat of the cleaning world.
-
Step 6: Try White Vinegar for Stubborn Odor and Mineral Film
If the smell is more persistent, use white vinegar. Fill the flask partway with white vinegar, then top it off with warm water. Let it soak for a few hours, or overnight for stronger odors. Afterward, scrub and rinse thoroughly. Vinegar can also help loosen mineral deposits and stale buildup that dish soap misses.
For narrow-neck flasks, some people also use a small amount of uncooked rice with vinegar as a gentle shaking scrub. That can help dislodge residue from hard-to-reach spots. Just rinse very well afterward.
Important: never mix vinegar with bleach. That combination creates dangerous fumes, which is a terrible ending for a bottle-cleaning session.
-
Step 7: Use Cleaning Tablets for Coffee, Tea, and Mystery Stains
If your vacuum flask has been used heavily for coffee or tea, odor may be tied to stain buildup. In that case, denture tablets or bottle-cleaning tablets can work surprisingly well. Fill the flask with warm water, drop in the tablet as directed, and let it fizz away for the recommended time or overnight for stubborn staining.
This is a smart option when the flask smells “old coffee shop mop bucket” even after hand washing. Tablets are also handy for lids and removable parts that have too many curves, corners, or attitude issues for normal scrubbing.
-
Step 8: Sanitize Only When Needed, and Do It Safely
If the odor is severe, if the flask sat dirty for days, or if you suspect mold in a removable part, a sanitizing step may help. Use only a properly diluted bleach solution and only if the flask maker’s care instructions allow it. After sanitizing, rinse thoroughly and let everything air-dry completely.
Sanitizing should be the backup singer, not the lead vocalist. For routine care, soap, scrubbing, and thorough drying do most of the heavy lifting.
-
Step 9: Rinse Until There Is No Cleaner Smell Left
Whatever cleaning method you used, rinse the flask and all parts extremely well. A lot of people remove a musty smell only to replace it with a vinegar smell, bleach smell, or “mystery mint tablet” smell. That is not winning. That is just odor rebranding.
Use warm water and rinse repeatedly until the interior smells neutral. If needed, wash once more with mild soap after a vinegar or tablet soak.
-
Step 10: Dry the Flask Completely with the Lid Off
This step is non-negotiable. Place the flask upside down on a drying rack or towel and let it air-dry with the lid removed. Dry the lid, straw, and gasket separately. If you reassemble or close the flask while it is still damp, you may recreate the exact swampy conditions that caused the musty odor in the first place.
Most recurring flask odor problems are not really cleaning failures. They are drying failures wearing a fake mustache.
-
Step 11: Replace Worn Seals or Damaged Parts if the Smell Keeps Coming Back
If you have cleaned thoroughly and the musty odor returns fast, inspect the gasket and lid again. Silicone seals can absorb smells over time, especially after repeated contact with coffee, soup, sugary drinks, or milk-based beverages. Cracked, warped, or permanently smelly parts may need to be replaced.
Also replace the flask if the interior lining is damaged, if there are unreachable crevices, or if the lid no longer fits correctly. At some point, “deep clean” stops being a routine and starts becoming a hostage negotiation.
How to Keep Musty Odors from Coming Back
Once your vacuum flask is finally fresh again, a few habits will help keep it that way:
- Wash it promptly after using coffee, tea, soup, smoothies, or anything sweet.
- Do not store it sealed while damp.
- Remove and clean the lid gasket regularly.
- Use a bottle brush instead of relying on a quick rinse.
- Check whether your lid or flask is dishwasher-safe before using the dishwasher.
- Deep-clean it periodically with baking soda, vinegar, or cleaning tablets.
- Store it open when not in use for long periods.
If you use your flask only for plain water, you can usually get by with a simpler cleaning routine. But if it regularly carries coffee, tea, broth, electrolytes, or protein drinks, clean it sooner rather than later. Sugary liquids and flavored beverages do not leave quietly.
Common Mistakes That Make Flask Odors Worse
Some cleaning habits sound reasonable but actually make odor issues worse. One is sealing the flask right after rinsing it. Another is ignoring the lid because “the inside looks fine.” Yet another is using abrasive scrubbers that scratch the surface and make future buildup easier. Some people also jump straight to strong cleaners without doing a basic soap-and-brush wash first, which is like calling in a helicopter for a paper cut.
And finally, never use random internet potion recipes that combine multiple cleaners. Stick with proven methods, use one cleaning approach at a time, and rinse thoroughly between steps.
What This Looks Like in Real Life: Musty Flask Experiences and Lessons Learned
In real life, musty flask odors rarely show up in glamorous ways. They usually arrive after ordinary human chaos. Someone leaves coffee in the flask overnight. Someone forgets a protein shake in a school bag. Someone rinses the bottle, screws the cap back on while it is still wet, and confidently assumes the situation is under control. Then, two days later, the lid opens and everyone in the room learns a valuable lesson.
One of the most common experiences is the “coffee flask surprise.” A person uses a vacuum flask every weekday, gives it a quick rinse at night, and assumes stainless steel is basically magic. But coffee oils cling to the interior, especially around the neck and under the lid. Over time, the smell changes from pleasant roast to damp diner rag. The fix is usually not complicated, but it does require more than a heroic splash of tap water. A real wash, a brush, and attention to the gasket make all the difference.
Another familiar scenario is the travel mug or flask used for soup. Soup sounds harmless until a tiny amount dries in the lid threads or under the stopper. Then the flask develops a smell that is somehow both savory and suspicious. People often scrub the inside beautifully and still cannot get rid of the odor because the real problem is hiding in the cap. Once they remove the seal and clean every groove, the mystery finally ends.
Then there is the classic gym-and-backpack situation. A flask gets tossed into a bag after practice, half-finished flavored water still inside, and sits there overnight. The next day it smells stale. By day three, it smells like regret. In these cases, baking soda or vinegar usually helps, but the bigger lesson is prevention: empty the flask the same day, dry it fully, and do not let the lid trap moisture for a weekend.
Families also run into the lid problem with kids’ drink containers. The bottle body may look spotless, but the mouthpiece, straw, or seal can hold onto smells far longer. Parents often discover that the part creating the odor is tiny, removable, and shockingly gross once detached. It is not fun, but it is useful. Once you know where odors hide, future cleanups become much faster.
Perhaps the most relatable experience of all is realizing that the flask was never “broken.” It was just not being cleaned in a way that matched how it was used. A flask that holds plain water all day needs one kind of routine. A flask that cycles through coffee, soup, lemon water, and post-workout shakes needs a stricter one. The people who have the least trouble are not necessarily the neatest. They are usually the ones who built a simple habit: wash, dry, store open, repeat.
That is really the whole secret. Musty odors in vacuum flasks are annoying, but they are usually not mysterious. They come from residue, trapped moisture, and neglected small parts. Once you clean the flask thoroughly and change the routine that caused the smell, the problem usually stops feeling dramatic. Your flask can go back to doing what it does best: keeping drinks hot or cold, instead of moonlighting as a portable swamp.
Conclusion
If your vacuum flask smells musty, do not panic and do not throw it out too quickly. In most cases, the solution is simple: disassemble the lid, wash with warm soapy water, scrub the tight spots, use baking soda or vinegar for odors, try cleaning tablets for stubborn buildup, and let every part dry completely before reassembling. If the smell still lingers, replace the gasket or damaged parts.
A clean flask should smell like nothing at all. That is the dream. Not lavender. Not bleach. Not old espresso. Just glorious, boring, odor-free nothing. Aim for that.


