Table of Contents >> Show >> Hide
- What a Flush Valve Does (and Why It Fails)
- Tools and Parts Checklist
- Before You Buy: Identify Flush Valve Size and Style
- Safety and Setup: Do This First
- Step-by-Step: Replace a Standard Flapper-Style Flush Valve
- Step 1: Disconnect the Supply Line
- Step 2: Remove the Flapper Chain and Tank Hardware
- Step 3: Remove the Old Flush Valve
- Step 4: Clean the Tank Opening and Seal Surfaces
- Step 5: Install the New Flush Valve
- Step 6: Reinstall the Tank-to-Bowl Gasket and Tank Bolts
- Step 7: Reattach the Flapper and Chain
- Step 8: Reconnect the Supply Line and Turn Water Back On
- Dial It In: Water Level and Refill Tube
- If You Have a Canister/Tower Flush Valve (Kohler/TOTO-Style)
- Troubleshooting After Installation
- When to Call a Plumber (No Shame, Just Strategy)
- Maintenance Tips to Make Your Repair Last
- Conclusion
- Common DIY Experiences and Lessons Learned (Extra )
- 1) The “I Turned the Water Off… I Think?” Moment
- 2) Rusted Tank Bolts: The Boss Level of Toilet Repairs
- 3) Overtightening Is Everyone’s First Mistake
- 4) The Sneaky “Chain Problem”
- 5) Buying the Wrong Size (2-Inch vs 3-Inch) Happens a Lot
- 6) The “It’s Still Running” Plot Twist (Fill Valve Edition)
- 7) The Best Feeling: A Dry Floor and a Quiet Tank
A toilet that runs forever (or “ghost flushes” in the middle of the night like it’s haunted) can waste a surprising amount of water and quietly inflate your bill.
The good news: replacing a toilet flush valve is a very doable DIY repair if you work slowly, keep track of parts, and treat the porcelain tank like the fragile, expensive cookie jar it is.
This guide walks you through how to replace a toilet flush valve step by step, including how to choose the right replacement, what tools you actually need,
and how to test everything so you’re not back in here next weekend pretending you “meant” to learn plumbing.
What a Flush Valve Does (and Why It Fails)
Inside your toilet tank, the flush valve is the assembly in the center that releases tank water into the bowl during a flush. It typically includes:
the drain opening, an overflow tube, and a seal system (a flapper or a canister/tower seal). When that sealing surface wears out, water can leak from the tank into the bowl,
causing constant refilling, phantom flushing, or weak flush performance.
Common Signs You Need a Flush Valve Replacement (Not Just a Flapper)
- You replaced the flapper but the toilet still runs or leaks into the bowl.
- The flush valve seat (the rim the flapper seals against) is pitted, warped, or crusted with mineral buildup that won’t clean up.
- Your toilet has a one-piece flapper/overflow design where the flapper is integrated and the easiest fix is swapping the whole assembly.
- The overflow tube or flush valve body is cracked (even a small crack can cause a persistent leak).
- You have a tower/canister style valve and the seal ring keeps leaking or the flush feels inconsistent even after adjustments.
Quick reality check: many “running toilet” issues really are just the flapper or the fill valve. But if you’ve tried the simple fixes and the leak persists,
replacing the entire flush valve is the clean, long-term solution.
Tools and Parts Checklist
Tools
- Adjustable wrench
- Channel-lock pliers (very helpful for stubborn locknuts)
- Large flathead screwdriver (for tank bolts on many toilets)
- Bucket and sponge (or a wet/dry vac if you’re feeling fancy)
- Old towel or rags
- Optional: mini hacksaw blade (only if tank bolts are badly rusted)
Parts You May Need
- Replacement flush valve kit (correct size and style)
- New tank-to-bowl gasket (often included, sometimes sold separately)
- New tank bolts and rubber washers (highly recommended if yours are corroded)
- Supply line (optional, but consider replacing if it’s old or kinked)
Tip: If your toilet is older and the hardware looks like it survived three decades of humidity and bad decisions, replacing the bolts and gasket during this job
can prevent leaks later. It’s cheaper than discovering a puddle at 2 a.m.
Before You Buy: Identify Flush Valve Size and Style
Step 1: Figure Out If You Have a 2-Inch or 3-Inch Flush Valve
Most toilets use either a 2-inch or 3-inch flush valve opening. The easiest way is to remove the tank lid, look at the opening at the bottom,
and measure across the drain hole (or compare the flapper size: 3-inch systems look noticeably larger).
- 2-inch is very common and often found on many older and standard toilets.
- 3-inch is also common on newer “higher performance” toilets and larger flush systems.
Step 2: Confirm the Style: Flapper vs. Canister/Tower
A flapper-style flush valve uses a rubber flapper that lifts with a chain when you press the handle.
A canister/tower-style valve uses a vertical tower or canister that lifts or twists, sealing with a ring or gasket.
If your toilet is a specific brand/model (especially some modern designs), manufacturer-specific parts may fit best.
If you’re unsure, take a few clear photos inside the tank before heading to the store. In the U.S., big-box home improvement stores carry universal kits,
but matching the style and size makes the job smoother and reduces “why is this not lining up?” moments.
Safety and Setup: Do This First
- Clear the area. Put down a towel and move anything that doesn’t want to meet toilet water.
-
Turn off the water supply. The shutoff valve is typically behind the toilet near the wall. Turn it clockwise until it stops.
If it won’t fully shut off, you may need to shut off the main water supply for the house. -
Flush and drain the tank. Flush the toilet and hold the handle down to drain as much water as possible.
Use a sponge to remove the remaining water from the bottom of the tank into a bucket. - Remove the tank lid carefully. Set it somewhere safe (porcelain lids love to chip when placed on hard surfaces).
Step-by-Step: Replace a Standard Flapper-Style Flush Valve
These steps apply to most common two-piece toilets with a flapper and overflow tube as part of the flush valve assembly.
You’ll typically remove the tank to access the flush valve locknut underneath.
Step 1: Disconnect the Supply Line
- Place a bucket under the connection where the supply line meets the bottom of the tank (at the fill valve).
- Use an adjustable wrench to loosen the coupling nut and disconnect the supply line.
- Let any leftover water drain into the bucket.
Step 2: Remove the Flapper Chain and Tank Hardware
- Unclip the chain from the flush handle lever (trip lever) inside the tank.
-
Locate the tank bolts (usually two) at the bottom of the tank. Hold the bolt head inside the tank with a screwdriver while loosening the nut underneath with a wrench.
If the nuts are severely corroded, you may need a hacksaw blade to cut the bolts. - Lift the tank straight up off the bowl and place it on a towel on a stable surface.
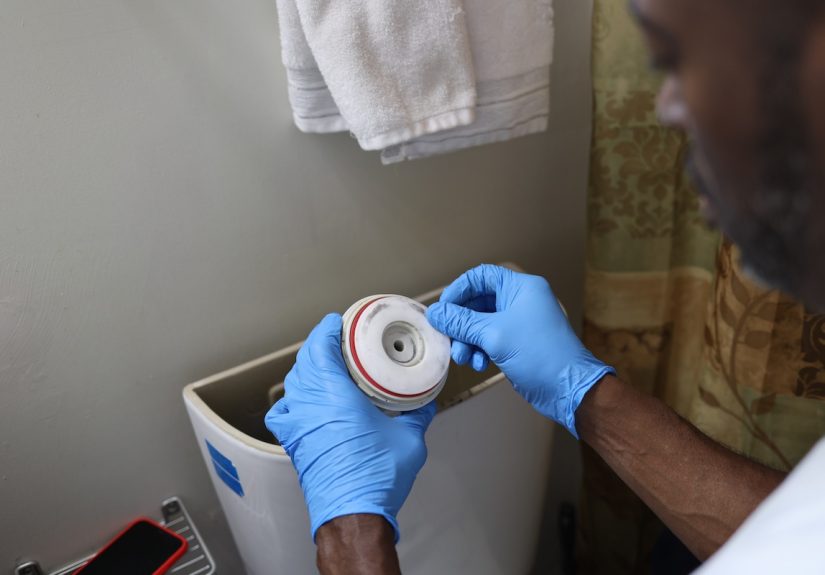
Step 3: Remove the Old Flush Valve
- Flip the tank carefully on its side so you can access the underside.
- Remove the large tank-to-bowl gasket (the thick “donut” gasket around the flush valve tailpiece).
- Use channel-lock pliers or a large wrench to loosen the big plastic locknut holding the flush valve to the tank.
- Pull the old flush valve assembly out from inside the tank.
Step 4: Clean the Tank Opening and Seal Surfaces
This is the unglamorous step that makes the difference between “perfectly dry” and “why is there a drip?”
Wipe the porcelain around the tank drain hole, removing debris, rubber residue, and mineral buildup.
A clean sealing surface helps the new gasket seat properly.
Step 5: Install the New Flush Valve
- Insert the new flush valve into the tank opening from inside the tank.
- Make sure the internal rubber gasket/washer is seated correctly against the inside of the tank.
- From underneath, thread on the locknut and tighten it snugly. Do not over-tightenplastic parts can crack, and porcelain tanks don’t forgive.
- Align the overflow tube so it sits vertically and matches the kit instructions (some valves rotate to lock into position).
Step 6: Reinstall the Tank-to-Bowl Gasket and Tank Bolts
- Slide the new tank-to-bowl gasket onto the flush valve tailpiece (or install it as your kit directs).
- Install tank bolts with rubber washers (usually rubber goes inside the tank, metal/rubber stack depends on the kit).
- Set the tank back onto the bowl, aligning the flush valve opening with the bowl inlet.
-
Tighten the bolt nuts evenly, alternating sides a little at a time.
Stop when the tank is stable and level. Over-tightening can crack the tank or deform washers.
Step 7: Reattach the Flapper and Chain
- Attach the flapper to the flush valve mounting points.
-
Connect the chain to the flush handle lever with a little slack.
Too tight: the flapper won’t seal. Too loose: weak flush because the flapper closes too soon.
Step 8: Reconnect the Supply Line and Turn Water Back On
- Reconnect the supply line to the fill valve shank under the tank (hand-tighten, then snug gently with a wrench).
- Turn on the shutoff valve slowly and let the tank fill.
- Watch for leaks at: the supply connection, tank bolts, and the tank-to-bowl gasket area.
Dial It In: Water Level and Refill Tube
For a reliable flush, set the tank water level correctly. A common rule is to keep water about
1/2 inch to 1 inch below the top of the overflow tube (or follow the waterline mark on the tank, if present).
Also confirm the refill tube from the fill valve is clipped to the overflow tube so the bowl refills properly after each flush.
If You Have a Canister/Tower Flush Valve (Kohler/TOTO-Style)
Some toilets use a tower or canister system instead of a flapper. In many of these designs, leaks can be fixed by replacing or cleaning a seal ring
rather than swapping the entire flush valve body. The exact method varies by model, so check your manufacturer’s documentation when possible.
General Canister/Tower Seal Steps (Typical Process)
- Shut off water, flush, and sponge out the remaining tank water.
- Remove the tank lid and set it safely aside.
- Release the actuator/gearbox or clip system (varies by brand/model).
- Rotate or unlock the flush tower and lift it out.
- Remove the rubber seal gasket/ring, rinse it, and inspect it. Replace if warped, nicked, or stiff.
- Reinstall the seal, seat the tower back into place, and lock it.
- Reassemble the actuator parts, turn water back on, and test flush performance and leaks.
Important: Some manufacturer manuals warn against using certain in-tank chemical cleaners because they can damage tank components and seals over time.
If your toilet’s seals keep failing, check whether your cleaning products are the undercover culprit.
Troubleshooting After Installation
Problem: Toilet Still Runs
- Chain too tight: add slack so the flapper fully closes.
- Flapper not centered: reseat it on the mounting points.
- Water level too high: adjust the fill valve so water sits below the overflow tube.
- Fill valve issue: if water is flowing down the overflow tube, the fill valve may be the real problem.
Problem: Weak Flush
- Flapper closing too fast: shorten the chain slightly (but not tight).
- Water level too low: adjust the fill valve float/setting upward.
- Refill tube not positioned correctly: clip it to the overflow tube.
Problem: Leaks Under the Tank
- Tank bolts leaking: ensure rubber washers are inside the tank and nuts are evenly snugged.
- Tank-to-bowl gasket leaking: confirm gasket is seated flat and tank is level.
- Flush valve locknut seep: gently snug the locknut; avoid over-tightening.
When to Call a Plumber (No Shame, Just Strategy)
- The tank or bowl is cracked (replacement is usually the safest route).
- The shutoff valve won’t close and you’re not comfortable shutting off the main.
- Hardware is fused with corrosion and you’re close to breaking porcelain.
- You have a specialty toilet system (pressure-assisted, in-wall carrier, or brand-specific parts that don’t match universal kits).
Maintenance Tips to Make Your Repair Last
- Check the tank once or twice a year for slow leaks (a few drops of food coloring in the tank can reveal silent leaks in the bowl).
- Avoid harsh in-tank cleaners if your manufacturer warns against them.
- If your water is hard, periodically wipe mineral buildup around seals and moving parts.
- Replace worn rubber parts proactivelysmall parts are cheaper than big water bills.
Conclusion
Replacing a toilet flush valve sounds dramaticlike something that should require a tool belt and a theme songbut it’s really a careful, step-by-step job:
shut off water, drain the tank, remove the tank (for most designs), swap the flush valve, reinstall with fresh seals, then test and adjust.
Take your time, tighten evenly, and you’ll end up with a toilet that flushes like it’s proud of you.
Common DIY Experiences and Lessons Learned (Extra )
Since you’re publishing this on the web, here’s the part readers love: the “real life” stuff that doesn’t always show up on the side of the box.
These are common experiences homeowners report when learning how to replace a toilet flush valve step by stepplus what they wish they’d known earlier.
1) The “I Turned the Water Off… I Think?” Moment
A lot of DIYers assume the shutoff valve is fully closed because it “got tighter.” Then they disconnect the supply line and discover the valve is more of a suggestion than a stop.
If the valve won’t shut off completely, don’t fight it with brute forceolder valves can break. Instead, close the main water supply (if you know where it is),
or pause and call a plumber. It’s better than turning your bathroom into a small indoor lake.
2) Rusted Tank Bolts: The Boss Level of Toilet Repairs
Tank bolts often look innocent until you try to loosen them. If they’re heavily corroded, the nut may not budgeor it may crumble like a cookie.
Many people end up cutting the bolts with a hacksaw blade. The lesson: plan to replace the bolts. New bolt kits are inexpensive, and you’ll get fresh rubber washers,
which dramatically reduces the chance of future leaks.
3) Overtightening Is Everyone’s First Mistake
It’s natural to think “tighter is safer.” But toilets are a weird mix of plastic, rubber, and porcelain, and each one has a different definition of “enough.”
Over-tightening a plastic locknut can crack it. Over-tightening tank bolts can crack the tank. The best approach is steady, even tightening:
snug, check alignment, snug again, and stop when the tank is stable and seals are compressednot flattened into oblivion.
4) The Sneaky “Chain Problem”
After installing a new flapper or flush valve, a surprisingly common issue is a toilet that runs intermittently. Often the flapper isn’t sealing because the chain is too tight,
holding it slightly open. Or the chain is too loose and slips under the flapper. A good rule is a little slack: enough that the flapper sits flat, but not so much that the chain tangles.
Many DIYers fix their “mystery leak” in 10 seconds just by moving the chain to a different hole on the lever.
5) Buying the Wrong Size (2-Inch vs 3-Inch) Happens a Lot
People frequently eyeball the opening and guess. Then they get home and the new flush valve looks like it belongs on a different planet.
Measuring the opening (or bringing the old part to the store) saves time. If your readers only remember one prep step, make it this one:
confirm size and style before you buy.
6) The “It’s Still Running” Plot Twist (Fill Valve Edition)
Sometimes readers replace the flush valve and the toilet still runsbecause water is actually spilling into the overflow tube due to a fill valve that won’t shut off.
The takeaway: if you see water trickling into the overflow tube, adjust or replace the fill valve. Flush valve problems usually leak into the bowl through the drain opening;
fill valve problems often show up as water constantly topping off and going down the overflow tube.
7) The Best Feeling: A Dry Floor and a Quiet Tank
DIYers often describe the final “win” as walking away, coming back 10 minutes later, and seeing no drips under the tankand hearing no refilling noise.
It’s the kind of home repair victory that makes you stand a little taller, even if you’re still holding a sponge like a trophy.


