Table of Contents >> Show >> Hide
- What Is Chebakia?
- Flavor Profile
- Ingredients
- Equipment You’ll Be Glad You Have
- Step-by-Step Moroccan Chebakia
- Chebakia Success Tips
- Common Problems and Fixes
- Variations (Still Very Chebakia, Just With Personality)
- Serving Ideas
- Storage and Make-Ahead
- Kitchen “Experiences” That Make Chebakia Easier (and More Fun)
- SEO Tags
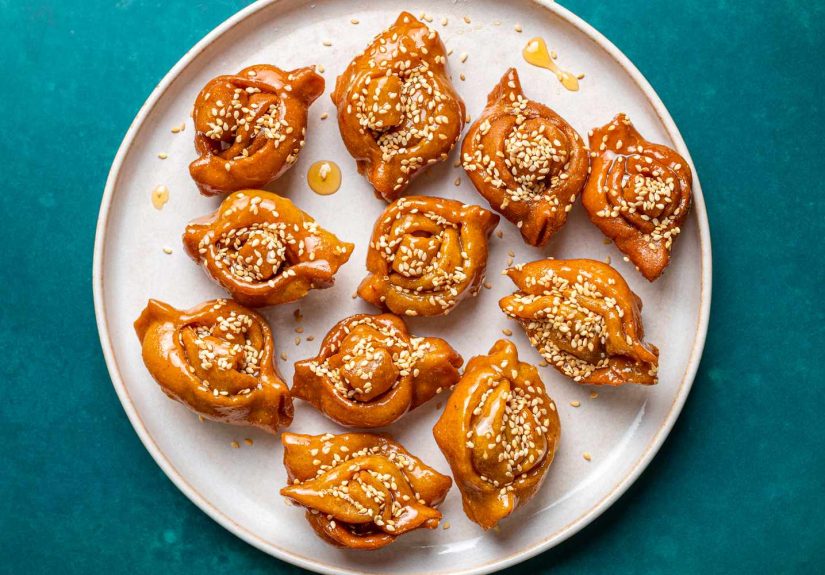
If a cookie and a doughnut had a very fancy Moroccan baby, it would be chebakia (also spelled chebbakia/shebakia and sometimes called
halwa chebakia or mkharka). These are flower-shaped, sesame-rich pastries that get fried until golden, then
take a luxurious dip in orange-blossom honey and come out glossy, fragrant, and dangerously snackable.
Chebakia is famous during Ramadan and special occasions, often served alongside harira (a hearty Moroccan soup),
plus dates and mint teabasically the dream “break-the-fast” spread. It’s also a team sport: many families make big batches together because shaping each
piece is the delicious kind of time-consuming. Don’t worry, thoughthis guide breaks it down so you can make it at home without needing to recruit your
entire extended family (but you’re welcome to).
What Is Chebakia?
Chebakia is a traditional Moroccan sesame pastry shaped into a flower/rose form, fried, and then coated in honey flavored with orange blossom water.
The dough is typically spiced with warm aromatics like anise, cinnamon, and often saffron and
turmeric for that signature golden hue. The result is a cookie that’s crisp on the outside, pleasantly chewy inside, and perfumed like a
pastry shop next to a blooming citrus grove.
Flavor Profile
- Sesame-forward: toasted sesame is the backbone (earthy, nutty, rich).
- Warm spices: anise + cinnamon (sometimes fennel) give a cozy, aromatic depth.
- Floral-citrus finish: orange blossom water in the dough and/or honey makes it unmistakably Moroccan.
- Honey gloss: not cloying if balancedthink sweet, sticky, and bright.
Ingredients
This makes a generous batch (about 45–60 cookies depending on size).
For the Dough
- 1 cup (150 g) sesame seeds, toasted and cooled (plus extra for garnish)
- 3 1/2 to 4 cups (440–510 g) all-purpose flour (start with 3 1/2 cups, add as needed)
- 2 tsp baking powder
- 1/2 tsp fine salt
- 1 1/2 tsp ground anise
- 1 tsp ground cinnamon
- 1/2 tsp ground turmeric (optional, for color)
- Pinch of saffron threads, crumbled (optional but lovely)
- 1 tsp instant yeast
- 1/4 tsp sugar (to help bloom yeast)
- 1 large egg (or 1 egg + 1 yolk for richer dough)
- 1/4 cup (60 ml) olive oil
- 1/4 cup (60 ml) melted unsalted butter
- 2–3 tbsp neutral oil (sunflower/vegetable)
- 1/4 cup (60 ml) white vinegar (yes, reallytenderizes and helps texture)
- 1/4 cup (60 ml) orange blossom water (or 2 tbsp if you want it subtle)
- 1/4 to 1/2 cup warm water (as needed for dough consistency)
- Optional: pinch of mastic or gum arabic (traditional aroma/texture boost)
For Frying + Honey Bath
- Vegetable oil for frying (enough for about 1–2 inches depth in a pan)
- 3 to 4 cups honey (you want enough for a real “bath,” not a “sad puddle”)
- 2 tbsp orange blossom water (stir into warm honey off heat)
- 1–2 tbsp lemon juice (optional; helps keep honey bright and less prone to crystallizing)
- Toasted sesame seeds for sprinkling
Equipment You’ll Be Glad You Have
- Heavy-bottomed pot or deep skillet (stable frying temperature)
- Candy/deep-fry thermometer (optional, but it makes life calmer)
- Slotted spoon or spider strainer
- Sheet pans or trays + clean towels (to hold shaped dough)
- Fluted pastry wheel/cutter (pretty edges, classic look)
- Small sharp knife (for the inner cuts)
- Food processor/spice grinder (for sesame)
Step-by-Step Moroccan Chebakia
1) Toast and Grind the Sesame
Toast sesame seeds in a dry skillet over medium heat, stirring often, until golden and fragrant. Cool completely.
Grind most of the sesame into a coarse powder (not peanut-butter smooththink “sandy”).
Reserve a handful of toasted seeds for garnishing later.
2) Bloom the Saffron and Yeast
If using saffron, steep it in a tablespoon of warm water (or a tablespoon of orange blossom water) for 5–10 minutes.
In a separate small bowl, dissolve yeast and sugar in a few tablespoons of warm water and let it get foamy (about 5 minutes).
This is your “proof-of-life” moment.
3) Mix the Dough
In a large bowl, whisk together flour (start with 3 1/2 cups), ground sesame, baking powder, salt, anise, cinnamon,
turmeric, and optional mastic/gum arabic.
Add egg, olive oil, melted butter, neutral oil, vinegar, orange blossom water, the bloomed saffron (if using), and the yeast mixture.
Mix and knead until you get a stiff-but-pliable doughsimilar to a soft modeling clay. If it’s dry and cracking, add warm water
a tablespoon at a time. If it’s sticky, add flour in small increments.
4) Rest the Dough
Cover the dough and let it rest 20–30 minutes. This relaxes the gluten so rolling is easier and the dough won’t fight you like a stubborn lid on a pickle jar.
5) Roll and Cut
Divide dough into 3–4 pieces (keep the rest covered so it doesn’t dry out). Roll one piece thinabout the thickness of thin cardboard.
Cut into rectangles roughly the size of your palm (about 2 1/2 x 4 inches).
In each rectangle, make 4 evenly spaced cuts lengthwise, stopping before the edges so the strips remain attached. You should end up with 5 “fingers” of dough.
6) Shape the Classic Flower
Here’s the simple version: gently pinch the rectangle at the center to open the cuts, then weave or “thread” alternating strips through the middle to form a layered flower.
Don’t stress if your first few look like abstract art. Abstract art can still be delicious.
Place shaped chebakia on trays and cover lightly with a towel while you shape the rest.
7) Warm the Honey (and Set Up a “Fry Station”)
Warm honey in a wide pot until hot and fluidsteaming and foamy is fine, but you don’t want a hard boil. Turn off the heat and stir in orange blossom water
(and lemon juice if using). Keep it warm so it soaks easily.
8) Fry Low and Slow
Heat 1–2 inches of oil to about 325°F (163°C). Fry in small batches so the oil temperature doesn’t crash.
Cook until deep golden, turning as needed. A gentler temperature helps cook the inner layers without scorching the outside.
9) Honey Bath + Sesame Shower
Transfer fried chebakia directly into warm honey. Let them soak for several minutes so the layers drink up sweetness and shine.
Lift out to a strainer/colander to drain briefly, then pile onto a platter and sprinkle with toasted sesame seeds while still sticky.
Chebakia Success Tips
Get the Dough Texture Right (It Matters More Than You Think)
- Too dry: it cracks while shaping. Add warm water 1 tbsp at a time and knead again.
- Too soft/sticky: it loses definition in the oil. Add flour gradually until it’s pliable but firm.
Roll Thin for Better Layering
Thick dough makes bulky flowers that don’t crisp properly. Thin dough creates that signature layered look and a better crunch-to-chew ratio.
Keep Oil Temperature Steady
Hot oil browns too fast and leaves the center undercooked. Cooler oil makes greasy pastries. Aim for a steady medium-low fry.
Warm Honey, Off-Heat Orange Blossom
Adding orange blossom water off heat preserves its delicate aroma. If the honey is too thick, a tiny splash of water (or lemon juice) can help loosen it.
Common Problems and Fixes
“My chebakia unravels while frying.”
- Your dough may be too wet, or the strips weren’t tucked securely. Firm up dough with a little flour and pinch the center more decisively.
- Don’t overcrowd the panbumping can undo shapes.
“They’re hard instead of tender-chewy.”
- Dough may be over-floured or rolled too thick. Use the minimum flour needed and roll thin.
- They may have fried too hotfast browning can lead to tough texture.
“My honey crystallized.”
- Warm gently to smooth it out. A little lemon juice can help discourage crystallization.
- Store chebakia in a sealed container once fully cool to reduce moisture swings.
Variations (Still Very Chebakia, Just With Personality)
Nutty Boost
Some modern versions include a bit of almond meal in the dough for extra richness. It’s not mandatory, but it’s very “I brought snacks and emotional support.”
Spice Tweaks
Add a pinch of ground fennel or a hint of clove for deeper warmth. Keep it subtlechebakia should taste perfumed, not like a candle aisle.
Honey Syrup Add-Ons
A thin strip of lemon peel simmered in honey adds brightness. You can also add a whisper of cinnamon stick while warming honey, then remove it.
Serving Ideas
- Classic: with Moroccan mint tea.
- Ramadan-style: alongside harira, dates, and tea for a sweet-savory balance.
- Dessert board: pair with oranges, toasted nuts, and dark coffee.
Storage and Make-Ahead
How to Store
Once completely cool, store in an airtight container at room temperature. Chebakia keeps well for several days and often tastes even better after the flavors settle.
Make-Ahead Strategy
- Toast and grind sesame in advance.
- Make and shape the dough earlier in the day, then fry and honey-coat when you’re ready.
- If making a big batch, recruit one helper: one shapes, one fries. Suddenly you’re a Moroccan pastry production line (in the best way).
Kitchen “Experiences” That Make Chebakia Easier (and More Fun)
The first time you make chebakia, you’ll likely have a moment where you stare at the cut rectangle of dough and think,
“How does this become a flower and not… a sad sea creature?” That moment is normal. Chebakia is one of those recipes where the written steps are helpful,
but the real learning happens in your handsafter three or four tries, your fingers suddenly understand what your brain was arguing about.
Many home cooks notice the biggest emotional plot twist isn’t the fryingit’s the shaping. The dough feels a little like pasta dough:
firm, slightly elastic, and cooperative only when it’s in the mood. If it’s too dry, it cracks as you thread the strips; if it’s too soft, your flower loses
definition and looks like it melted from embarrassment. The sweet spot is a dough that feels like soft modeling clay: it bends without tearing and holds its shape
when you pinch the center. If you hit that texture, shaping becomes oddly relaxinglike edible origami.
Then comes the sensory part that makes chebakia unforgettable. As the first batch fries, your kitchen starts smelling like toasted sesame and warm spice.
It’s the kind of aroma that makes people wander in and ask, “What’s happening in here?”even if they were perfectly content five minutes ago.
When the pastries turn golden, you lift them out, and they look pretty… but not spectacular yet. The real magic happens when they go into the warm honey:
they darken into a glossy amber and suddenly look like something from a pastry shop window.
The honey bath is also where you learn patience. If you dunk and pull them out too quickly, the coating sits on the surface like a jacket that doesn’t fit.
Give them timeseveral minutesso the layers absorb honey and become fragrant, shiny, and cohesive. This is also why chebakia can feel “not too sweet” compared to
what you’d expect: it’s sweet, yes, but it’s balanced by sesame, spice, and that floral citrus note. It’s more “honeyed and aromatic” than “sugar bomb.”
If you’re making chebakia for Ramadan or a holiday table, you’ll probably notice how naturally it turns into a shared project. One person can cut rectangles,
another can shape, someone else can manage the oil, and suddenly the kitchen feels like a little assembly line with laughter and snacks.
Even if you’re cooking solo, you can create that same vibe by setting up stations: dough on one side, tray in the middle, fryer and honey pot on the other.
Put on music, work in small batches, and treat the process like an event rather than a chore.
And here’s the honest truth: your first chebakia might not look “perfect.” But it will still taste incrediblebecause fried sesame dough soaked in orange-blossom
honey is basically a cheat code for joy. By batch two, your flowers will look more flower-like. By batch three, you’ll start guarding the cooling platter with the
quiet intensity of someone protecting treasure. Consider yourself warned.


