Table of Contents >> Show >> Hide
- Why This No-Knead Skillet Focaccia Works
- No-Knead Skillet Focaccia Recipe
- Step-by-Step Instructions
- Best Toppings for Skillet Focaccia
- Tips for Perfect No-Knead Focaccia
- Common Problems and Easy Fixes
- How to Serve No-Knead Skillet Focaccia
- How to Store and Reheat Focaccia
- Make-Ahead Strategy
- Nutrition and Practical Notes
- of Real Kitchen Experience: What This Recipe Teaches You
- Conclusion
- SEO Tags
If homemade bread makes you imagine flour on the ceiling, dough stuck to your elbows, and a stand mixer groaning like it has student loans, this No-Knead Skillet Focaccia Recipe is here to calm everyone down. Focaccia is the friendly bread. It does not ask you to braid, score, laminate, or whisper compliments in Italian. It only asks for flour, water, yeast, salt, olive oil, time, and a skillet that knows how to hold heat like a grudge.
This recipe gives you a golden, crispy-edged focaccia with a soft, airy middle and the kind of olive oil flavor that makes people suddenly “not very hungry” while eating half the pan. The no-knead method relies on hydration and time instead of elbow grease. In plain kitchen language: you stir the dough, let it rest, move it into an oiled skillet, dimple it like you are politely poking a very puffy pillow, and bake until the edges turn beautifully crisp.
The result is rustic, impressive, and shockingly easy. It works as a side for soup, a base for sandwiches, a snack with balsamic vinegar, or a dinner-table peace offering when the pasta is running late.
Why This No-Knead Skillet Focaccia Works
The magic of no-knead focaccia is simple: a wet dough develops structure while it rests. Instead of kneading for 10 minutes, you let the flour absorb water and allow gluten to form slowly. Time does the heavy lifting, which is excellent news for anyone whose workout plan does not include wrestling bread dough.
A skillet, especially cast iron, makes this recipe extra satisfying. The heavy pan heats evenly and helps fry the bottom of the bread in olive oil as it bakes. That is why skillet focaccia has such a crave-worthy contrast: crisp and golden underneath, chewy around the edges, and tender inside.
The Key Details
High hydration: This dough is sticky on purpose. Do not panic and add a snowstorm of flour. A wet dough creates the open, bubbly crumb that makes focaccia look bakery-worthy.
Olive oil: Focaccia is not shy about oil. It flavors the bread, prevents sticking, and creates those crisp edges everyone fights over in a very civilized, “I was just evening the slice” sort of way.
Slow rise: An overnight rest in the refrigerator builds flavor and gives the dough better texture. Same-day focaccia can work, but overnight focaccia tastes deeper, more developed, and less like it rushed through airport security.
No-Knead Skillet Focaccia Recipe
Recipe Overview
- Prep time: 15 minutes active time
- Rise time: 8 to 24 hours overnight, plus 1 1/2 to 3 hours before baking
- Bake time: 22 to 28 minutes
- Total time: About 10 hours to 1 day, mostly hands-off
- Yield: One 10-inch skillet focaccia, about 6 to 8 servings
- Best pan: 10-inch cast iron skillet or oven-safe heavy skillet
Ingredients
- 2 1/2 cups all-purpose flour, about 300 grams
- 1 teaspoon instant yeast
- 1 teaspoon fine sea salt or kosher salt
- 1 teaspoon sugar or honey, optional but helpful for browning
- 1 cup plus 2 tablespoons lukewarm water, about 270 grams
- 4 tablespoons extra-virgin olive oil, divided
- 1 tablespoon chopped fresh rosemary
- 1/2 teaspoon flaky sea salt, for topping
- 2 cloves garlic, thinly sliced or grated, optional
- Optional toppings: cherry tomatoes, olives, caramelized onions, parmesan, black pepper, or thinly sliced red onion
Step-by-Step Instructions
Step 1: Mix the Dough
In a large mixing bowl, whisk together the flour, instant yeast, salt, and sugar. Add the lukewarm water and 1 tablespoon of olive oil. Stir with a sturdy spoon or rubber spatula until no dry flour remains. The dough should look shaggy, sticky, and slightly messy. That is correct. Bread dough is allowed to have an awkward phase.
Cover the bowl with plastic wrap, a lid, or a damp kitchen towel. Let it sit at room temperature for 20 to 30 minutes so the flour can hydrate.
Step 2: Let Time Do the Kneading
Place the covered bowl in the refrigerator for 8 to 24 hours. During this cold fermentation, the dough will slowly rise and develop flavor. It may double in size, form bubbles, and look alive in a friendly way. If it looks slightly slack or wobbly, that is normal for focaccia dough.
If you are short on time, you can let the dough rise at room temperature for 3 to 4 hours instead. The flavor will be milder, but the bread will still be delicious.
Step 3: Oil the Skillet
Pour 2 tablespoons of olive oil into a 10-inch cast iron skillet. Tilt the skillet so the oil coats the bottom and sides. Be generous here. The oil creates the crispy bottom crust and keeps the bread from sticking. A dry skillet is how focaccia becomes a relationship test.
Step 4: Transfer and Fold the Dough
Lightly oil your hands. Remove the dough from the refrigerator. Gently loosen it from the sides of the bowl and fold the edges toward the center a few times. You are not kneading; you are simply encouraging the dough into a loose ball.
Transfer the dough to the oiled skillet. Turn it over once so both sides get coated in olive oil. Let it rest for 15 minutes, then gently stretch it toward the edges of the pan. If it resists, stop and let it rest another 10 minutes. Dough has boundaries. Respect them and it will cooperate.
Step 5: Final Rise
Cover the skillet loosely and let the dough rise in a warm spot for 1 1/2 to 3 hours, or until puffy and jiggly. The timing depends on your kitchen temperature. A cool kitchen slows the rise; a warm kitchen speeds it up. The dough should expand toward the edges of the skillet and show visible bubbles.
To test readiness, gently poke the dough with an oiled finger. If the indentation slowly springs back but remains slightly visible, it is ready. If it bounces back immediately, give it more time.
Step 6: Dimple and Top
Heat the oven to 425°F. Drizzle the remaining 1 tablespoon of olive oil over the dough. With oiled fingers, press deeply into the dough to create dimples across the surface. Go nearly to the bottom of the pan without tearing the dough. These dimples catch olive oil, salt, herbs, and tiny pools of joy.
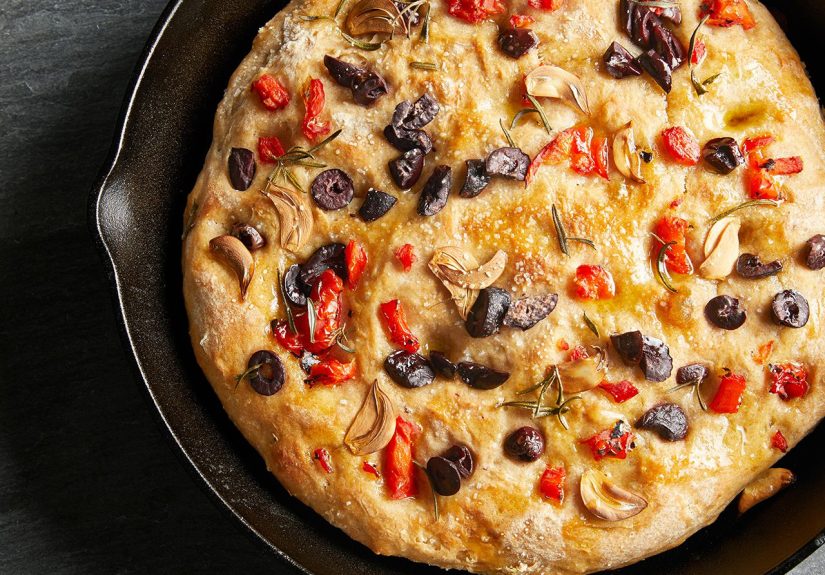
Sprinkle with rosemary and flaky sea salt. Add garlic or other toppings if using. Keep toppings moderate; too many wet ingredients can weigh down the dough.
Step 7: Bake Until Golden
Bake for 22 to 28 minutes, or until the focaccia is deeply golden on top and crisp around the edges. If the top browns too quickly, loosely tent it with foil during the last few minutes.
For extra crispness, carefully remove the focaccia from the skillet after baking and place it directly on a wire rack. Let it cool for at least 10 minutes before slicing. This is difficult, emotionally speaking, but it keeps the crumb from turning gummy.
Best Toppings for Skillet Focaccia
The classic rosemary and sea salt version is hard to beat, but focaccia welcomes creativity. Just remember: toppings should add flavor without drowning the dough.
Classic Rosemary Garlic
Use fresh rosemary, thinly sliced garlic, flaky sea salt, and olive oil. This version is simple, fragrant, and perfect with soups, roasted chicken, or pasta.
Tomato Olive Focaccia
Press halved cherry tomatoes and pitted olives into the dough before baking. Add black pepper and a little oregano for a Mediterranean-style skillet bread.
Parmesan Black Pepper
Sprinkle grated parmesan and cracked black pepper over the dough during the final 5 minutes of baking. This keeps the cheese from burning while still adding savory flavor.
Caramelized Onion
Add a thin layer of caramelized onions before baking. Keep the layer light so the dough can still rise and brown properly.
Tips for Perfect No-Knead Focaccia
Do Not Add Too Much Flour
Sticky dough is the secret, not the problem. Adding extra flour makes focaccia dense and dry. Use olive oil on your hands instead of flour when handling the dough.
Use a Hot Enough Oven
A 425°F oven gives the focaccia enough heat to rise quickly and brown well. If your oven runs cool, the bread may bake pale and soft instead of crisp and golden.
Be Generous With Olive Oil
This is not the moment for a shy drizzle. Olive oil gives focaccia its signature flavor and texture. Use good extra-virgin olive oil because you will taste it.
Let It Cool Before Slicing
Fresh focaccia smells like a legal loophole for impatience, but slicing too early can compress the interior. Ten to fifteen minutes of cooling makes a noticeable difference.
Common Problems and Easy Fixes
My Focaccia Is Dense
The dough may have needed more rising time, or too much flour may have been added. Next time, let the dough get puffy before baking and handle it with oiled hands rather than dusting it heavily with flour.
My Dough Did Not Rise
Check your yeast. Old yeast can lose power. Also make sure the water was lukewarm, not hot. Water that feels hot to the touch can damage yeast, while cold water slows the rise dramatically.
The Bottom Stuck to the Skillet
Use more olive oil and make sure the skillet is well-seasoned if using cast iron. Let the bread cool for a few minutes, then loosen the edges with a thin spatula.
The Top Is Pale
Bake a few minutes longer or move the skillet to a higher oven rack for the final stretch. A light drizzle of olive oil before baking also helps browning.
How to Serve No-Knead Skillet Focaccia
This bread is flexible enough to go from casual snack to dinner-table hero. Serve warm slices with olive oil and balsamic vinegar, or pair it with tomato soup, minestrone, chili, roasted vegetables, or a big salad. It also makes excellent sandwich bread. Slice a square horizontally and fill it with mozzarella, roasted peppers, turkey, pesto, or grilled vegetables.
For appetizers, cut the focaccia into small strips and serve with whipped ricotta, marinara, garlic butter, or herbed olive oil. If you accidentally eat three pieces while “testing the texture,” that is between you and your cutting board.
How to Store and Reheat Focaccia
Store leftover focaccia in an airtight container at room temperature for up to 2 days. For longer storage, wrap it tightly and freeze for up to 2 months.
To reheat, place slices in a 350°F oven for 8 to 10 minutes. You can also warm them in a dry skillet over medium-low heat to revive the crispy bottom. Avoid microwaving if possible, because it can make the bread chewy in a not-fun way.
Make-Ahead Strategy
This recipe is perfect for planning ahead. Mix the dough the night before, refrigerate it overnight, then transfer it to the skillet the next day. Let it rise while you prepare dinner, clean the kitchen, or pretend not to check on it every seven minutes.
If the dough is fully risen but you are not ready to bake, place the skillet in the refrigerator for up to 1 hour. Bring it back to room temperature while the oven heats, then dimple and bake.
Nutrition and Practical Notes
Focaccia is bread enriched with olive oil, so it is more flavorful and slightly richer than a basic loaf. A typical serving provides carbohydrates for energy, some fat from olive oil, and a small amount of protein from flour. If you want a lighter serving, pair a small slice with soup or salad. If you want a heartier meal, use it for sandwiches or serve it with beans, eggs, chicken, or roasted vegetables.
You can make this recipe vegan by using sugar instead of honey and skipping cheese toppings. You can also make it dairy-free without changing the base recipe.
of Real Kitchen Experience: What This Recipe Teaches You
The best thing about making no-knead skillet focaccia is that it changes how you think about bread. Many home cooks treat yeast dough like a tiny science exam hiding in a mixing bowl. Focaccia proves that bread can be relaxed, forgiving, and even a little playful. The first time you stir the dough, it may look too wet. You may wonder if you made soup with career goals. But after the overnight rest, the dough becomes stretchy, bubbly, and surprisingly strong.
One practical lesson is that patience matters more than muscle. A long rise develops flavor in a way that rushed dough cannot copy. The dough becomes slightly tangy, more aromatic, and easier to handle. When you bake it, the crust has better color and the inside tastes like real bread, not just flour that survived the oven.
Another lesson is that olive oil is not decoration. In skillet focaccia, oil is a structural ingredient. It helps the dough release from the pan, fries the bottom crust, carries the rosemary flavor, and gives the finished bread its glossy, golden personality. If you use too little oil, the bread can stick or taste flat. If you use the right amount, the bottom becomes crisp enough to make a tiny crackle when sliced.
The skillet also teaches you about heat. Cast iron holds heat beautifully, so the edges brown faster and develop a thicker crust than focaccia baked in a thin pan. That makes this version especially good for people who love the corner pieces. In a skillet, every slice gets a little edge action. Nobody has to negotiate like it is a family board meeting.
Over time, you will learn how your kitchen affects the dough. In summer, the final rise may be fast. In winter, the dough may take longer and need a warm spot near the oven. The recipe gives time ranges because dough is alive. It responds to temperature, humidity, flour type, and yeast strength. Once you start watching the dough instead of the clock, your bread improves quickly.
This recipe is also a great confidence builder. After one successful skillet focaccia, you may start adding toppings, changing herbs, or turning leftovers into sandwiches. You may bake one for a potluck and casually say, “Oh, it is just homemade focaccia,” while everyone looks at you as if you have unlocked a secret culinary achievement badge. The truth is, the method is simple. But simple food made well has a way of feeling special.
Most importantly, no-knead skillet focaccia reminds you that homemade bread does not need to be perfect to be wonderful. Uneven dimples, rustic edges, and a few dramatic bubbles are part of its charm. It is bread with personality, and frankly, more foods should come with that kind of confidence.
Conclusion
This No-Knead Skillet Focaccia Recipe is the kind of homemade bread that makes you look wildly more skilled than the effort required. With a sticky dough, a slow rise, plenty of olive oil, and a sturdy skillet, you get crisp edges, a tender middle, and deep savory flavor without kneading or complicated equipment.
Whether you keep it classic with rosemary and sea salt or dress it up with tomatoes, olives, garlic, or parmesan, skillet focaccia is a reliable recipe for beginners and experienced bakers alike. It is simple enough for a weeknight plan and impressive enough for guests. Just be warned: once people know you can make it, they may start inviting themselves over “just to say hi.” Bring bread boundaries.
SEO Tags
Note: This article is written in original American English and is based on real baking principles for no-knead focaccia, including high-hydration dough, slow fermentation, olive-oil baking, skillet heat retention, and practical home-kitchen testing tips.


