Table of Contents >> Show >> Hide
- First: What Kind of “Refinishing” Are You Doing?
- The Main Floor Sanders (Big Machines)
- Edge Sanders: The Wall-Hugging Specialists
- The Buffer: The Unsung Hero of a Professional-Looking Floor
- A Practical Sander Lineup for Most Full Refinishes
- Grit Progression: The Part People Try to “Optimize” (and Regret)
- Dust Control and Safety: Keep Your Lungs and Your House Happy
- Choosing the Right Sander for Your Floor: Quick Scenarios
- Special Cases: When You Should Slow Down and Double-Check
- How to Avoid the Most Common Sanding Problems
- Conclusion: Build the Right Sander “Team,” Not Just the Biggest Machine
- DIY Experiences & Lessons People Learn While Refinishing Floors (Extra 500+ Words)
- Experience #1: The drum sander is fast… and that’s the problem
- Experience #2: The edger is where confidence goes to be humbled
- Experience #3: “I’ll just skip a grit to save time” is a trap
- Experience #4: The floor looks different in “real lighting”
- Experience #5: Dust gets everywhere you didn’t think dust could get
- Experience #6: The “right sander” depends on your personality, not just the floor
Refinishing hardwood floors is a little like giving your house a fresh haircut: the tools matter, the technique matters more,
and one bad “oops” can turn a simple trim into a dramatic life choice. The good news? If you pick the right sanders (and use them
in the right order), you can get that smooth, glowy, “did you secretly hire a pro?” lookwithout accidentally carving your initials
into the living room.
This guide breaks down the most common sanders used for hardwood floor refinishing, what each one is best at, and how they work together.
We’ll also cover grit progression, edge blending (aka “how to avoid the dreaded halo”), dust control, and real-world lessons people learn
the hard wayso you don’t have to.
First: What Kind of “Refinishing” Are You Doing?
Before you rent the biggest, loudest machine available (tempting, I know), figure out which job you actually have:
1) Screen-and-recoat (light refresh)
If your floor finish is dull, lightly scratched, or scuffedbut the wood itself isn’t deeply gougedyou may only need to abrade the existing
finish and apply a new topcoat. This usually involves a floor buffer (also called a rotary buffer) with a sanding screen or abrasive pad.
It removes minimal wood and is faster and less risky than full sanding.
2) Full sand-and-refinish (down to bare wood)
If you’ve got deep scratches, pet stains, uneven color, worn-through finish, or you want a new stain color, you’re typically sanding down to
bare wood. That means you’ll likely use a “big machine” (drum/belt or a multi-disc/orbital system), plus an edge sander, plus detail tools,
plus a buffer to blend everything together.
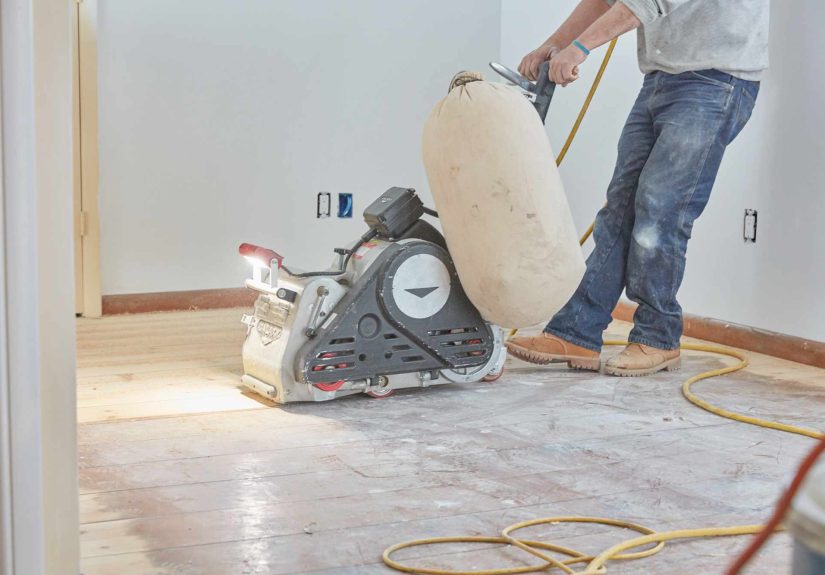
The Main Floor Sanders (Big Machines)
Drum sander
The drum sander is the classic workhorse. It removes finish fast and can flatten minor unevenness, which is why it’s commonly used in full
refinish jobs. It’s also the machine most likely to punish distractions. If you pause with the drum engaged, you can create stop marks or gouges.
Think of it as a powerful sports car: amazing performance, but you should read the manual before you drift it through your hallway.
- Best for: Heavy finish removal, flattening, deep scratches, changing stain color.
- Not ideal for: Nervous first-timers without practice, delicate/very thin wear layers, tiny rooms packed with obstacles.
- Pro tip: Keep it moving, feather the drum down/up smoothly, and overlap passes consistently.
Belt sander (professional-style walk-behind)
In many refinishing setups, the “big machine” is actually a belt sander rather than a classic drum. It’s still aggressive, still removes material
quickly, and still requires carebut many pros and experienced DIYers find it a bit more forgiving and consistent than some drum models.
- Best for: Full refinish work where you want strong cutting power with steady control.
- Not ideal for: Ultra-tight spaces; it’s still a large machine with a learning curve.
- Pro tip: Pair it with the right grit progression and don’t skip steps. Speed doesn’t equal “finished.”
Random-orbit floor sander (walk-behind orbital)
If drum sanders feel like too much commitment, a walk-behind random-orbit floor sander is often the DIY-friendly option. It’s slower at removing
old finish, but it’s less likely to leave deep directional scratches or dramatic gouges. Many guides recommend it for flat floors and for
homeowners who want more control (and fewer “why is there a trench near the sofa?” moments).
- Best for: DIYers, flatter floors, moderate sanding, and some refinishing jobs where speed isn’t the top priority.
- Not ideal for: Severely cupped/wavy floors that need leveling; extremely thick or stubborn finishes where time is limited.
- Pro tip: Even orbital machines can damage wood if left in one spotkeep moving and overlap passes.
Multi-disc / planetary sanders (often “dustless” pro systems)
Multi-disc sanders use several smaller rotating discs under one machine. They can produce very uniform scratch patterns and, with proper dust extraction,
are popular for dust control and fine finishing stages. Depending on the setup, they may be used for full sanding, final sanding, or blending.
- Best for: Cleaner operation (with vacuum), consistent scratch pattern, blending and finish-quality sanding.
- Not ideal for: Budget DIY projects if rental availability is limited; still requires technique and correct abrasives.
- Pro tip: Let the machine do the workforcing it can create uneven results or swirl issues.
Edge Sanders: The Wall-Hugging Specialists
Edge sander (edger)
Your big machine can’t reach right up to baseboards or into tight perimeter areas. That’s where the edger comes in. It’s powerful, it’s fast,
and it’s infamous for leaving swirl marks if you rush or tilt it. The goal is to match the big machine’s sanding steps so the “field” (center area)
and the “edges” blend seamlessly.
- Best for: Perimeter sanding, along walls, under toe-kicks (with care), closets/edges.
- Common mistake: Over-sanding edges so the perimeter is slightly lower than the center (a subtle “dish” effect).
- Pro tip: For the final edging pass, use the same grit as the final pass of your big machine, and blend the overlap area carefully.
Detail sanders and corner tools
Corners and awkward spots need smaller tools. Options include:
- Hand scraper: Great for corners and detail areas where sanders can’t reach. Keep the edge sharp for clean results.
- Palm/random-orbit sander: Helpful for blending edger marks and smoothing the perimeter zone.
- Detail (“mouse”) sander: Handy in tight corners, though slower and best for finishing passes.
- Oscillating multi-tool with sanding pad: Useful for tricky edges, but keep grits consistent and avoid digging in.
The Buffer: The Unsung Hero of a Professional-Looking Floor
A floor buffer (rotary buffer) isn’t just for polishingduring refinishing, it’s often used with sanding screens or abrasive pads to blend scratch
patterns and remove minor imperfections left by the big sander and edger. This is where a good job becomes a “wow” job.
When to use a buffer
- During full refinishing: After your main sanding steps, to blend the field and edge scratch patterns.
- During screen-and-recoat: To abrade the existing finish so a new coat bonds properly.
- Between coats (optional but common): Light abrasion between finish coats for adhesion and smoothness (follow your finish manufacturer’s instructions).
Screening grit basics (practical guidance)
For blending before finish, many workflows land around the 100–120 grit range depending on your sanding sequence and wood species.
For between-coat abrasion, people often go finer (for example, roughly 150–180 range) to avoid cutting too aggressively.
Always align this with the finish system you’re using.
A Practical Sander Lineup for Most Full Refinishes
If you’re doing a full sand-and-refinish, a common toolkit looks like this:
- Main floor sander: Drum sander or belt sander or random-orbit floor sander
- Edge sander: For the perimeter
- Corner/detail tools: Scraper + small sander for corners
- Floor buffer: With screens/pads to blend and prep
- Dust control: Vacuum (preferably HEPA) + good containment habits
Grit Progression: The Part People Try to “Optimize” (and Regret)
A reliable sanding sequence typically moves from coarse to medium to fine. The exact grits depend on your machine, abrasives, and floor condition,
but a common progression is something like:
- Coarse cut: 36–40 grit (removes old finish, levels the surface)
- Medium cuts: 60–80 grit (removes scratches from the coarse cut)
- Fine cut: 100–120 grit (preps for stain/finish)
The biggest rule: don’t skip grits. Each step removes the scratch pattern from the previous step. If you jump too far ahead,
you can end up with visible lines or blotchy stain absorptionespecially around edge zones where scratch patterns differ.
Match the edges to the field
Your edging sequence should track your main sanding sequence. If your final main-floor pass is 100 grit, your final edging pass should typically
be 100 grit too, then you blend with a buffer or orbital method so the transition disappears.
Vacuum between grits (yes, every time)
Dust from coarser grits can create deep scratches during your finer passes. Vacuum thoroughly between each grit stage, and do a final meticulous
clean before staining or finishing. This is one of those boring steps that directly impacts the “professional” look.
Dust Control and Safety: Keep Your Lungs and Your House Happy
- Respiratory protection: Use a properly fitted respirator rated for fine dust.
- Hearing and eye protection: These machines are loud and dust is sneaky.
- Dust bag discipline: Don’t let collection bags overfill. Fine sanding dust can be highly flammable, and safe handling matters.
- Seal the room: Cover vents, seal doorways with plastic, and plan airflow for finishing fumes.
- Electrical reality check: Many sanders need solid power (and the right extension cord). Avoid overloading circuits.
Choosing the Right Sander for Your Floor: Quick Scenarios
If your floors are flat and you’re a first-timer
A random-orbit floor sander is often the calmer choice. It takes longer, but it’s less prone to dramatic mistakes.
You’ll still need an edger and some detail toolsand you’ll still want a buffer for blending.
If your floors are cupped, wavy, or uneven
A drum or belt sander is typically used because it can level more effectively. If that sounds intimidating,
it’s totally reasonable to consider professional help for the first heavy cut (or at least practice in a low-stakes room).
If your floor mostly looks good but the finish is tired
Consider screen-and-recoat using a buffer and the correct abrasive/screen. This is faster, removes less wood,
and can dramatically improve appearance when the underlying wood is in decent shape.
Special Cases: When You Should Slow Down and Double-Check
Engineered hardwood floors
Engineered wood has a real wood “wear layer” on top of a core. The key question is: how thick is that wear layer?
Very thin wear layers may only tolerate a light scuff-sand, while thicker wear layers may handle a true sand-and-refinish.
If you’re not sure, check the manufacturer specs or inspect a vent/register opening where you can sometimes see the layers.
When the wear layer is too thin, aggressive sanding risks exposing the corean expensive “surprise” you don’t want.
Parquet and patterned floors
Parquet and decorative patterns can show sanding marks easily. A multi-disc or orbital approach (plus careful blending) can help keep scratch
patterns less noticeable. The trick is consistency: same grits, thorough blending, and excellent lighting checks as you go.
Stairs
Stairs are usually a separate strategy: smaller sanders, detail tools, and patience. It’s slower work, but it’s also easier to control with
handheld tools than trying to “make” a big floor sander behave on steps.
How to Avoid the Most Common Sanding Problems
Problem: “Halo” around the room (edges look different than the center)
- Don’t overwork the edger in one spot.
- Use a small random-orbit/palm sander to soften edger swirls in the overlap zone.
- Blend the entire floor with a buffer and appropriate screen/pad before finishing.
Problem: Visible stop marks or dips
- Keep the big machine moving while engaged.
- Feather down and feather upno sudden drops.
- Stagger your start/stop points so they don’t line up in a neat “oops” row.
Problem: Scratches that “magically” appear after staining
- Don’t skip grits.
- Vacuum between every sanding step.
- Check your work with raking light (a flashlight held low across the floor) before you stain or coat.
Conclusion: Build the Right Sander “Team,” Not Just the Biggest Machine
Refinishing hardwood floors isn’t about finding one perfect sanderit’s about using the right combination. The main floor sander handles the big area,
the edger handles the perimeter, detail tools solve corners, and the buffer blends everything into a uniform surface that’s ready for stain or finish.
If you respect grit progression, control dust, and take your time on blending, you’ll get results that look clean, even, and genuinely satisfying.
(Also: you’ll walk into the room afterward and casually pretend it was “no big deal,” which is a vital part of the tradition.)
DIY Experiences & Lessons People Learn While Refinishing Floors (Extra 500+ Words)
Below are common experiences many DIY refinishing folks share after their first (or second… or “why did I do this in an open-concept house?”)
hardwood floor project. Think of these as friendly field notes from the land of dust, extension cords, and sudden respect for professional trades.
Experience #1: The drum sander is fast… and that’s the problem
A lot of first-timers describe the same moment: you start the drum sander, you’re feeling confident, and then you realize it removes finish like a
hungry bear removes a picnic basket. The speed is greatuntil you slow down for half a second to think, and the machine politely etches a reminder
into the wood. The lesson people repeat: plan your path before you start, keep your pace steady, and practice feathering the drum up and down
somewhere that won’t haunt you forever (a closet, a small bedroom, or a room you don’t mind calling “rustic”).
Experience #2: The edger is where confidence goes to be humbled
Many homeowners say the edger felt “manageable” right up until it started tugging toward the wall or leaving visible swirls. It’s common to focus
so hard on reaching the edge that you accidentally sand the perimeter slightly lower than the field. That’s when the halo effect appears laterespecially
under stain. People who get great results usually do two things: they keep the edger moving in a controlled pattern and they plan a blending step
with a buffer or a small random-orbit sander around the perimeter. In other words: edging is not a one-tool victory lap; it’s a team sport.
Experience #3: “I’ll just skip a grit to save time” is a trap
This is a classic. It’s late, you’re tired, and switching abrasives feels like a personal insult. So someone jumps from a coarse grit to a fine grit.
The floor might look okay… until stain or finish reveals the deeper scratch pattern you didn’t remove. That’s when people discover the painful truth:
sanding is not just removing finishit’s removing the marks from the previous step. The fastest projects, ironically, are usually the ones that
follow a sensible grit progression without shortcuts, because they avoid redo work.
Experience #4: The floor looks different in “real lighting”
Plenty of DIYers report that the floor looked perfectuntil morning sunlight hit it sideways and exposed swirl marks, stripes, or missed patches.
The fix most people recommend after learning this the hard way: use a flashlight held low (raking light) after each major sanding stage and especially
before stain/finish. The low-angle light exaggerates scratches and uneven spots so you can correct them while the floor is still in “fixable mode.”
This one habit can save hours.
Experience #5: Dust gets everywhere you didn’t think dust could get
Even with careful prep, sanding dust has a talent for traveling. DIYers often say they underestimated how much time sealing off doorways, covering vents,
and vacuuming between steps would take. The silver lining: the people who obsessively vacuum and wipe down surfaces usually end up with a smoother finish
(less grit trapped under coats) and fewer regrets. If you want a simple mantra borrowed from the collective experience: cleaning is part of sanding.
Experience #6: The “right sander” depends on your personality, not just the floor
Two people can refinish identical oak floors and choose different approaches based on temperament. Some DIYers are patient and methodical; they’ll gladly
use a random-orbit floor sander, take longer, and sleep well at night. Others want speed and don’t mind practicing technique; they may prefer a drum or belt sander
for the main cuts. The shared lesson is encouraging: the best tool isn’t always the most powerfulit’s the one you can control consistently for hours.
Floor refinishing is a marathon with loud machines, and the winner is usually the person who stays steady and doesn’t rush the blending steps.


