Table of Contents >> Show >> Hide
- Before You Start: A Quick (Important) Safety Reality Check
- Way #1: Use a Paintable Cord Cover (Raceway) for a Clean, Fast Fix
- Way #2: Hide Cables Along Trim (Baseboards, Crown Molding, and Corner Runs)
- Way #3: Run Cables Through the Wall (The “Floating TV” Look)
- How to Choose the Best Method for Your Space
- Common Mistakes (So You Don’t Learn Them the Expensive Way)
- Pro-Level Finishing Touches for a Truly Clean Look
- Real-World Experiences: What People Usually Run Into (And How to Win Anyway)
- Conclusion
- SEO Tags
You mounted the TV. You leveled it. You stepped back to admire your work… and then your eyes locked onto the dangling cords like they owed you money. Don’t worryhiding cables on the wall is one of those “small” upgrades that makes a room look instantly more expensive (without requiring a second mortgage).
Below are three practical, good-looking ways to hide cables on the wallranging from renter-friendly to “I own a stud finder and I’m not afraid to use it.” You’ll get step-by-step instructions, safety notes, and real-life examples so you can choose the method that fits your wall, your budget, and your patience level.
Before You Start: A Quick (Important) Safety Reality Check
Not all “cables” are created equal. Low-voltage lineslike HDMI, Ethernet, coax, speaker wireare usually easier to conceal. Power cords are where you need to slow down and do it correctly.
- Do not run an extension cord (or a TV power cord) through the wall. That’s a fire risk and generally not permitted as a substitute for permanent wiring.
- If you want power behind a wall-mounted TV, use a code-compliant in-wall power kit (listed for in-wall use) or hire a licensed electrician to add/move an outlet.
- If you’re routing low-voltage cables inside a wall, use in-wall rated cable when required (often marked CL2/CL3 for certain A/V wiring).
Translation: hiding wires can be a DIY win, but electricity is not the place to “creative improv” your way into a smoky life lesson.
Way #1: Use a Paintable Cord Cover (Raceway) for a Clean, Fast Fix
A cord cover raceway (also called a cable channel, cord hider, or wire hider) is the simplest way to hide cables on the wall without opening drywall. It’s basically a slim tunnel that mounts to the wall, holds your cables, and snaps closed. Many are paintable, so you can blend them into your wall color.
Best for
- Renters (often removable with care)
- Textured walls where cables look extra chaotic
- Home offices, gaming setups, and wall-mounted TVs
- Anyone who wants “better” todaynot “perfect” next month
What you’ll need
- Cable raceway kit (straight sections + corner pieces)
- Measuring tape and pencil
- Level (optional but helpful if you like straight lines and inner peace)
- Hacksaw or miter shears (depending on the raceway type)
- Mounting method: adhesive backing, screws/anchors, or both
- Paint + small brush/roller (optional)
Step-by-step
- Plan the route. The cleanest look is usually a straight vertical run down from the TV to a console or outlet, then horizontal along the baseboard if needed.
- Measure twice, cut once. Raceway kits are easy to trim, but you’ll get a more professional look if your cuts line up neatly at corners and endpoints.
- Decide: adhesive or screws? Adhesive is fast and minimal-damage, but screws hold better on textured walls or in high-traffic areas. If your kit allows it, screws are the “sleep better at night” option.
- Mount the base. Clean the wall first (dust and grease are adhesive’s mortal enemies). Install the base section, check level, then add corner fittings as you go.
- Lay cables inside, then snap the cover on. Avoid overstuffingif the cover bulges, it’ll look like your wall swallowed a burrito.
- Blend it in. If the raceway is paintable, lightly sand if recommended, then paint. Many DIYers paint the cover before snapping it on for a cleaner finish.
Real example
You have a wall-mounted TV above a media console, with an HDMI cable, a power cord, and an Ethernet line. A single wider cable channel can hide all three. Run it straight down behind the TV mount, end it just above the console, then bundle excess cable length behind the furniture with hook-and-loop ties. Result: “magazine photo,” not “IT closet panic.”
Pros and cons
- Pros: Fast, budget-friendly, minimal mess, paintable, easy to modify later
- Cons: Slightly visible (though much better-looking than dangling cords), adhesive can fail on heavy texture/humidity
Way #2: Hide Cables Along Trim (Baseboards, Crown Molding, and Corner Runs)
If you want cables to be nearly invisible without cutting open the wall cavity, trim routes are the sweet spot. The idea is simple: the eye already expects lines at the baseboard, ceiling, or cornersso you “borrow” those lines to conceal the cables.
Best for
- Rooms where you need to run cables across a longer distance
- Speaker wire routes (surround sound, wall-mounted speakers)
- People who want a more built-in look than a vertical raceway alone
Trim-based options (pick your vibe)
- Baseboard route: Run cables along the baseboard using discreet clips, or tuck behind baseboard where there’s space.
- Quarter-round trick: Add (or remove and reinstall) quarter-round molding to create a hidden channel. This works well when your setup needs to travel along the floor line.
- Crown molding route: Great for routing cables around a roomespecially for speakersbecause the ceiling line hides it naturally.
- Corner run: Use a corner raceway or trim piece so cables “disappear” in the wall-to-wall or wall-to-ceiling corner.
Step-by-step (baseboard/quarter-round method)
- Map the path. Identify where the cable needs to start and end. Keep it as direct as possible.
- Choose the concealment style. If you’re not removing trim, use low-profile clips or a slim corner channel. If you are removing trim, label it (painters tape + a number) so it goes back where it came from.
- Make room for the cable. Some setups simply tuck behind existing baseboard gaps. Other times, you’ll need a shallow notch/channel (especially behind quarter-round). Take your timeclean carpentry is what makes this look “built in.”
- Secure the cable gently. For low-voltage wiring, use appropriate cable staples/clips that won’t crush the wire. Don’t pinch the cable so tightly that it damages insulation.
- Reinstall trim and touch up. Fill nail holes, caulk seams, and paint if needed. The goal is for your guests to say, “Wow, nice room,” not “Wow, what a fascinating baseboard.”
Where this shines
Say your router is on the opposite side of the room from your TV, and you want a clean Ethernet run (or a coax line) without a visible cable snaking across the wall. Routing along baseboards keeps the cable nearly invisible and avoids the “cord necklace” look across your drywall.
Pros and cons
- Pros: Very discreet, great for long runs, can look built-in
- Cons: More time/effort, minor carpentry skills help, still not a substitute for proper in-wall power wiring
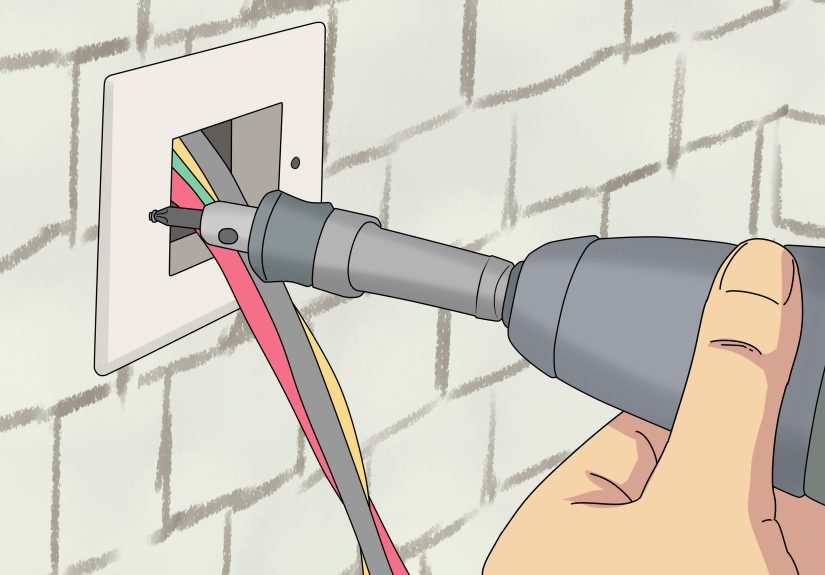
Way #3: Run Cables Through the Wall (The “Floating TV” Look)
If you want the cleanest possible resultno visible wire hider, no channel, no trim tricksrunning cables inside the wall is the top-tier option. It’s also the option where doing it safely matters most.
Best for
- Wall-mounted TVs and soundbars
- Homeowners (or anyone allowed to cut and patch drywall)
- People who want the “nothing is connected to anything” illusion
Two safe approaches
- Low-voltage pass-through: Install low-voltage brackets/brush plates and fish HDMI/Ethernet/coax through the stud bay.
- In-wall power kit or new outlet: To power the TV behind the wall, use a listed in-wall power kit (designed for this job) or have an electrician install an outlet behind the TV.
What you’ll need (typical)
- Stud finder
- Drywall saw or oscillating tool (carefully!)
- Low-voltage mounting brackets + wall plates (brush plates or pass-through plates)
- Fish tape or fish rods
- In-wall rated cables where appropriate (for example, certain A/V wiring rated for in-wall use)
- For power: a listed in-wall power kit or a licensed electrician
Step-by-step (low-voltage pass-through)
- Find your stud bay. Most people run cables straight down in the same stud cavity from behind the TV to a point near the outlet or media console.
- Mark the openings. One opening behind the TV, one lower opening where the cables will exit. Keep openings aligned vertically for easier fishing.
- Cut the drywall carefully. Use light pressure and stop if you hit resistance. (Walls sometimes hide surprises.)
- Install low-voltage brackets and plates. Brush plates give a clean look and help protect cables from sharp drywall edges.
- Fish the cables. Drop a fish tape down from the top opening, grab it from the bottom opening, and pull cables through gently. Avoid sharp bendsHDMI cables especially can be diva-level sensitive.
- Finish and tidy. Connect devices, bundle slack behind the console, and label cables if you ever plan to change gear later.
Power note (worth repeating)
If you want an outlet behind the TV, don’t feed a regular power cord through the wall. Use a listed in-wall power kit or have an electrician add the outlet. This is the difference between “sleek” and “why does my wall smell like regret?”
Pros and cons
- Pros: Cleanest look possible, perfect for wall-mounted TVs, adds a high-end finish
- Cons: More tools and planning, drywall work, must follow safety/code practices for power
How to Choose the Best Method for Your Space
Here’s a simple way to decide without spiraling into a 47-tab research marathon:
- If you rent or want a no-mess option: Start with a paintable cable raceway. You can remove it later (carefully) and patch small holes if you used screws.
- If you want a built-in look without opening drywall: Run cables along trim (baseboards/corners/crown). It’s discreet and great for longer routes.
- If you want the cleanest “floating” look: Go in-wallespecially for a TV and soundbar. Just keep power code-compliant with a proper kit or an electrician.
Common Mistakes (So You Don’t Learn Them the Expensive Way)
- Using extension cords as permanent wiring. Even if it “works,” it’s not a safe long-term solution.
- Overstuffing a cord cover. If the cover won’t close easily, you need a bigger channel or fewer cables in that run.
- Skipping wall prep. Dusty walls and adhesive strips have a short, dramatic relationship.
- Forgetting future upgrades. If you might add a soundbar, game console, or streaming box later, choose a slightly larger raceway or plan a second route now.
- Drilling blindly. Use a stud finder and be cautiouswalls can contain plumbing, wiring, and surprises.
Pro-Level Finishing Touches for a Truly Clean Look
- Use shorter cables where possible to reduce slack and clutter behind furniture.
- Label both ends of your cables (future-you will write you a thank-you note).
- Leave a pull string in an in-wall run so adding a cable later doesn’t require new drywall cuts.
- Color match raceways and plates to the wall for near-invisibility.
Real-World Experiences: What People Usually Run Into (And How to Win Anyway)
Let’s talk about what happens after the instructionsbecause in real homes, wires don’t behave like they’re in a product photo. Below are common, very normal “experiences in the wild” that DIYers run into when trying to hide cables on the wall, plus the practical fixes that keep the project from turning into a weekend-long saga.
Experience #1: “My wall is textured, and the adhesive hates it.”
A lot of cord covers advertise peel-and-stick installation, and on smooth drywall they can be fantastic. But heavy texture (orange peel, knockdown, or anything with a sand-like paint finish) reduces the surface contact area. People often report that the raceway looks great for a day… then slowly starts peeling like a sad banana. The fix is simple: use screws and anchors at key points (especially near the top where gravity is doing its best work), and treat adhesive as “extra insurance,” not the only support. If you can’t use screws (rental rules), using more attachment points, pressing longer, and choosing a lighter cable load improves success.
Experience #2: “I hid the cables… and now my setup is harder to use.”
This one surprises people: you can make cords invisible and still end up annoyed daily if you didn’t plan access. For example, a console that needs frequent plugging/unplugging (charging controllers, swapping HDMI devices, resetting a router) can feel frustrating if everything is “sealed away.” A practical compromise is to hide the visible vertical run (TV-to-console) with a raceway or in-wall route, but keep a small service loop and an accessible cable management box behind the console. The room looks clean, and you don’t need a flashlight and a yoga pose every time you change something.
Experience #3: “In-wall looked easy… until I met the fire block.”
Many walls have horizontal framing pieces (fire blocks) that can stop a straight cable drop. DIYers sometimes cut openings, drop a fish tape, and then hit an invisible barrier. When that happens, people either (a) shift to an on-wall raceway for that section, (b) reroute to a different stud bay, or (c) open the wall a bit more to drill through the blocksomething that may be reasonable for a confident DIYer but is also where “hire a pro” becomes a totally respectable choice. The winning mindset: plan for a backup route before you cut, and don’t assume every wall is a clear vertical highway.
Experience #4: “My ‘one cable’ turned into seven cables overnight.”
A TV setup multiplies cords like it’s trying to win an award: TV power, soundbar power, HDMI, Ethernet, optical audio, coax, maybe a camera cable, and suddenly your single slim raceway is auditioning for a circus act. The practical lesson people learn is to size up one step: pick a wider cable channel than you think you need, and choose a system with corner fittings so you can route neatly. If you’re going in-wall, consider running a conduit sleeve or leaving a pull string for future upgrades. Today’s “simple setup” is often tomorrow’s “I bought a console and now everything needs a port.”
Experience #5: “I tried to hide power in the wall the wrong wayand got scared straight.”
Many people are tempted to push a power cord through the wall because it seems like the fastest path to a clean look. The good news is that most DIYers pause once they learn it’s not a safe substitute for proper wiring. The better approach is what experienced installers do: use a listed in-wall power kit designed for the job, or have an electrician add an outlet behind the TV. People who choose the compliant route usually describe the same feeling afterward: the setup looks high-end and they’re not lying awake wondering if their wall is quietly plotting something.
Bottom line: hiding wires is less about “perfect technique” and more about matching the method to your wall, your cable load, and your future plans. When you pick the right approachraceway, trim route, or in-wallyou get that clean, calm look where your room feels intentional instead of improvised.
Conclusion
You don’t need a full renovation to make a room look polished. If you want the quickest win, a paintable cord cover raceway is the easy button. If you want something more integrated, trim routes keep cables nearly invisible along lines the eye already expects. And if you want the cleanest “floating” look, running cables through the wall delivers the most dramatic transformationjust keep power solutions code-compliant and safe.
Choose the method that fits your space, your comfort level, and how often you change your setup. The goal isn’t just hidden wiresit’s a room that looks finished on purpose.


