Table of Contents >> Show >> Hide
- What Does It Mean to Peel and Devein Shrimp?
- Before You Start: A Few Smart Shrimp Prep Tips
- Method 1: Peel and Devein Shrimp by Hand
- Method 2: Use Kitchen Shears for Fast, Clean Prep
- Method 3: Use a Toothpick or Skewer for Shell-On Shrimp
- Which Shrimp-Peeling Method Is Best?
- Do You Always Have to Devein Shrimp?
- How to Buy Shrimp for Easier Peeling
- Troubleshooting: Why Is This Shrimp Fighting Back?
- Cooking Tip: Clean Shrimp Still Need Gentle Heat
- Conclusion
- Real-World Kitchen Experiences With Peeling and Deveining Shrimp
Shrimp are the little black dress of the seafood world: they fit almost every occasion, from fast weeknight tacos to fancy-ish shrimp cocktail that makes you feel like you should suddenly own linen napkins. The only catch? A lot of home cooks freeze in place when the shrimp still have their shells on and that mysterious dark line running down the back. Good news: peeling and deveining shrimp is much easier than it looks, and once you learn a few methods, you can clean a whole batch without turning your kitchen into a seafood panic room.
This guide breaks down three easy ways to peel and devein shrimp, plus when to leave the tail on, when you can skip deveining, and how to prep shrimp with less mess and more confidence. Whether you are making shrimp scampi, fried shrimp, grilled skewers, or a big peel-and-eat platter, these shrimp prep tips will help you move faster and waste less.
What Does It Mean to Peel and Devein Shrimp?
Peeling shrimp means removing the shell, legs, and sometimes the tail. Deveining shrimp means removing the dark line that runs along the back. That line is the digestive tract. It is usually safe to eat, but many cooks remove it for better texture, cleaner presentation, and peace of mind. In larger shrimp, it can look gritty or muddy, which is not exactly the flavor profile most people dream about at dinner.
Here is the nice part: you do not always need perfection. If you are working with tiny shrimp for fried rice, soup, or stuffing, many people skip deveining unless the tract is especially visible. But if you are serving jumbo shrimp, butterflied shrimp, cocktail shrimp, or anything where appearance matters, deveining is usually worth the extra minute.
Before You Start: A Few Smart Shrimp Prep Tips
1. Thaw shrimp safely
If your shrimp are frozen, thaw them in the refrigerator ahead of time for the best texture. Need them faster? Put the shrimp in a sealed bag and submerge the bag in cold water until they are pliable. Avoid thawing shrimp on the counter. Room-temperature seafood is a fast track to regret.
2. Decide whether you want the tail on or off
Leave the tail on for dishes where shrimp are picked up by hand, such as shrimp cocktail, grilled shrimp, or fried shrimp appetizers. Remove the tail for pasta, casseroles, salads, and stir-fries, where no one wants to wrestle a tail in the middle of a bite.
3. Keep the shells if you can
Do not toss those shells automatically. Shrimp shells make a flavorful seafood stock for soups, risotto, chowder, and pan sauces. It is one of the rare kitchen scraps that can still feel weirdly luxurious.
4. Pat shrimp dry after cleaning
Once peeled and deveined, blot the shrimp dry with paper towels. Dry shrimp brown better, season better, and are less likely to steam when they hit a hot pan.
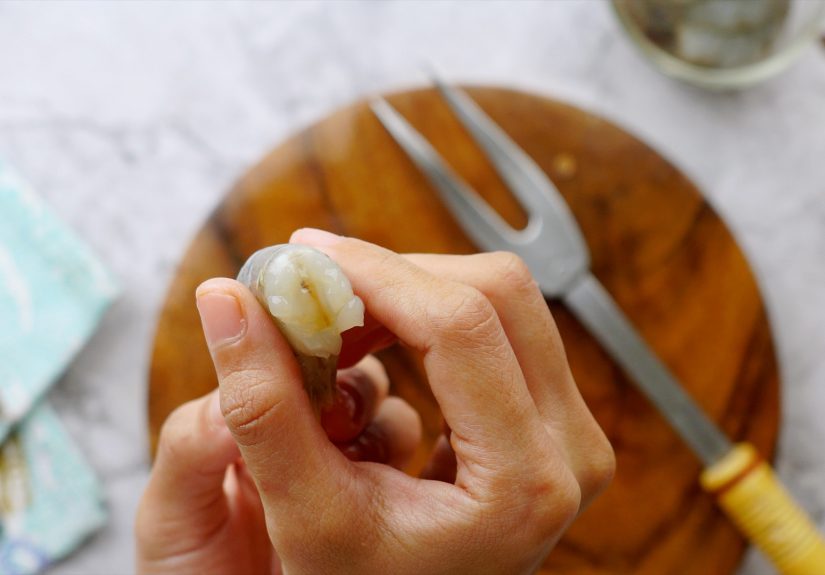
Method 1: Peel and Devein Shrimp by Hand
This is the classic method and the easiest one to learn if you are new to cleaning shrimp. It works especially well on thawed raw shrimp with headless shells still attached.
Best for
- Beginners
- Medium to large shrimp
- Recipes where the shell comes off completely
How to do it
- Start underneath the shrimp. Turn the shrimp belly-side up, where the legs are attached.
- Pull off the legs. They usually come away easily with your fingers.
- Crack the shell open. Use your thumbs to loosen the shell along the belly, where it is softer.
- Peel away the shell segments. Work from the underside toward the back, removing the shell in sections.
- Leave or remove the tail. Pinch the last shell segment and tug gently if you want the tail off.
- Cut a shallow slit along the back. Use a small paring knife and do not cut too deep.
- Lift out the vein. Use the tip of the knife or your fingers to pull it away.
Why this method works
Peeling shrimp by hand gives you the most control. It is great when you want clean-looking shrimp for sautéing, poaching, or marinating. It also lets you feel where the shell loosens naturally, which helps prevent tearing the flesh.
Common mistake to avoid
Do not slice too deeply down the back. You want to expose the vein, not butterfly the shrimp unless the recipe calls for it. A gentle slit is all it takes.
Method 2: Use Kitchen Shears for Fast, Clean Prep
If your goal is speed, kitchen shears are your best friend. This method is especially useful for larger shrimp, shell-on recipes, and anyone who wants to feel like a seafood surgeon with a schedule.
Best for
- Large or jumbo shrimp
- Peel-and-eat shrimp
- Boiled shrimp, grilled shrimp, and shell-on presentations
- Batch prep when you have a lot of shrimp
How to do it
- Place the shrimp curved-side up. The back should face you.
- Snip along the shell. Use kitchen shears to cut from the head end toward the tail along the back.
- Stop before cutting through the tail if you want the tail intact.
- Open the shell slightly. You can now either leave it shell-on for easier serving or peel the shell away with your fingers.
- Expose and remove the vein. The cut along the back makes the digestive tract easy to spot and lift out.
Why this method works
Kitchen shears are fast, tidy, and surprisingly precise. They are ideal when you want to butterfly the shrimp just a little or keep the shell attached for flavor and presentation. This method is a favorite for shrimp boils and peel-and-eat platters because it makes the shell easier to remove after cooking, too.
Common mistake to avoid
Do not hack all the way through the shrimp. A shallow snip through the shell and just into the flesh is enough to reveal the vein without splitting the shrimp in half.
Method 3: Use a Toothpick or Skewer for Shell-On Shrimp
This method is excellent when you want to keep the shell mostly intact. It sounds fussy, but once you get the angle right, it is oddly satisfying. Think of it as the neat-freak method for people who want the shell-on flavor but not the gritty surprise.
Best for
- Shell-on shrimp
- Shrimp cocktail
- Grilled or poached shrimp
- Anyone who wants minimal cutting
How to do it
- Leave the shell on. You can remove the head first if needed.
- Find the dark line on the back. Look between the shell segments.
- Insert a toothpick or small skewer under the vein near the top of the shrimp’s back.
- Gently lift upward. The vein should catch and pull free in one piece, or mostly one piece if the shrimp are being dramatic.
- Rinse quickly if needed and pat dry.
Why this method works
You keep the shell intact, which can help protect the shrimp from overcooking and add flavor during boiling or grilling. It is also useful when presentation matters and you do not want a visible cut running down the shrimp.
Common mistake to avoid
Do not jab too deeply. You are trying to hook the tract, not spear the shrimp like it insulted your family.
Which Shrimp-Peeling Method Is Best?
The best method depends on the dish:
- For pasta, stir-fries, and sautés: Peel by hand and devein with a knife.
- For shrimp boils and peel-and-eat platters: Use kitchen shears to split the shell down the back.
- For shell-on grilling or shrimp cocktail: Try the toothpick method to remove the vein while keeping the shell mostly intact.
If you cook shrimp often, it is worth learning all three. One saves time, one gives precision, and one preserves presentation. That is a strong little trio for a creature that cooks in about five minutes.
Do You Always Have to Devein Shrimp?
Not always. Many cooks skip deveining very small shrimp, especially in recipes where the shrimp are chopped or mixed into fillings. But for medium, large, or jumbo shrimp, deveining is usually a smart move. The tract can hold grit, and it is more noticeable in big shrimp. If you are serving guests, this is one of those little details that makes the dish feel cleaner and more polished.
How to Buy Shrimp for Easier Peeling
If convenience matters, look for shrimp labeled easy-peel, shell split, or peeled and deveined. If flavor and value matter more, buy shell-on raw shrimp and clean them yourself. Many cooks prefer shell-on shrimp because the flesh is often better protected and the shells can be saved for stock.
Also pay attention to size labels like 16/20 or 21/25. Those numbers refer to how many shrimp make up a pound. The smaller the number, the larger the shrimp. Larger shrimp are generally easier to peel and devein because everything is easier to see.
Troubleshooting: Why Is This Shrimp Fighting Back?
The shell sticks
Your shrimp may still be too cold or partly frozen. Let them thaw until flexible, then try again.
The vein breaks apart
That is normal. Use the tip of a knife, a toothpick, or even tweezers to remove the rest.
The shrimp tears
You are probably pulling too hard or cutting too deeply. Work gently and let the shell loosen in sections.
The shrimp smells off
Fresh shrimp should smell mild and briny, not strongly fishy or sour. If the smell is off, do not gamble with dinner.
Cooking Tip: Clean Shrimp Still Need Gentle Heat
Once your shrimp are peeled and deveined, do not overcook them. Shrimp go from tender to rubbery faster than a group chat turns chaotic. In most recipes, they are done when they turn opaque and curl into a loose “C.” If they tighten into a tiny “O,” they have probably gone too far.
Conclusion
Learning how to peel and devein shrimp is one of those small kitchen skills that pays off again and again. The hand-peel method is simple and beginner-friendly. Kitchen shears are fast and efficient for shell-on prep. A toothpick or skewer is perfect when you want to keep the shell mostly intact. Once you know when to use each approach, shrimp stop feeling intimidating and start feeling like the easiest impressive dinner ingredient in your freezer.
In other words, do not let a shell and a tiny dark line boss you around. With the right method, you can prep shrimp quickly, cook them beautifully, and maybe even feel a little smug about it.
Real-World Kitchen Experiences With Peeling and Deveining Shrimp
One reason this topic matters so much is that shrimp prep looks simple on paper but feels very different in a real kitchen. Many home cooks have the same first experience: they buy a bag of frozen shell-on shrimp because it is cheaper, dump it into a colander, stare at the shells for a full thirty seconds, and wonder whether takeout was the better life choice. Then they clean one shrimp awkwardly, clean the second one more confidently, and by the sixth shrimp they suddenly understand the rhythm. That is how shrimp prep usually works. It is less about talent and more about repetition.
Another common experience is discovering that the “best” method really depends on the recipe. If you are making shrimp tacos on a Tuesday night, peeling by hand and slicing the back with a paring knife feels perfectly practical. If you are prepping two pounds for a cookout, kitchen shears suddenly feel like a miracle tool. And if you are serving chilled shrimp on a platter for guests, preserving the shell while removing the vein can make the final dish look much more polished. The lesson most cooks learn pretty quickly is that shrimp are flexible, but your prep strategy should match your meal.
People also learn that thawing affects everything. Shrimp that are still slightly icy tend to fight back. The shells cling. The vein snaps. The flesh feels stiff. Properly thawed shrimp are easier to peel, easier to cut cleanly, and much less likely to tear. That one small detail often makes the difference between a calm prep session and a muttered monologue in front of the sink.
There is also the matter of speed. The first time someone peels and deveins shrimp, it may take a while. The tenth time, it goes much faster. Experienced home cooks often develop a little assembly line: bowl for cleaned shrimp, bowl for shells, small knife or shears on the cutting board, paper towels nearby, and maybe a trash bowl if they are feeling fancy. That setup saves time, reduces mess, and makes the whole process feel less like a chore.
Another real-life lesson is that shrimp shells are more useful than many beginners realize. Plenty of cooks throw them away at first, then later discover that those shells can build a quick stock with onion, celery, garlic, and water. It is one of the easiest ways to get more value from seafood and add extra flavor to sauces, soups, and rice dishes. Once someone makes shrimp stock successfully once, throwing shells away starts to feel like tossing money into the garbage.
Finally, there is the confidence factor. Shrimp prep tends to look like “chef stuff” until you actually do it. Then it becomes one of those reliable kitchen skills that makes cooking feel easier. You stop overpaying for prepped shrimp, you stop avoiding shell-on recipes, and you start noticing details that improve the final dish. That is really the best experience tied to learning how to peel and devein shrimp: not just cleaner seafood, but a calmer, smarter, more capable cook at the stove.


