Table of Contents >> Show >> Hide
- Materials You Will Need
- How to Make a Light Saber Using Everyday Items: 11 Steps
- Step 1: Choose Your Light Saber Style
- Step 2: Build the Hilt From a Cardboard Tube
- Step 3: Add Grip Details With Tape
- Step 4: Create a Safe Light Source
- Step 5: Choose a Blade Material That Diffuses Light
- Step 6: Add Color With Cellophane or Tissue Paper
- Step 7: Attach the Blade to the Hilt
- Step 8: Make the Tip Soft and Rounded
- Step 9: Add Control Buttons and Decorative Panels
- Step 10: Test the Glow in a Dim Room
- Step 11: Finish With a Costume-Safe Rule
- Helpful Design Tips for a Better DIY Light Saber
- Common Mistakes to Avoid
- Why This Everyday-Item Light Saber Works
- of Real-World Experience: What Making a Light Saber Teaches You
- Conclusion
- SEO Tags
Note: This guide is for making a lightweight, decorative, lightsaber-inspired costume prop. It is not designed for fighting, striking, rough play, or dueling. Think “photo booth hero,” not “living room furniture destroyer.”
Few household objects have more secret cinematic power than an empty paper towel tube. One minute it is recycling. The next minute it is a glowing space-fantasy prop, and someone in the room is making dramatic humming noises with complete confidence. The good news? You do not need a workshop, 3D printer, electronics degree, or mysterious crystal from a distant planet to make a fun light saber using everyday items.
This simple DIY light saber project uses safe, easy-to-find materials: cardboard tubes, paper, tape, foil, a small flashlight or LED tea light, colored cellophane, parchment paper, stickers, and markers. The goal is to create a lightweight glowing prop that looks great in photos, costume parties, school spirit days, bedroom displays, or a low-budget fan film where the special effects department is mostly snacks and imagination.
The instructions below synthesize real-world prop-making ideas, official lightsaber design inspiration, basic light-diffusion principles, and kid-friendly craft safety practices from reputable maker, science, craft, and entertainment sources. Official Star Wars and Disney sources show how lightsaber designs often depend on expressive hilts, modular parts, and symbolic color choices, while maker and science references demonstrate how flashlights, LEDs, translucent paper, and colored filters can create a convincing glow effect.
Materials You Will Need
Before you begin, gather your supplies. You can adjust the list depending on what you already have at home. The best DIY props are part engineering, part recycling, and part “I found this in a drawer and it looks important.”
- 1 empty paper towel tube, wrapping paper tube, or two toilet paper tubes taped together
- 1 small flashlight, battery-powered LED tea light, or mini LED puck light
- White parchment paper, tracing paper, wax paper, or thin printer paper for the blade
- Colored cellophane, tissue paper, or a transparent folder for blade color
- Aluminum foil for the hilt
- Black electrical tape, masking tape, painter’s tape, or duct tape
- Clear tape
- Rubber bands or hair ties
- Markers, stickers, bottle caps, buttons, or paper scraps for decoration
- Scissors for paper only, used carefully with supervision when needed
- Optional: bubble wrap or soft foam sheet for extra blade texture
How to Make a Light Saber Using Everyday Items: 11 Steps
Step 1: Choose Your Light Saber Style
Start by deciding what kind of light saber you want to make. A classic blue or green blade gives heroic energy. A red blade feels dramatic and villainous. Purple, yellow, orange, or white makes the prop feel more custom. This choice matters because the color will guide the paper, cellophane, tape, and hilt details you use later.
Also choose the size. A long wrapping paper tube creates a taller display prop, while a paper towel tube makes a compact version that is easier to carry. For younger crafters or crowded party spaces, shorter is safer and easier to manage. The perfect homemade light saber should feel fun in your hand, not like you accidentally brought a curtain rod to a birthday party.
Step 2: Build the Hilt From a Cardboard Tube
The hilt is the handle of your light saber, and it is the part that gives the whole prop personality. Cut or fold your cardboard tube so the handle is about 8 to 10 inches long. If you do not want to cut anything, simply mark off the handle area with tape and leave the rest as part of the blade structure.
Wrap the handle section tightly with aluminum foil. Smooth it down so it looks metallic. Do not worry if it wrinkles; honestly, wrinkles make it look more like something repaired after a very intense space adventure. Add black tape around the top and bottom edges to create clean borders. This instantly makes the cardboard look more like a real prop hilt instead of a snack container that went to acting school.
Step 3: Add Grip Details With Tape
Grip details make a homemade light saber look intentional. Wrap thin strips of black tape around the hilt in evenly spaced bands. You can angle the tape diagonally for a futuristic look or keep it horizontal for a clean classic style.
If you have painter’s tape, washi tape, or colored masking tape, use it to add accent lines. Silver foil plus black tape is the easiest combination, but gray, brown, gold, and red details can also look great. A good hilt should look like it has buttons, panels, and mysterious controls, even if those controls are technically just tape trying its best.
Step 4: Create a Safe Light Source
For the glow, use a small flashlight, LED tea light, or LED puck light. Battery-powered LEDs are ideal because they stay cool, are widely available, and do not require complicated wiring. Avoid candles, open flames, exposed wires, or any light source that gets hot.
Place the flashlight or LED at the top of the handle, pointing upward into the blade area. If the flashlight is narrow enough to slide into the tube, secure it with tape or a rubber band so the switch remains reachable. If it is too wide, tape it firmly to the top of the hilt and build the blade around it. The practical goal is simple: light should travel upward through the translucent blade material.
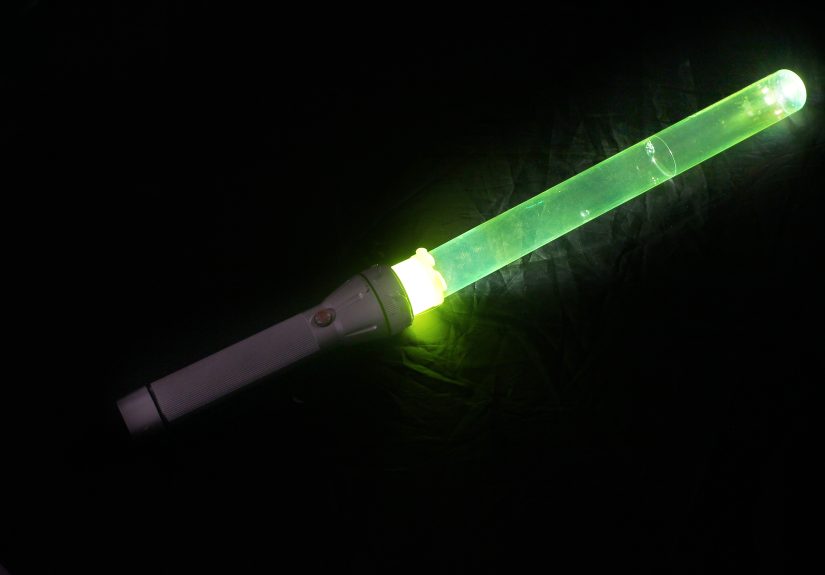
Step 5: Choose a Blade Material That Diffuses Light
The blade needs to be lightweight and translucent. Parchment paper, tracing paper, wax paper, or thin white printer paper can diffuse light, which means it spreads the glow instead of leaving one harsh bright spot. Science activities from PBS and the Exploratorium often use flashlights, everyday objects, and translucent materials to explore how light passes through, reflects, and changes color. That same basic idea helps your DIY light saber look smoother and more magical.
Roll your paper into a long tube about the same width as your hilt. Use clear tape along the seam. If you want a stronger blade, roll two layers together. Do not make it too heavy. The best blade is light enough to hold comfortably and soft enough that it will not hurt anyone if it bumps into something by accident.
Step 6: Add Color With Cellophane or Tissue Paper
Now give the blade its signature color. Wrap colored cellophane or tissue paper around the outside of the blade tube. Clear tape works best because it does not block much light. If you only have white paper, color it lightly with markers, but do not oversaturate it or the paper may wrinkle.
For a brighter effect, place a small square of colored cellophane over the flashlight lens before attaching the blade. This acts like a color filter. Blue cellophane creates a cool glow, green feels classic, red looks intense, and purple looks surprisingly fancy, like your light saber has a personal stylist.
Step 7: Attach the Blade to the Hilt
Slide the bottom of the paper blade over the light source and onto the top of the hilt. Secure it with clear tape first, then reinforce the joint with black tape or foil tape. The connection should be snug but not crushed.
Test the light before sealing everything completely. Turn on the flashlight or LED and check whether the blade glows evenly. If the light looks too concentrated at the bottom, add another layer of parchment paper inside the blade. If the color looks dull, remove one layer or switch to a brighter flashlight. DIY props are all about testing and adjusting, which is the polite way of saying “fixing weird stuff until it looks awesome.”
Step 8: Make the Tip Soft and Rounded
A safe homemade light saber should have a soft, rounded tip. Fold the top of the paper blade inward and tape it closed, or cover it with a small piece of tissue paper. Do not use hard plastic, sharp caps, metal pieces, or anything pointy at the end.
This step is important for safety and appearance. A rounded tip makes the prop look more finished and prevents the blade from becoming poky. It also helps trap light inside the blade, creating a gentle glow near the top.
Step 9: Add Control Buttons and Decorative Panels
Now it is time to make the hilt look like it could actually power a galactic gadget. Use bottle caps, small cardboard rectangles, foam stickers, old keyboard keys, or folded paper squares as buttons. Tape or glue them to the handle area. If using glue, choose school glue or glue dots; avoid hot glue unless an adult is handling it safely.
Add a “power button” near where your thumb naturally rests. Place two or three smaller paper panels below it. You can draw tiny lines, dots, or symbols with a marker. This is where the prop becomes personal. Some light sabers look sleek and elegant. Others look like they were built from spare spaceship parts during a lunch break. Both are valid. The galaxy is a big place.
Step 10: Test the Glow in a Dim Room
Turn off bright overhead lights and test your homemade light saber in a dim room. You should see the blade glow softly from the inside. If the glow is uneven, gently rotate the blade, adjust the paper layers, or reposition the flashlight.
If you want a stronger glow without adding complicated electronics, line the inside back of the hilt with a little aluminum foil. Foil reflects some light upward, helping the blade appear brighter. Keep the foil away from battery compartments and do not place it inside any exposed electronic device. With a normal sealed flashlight or LED tea light, foil around the cardboard area can help bounce light where you want it.
Step 11: Finish With a Costume-Safe Rule
The final step is not decoration. It is the rule that keeps the project fun: this light saber is for posing, display, gentle pretend play, and photos. Do not hit people, pets, furniture, windows, lamps, or anything breakable. A paper prop can still surprise someone, knock things over, or cause arguments with siblings who were “definitely standing too close.”
Use it as part of a costume, a themed party, a classroom craft, a fan film prop, or a bedroom decoration. If you make several, assign each one a color and character backstory. Suddenly your living room has a whole order of cardboard space knights, and the recycling bin has never felt more important.
Helpful Design Tips for a Better DIY Light Saber
Use Layers to Control Brightness
Too much paper blocks light. Too little paper creates bright spots. The sweet spot is usually one or two layers of translucent white paper plus one thin layer of color. If your flashlight is weak, use fewer layers. If your flashlight is very bright, add parchment paper to soften the beam.
Keep the Hilt Heavier Than the Blade
A light blade and slightly heavier handle make the prop easier to hold. Since the flashlight sits in or near the hilt, you already have some natural balance. Avoid adding heavy decorations to the blade. The blade should be the glow, not the gym workout.
Try a No-Light Version for Younger Kids
For a simpler craft, skip the flashlight and make a non-glowing version from colored paper, foil, stickers, and tape. It will still look great in daylight and can be safer for very young children because there are no batteries to manage.
Make It Display-Worthy
To turn your light saber into room decor, create a small wall hook from removable adhesive strips or place it in a cup filled with clean pebbles, marbles, or folded paper. Add a label with the saber’s name, color, and “origin story.” A homemade prop feels much cooler when it has lore. For example: “The Blue Noodle of Balance” may not sound ancient, but every legend starts somewhere.
Common Mistakes to Avoid
The most common mistake is making the blade too heavy. Thick cardboard, rigid plastic, or too many tape layers can make the prop awkward. Use lightweight paper whenever possible. Another mistake is hiding the flashlight switch under tape. Always keep the switch reachable so you can turn the light on and off without performing emergency surgery on your craft project.
Also avoid using materials that crack, splinter, or become sharp. This project should stay soft and simple. Do not add metal rods, wooden dowels, hard tips, or reinforced cores. Those materials might make a prop stronger, but stronger is not the goal here. Safer, lighter, and easier to customize is the whole point.
Why This Everyday-Item Light Saber Works
A convincing DIY light saber depends on three basic tricks: shape, glow, and detail. The long tube creates the iconic silhouette. The flashlight or LED creates the glow. The foil, tape, buttons, and panels make the handle feel like a real prop instead of plain cardboard. Maker projects often use these same principles: begin with a recognizable form, add light or movement, then finish with surface details that sell the illusion.
Official lightsaber props and toys have evolved from simple play designs to highly detailed collectibles with metal hilts, glowing blades, sound effects, and customizable parts. A household version obviously will not compete with a professional collectible, but it borrows the same design language: a distinct handle, a bright blade, a color identity, and a sense that the object belongs to a bigger story.
of Real-World Experience: What Making a Light Saber Teaches You
Making a light saber from everyday items is one of those projects that looks simple at first and then quietly teaches you a surprising amount. You learn that light does not automatically behave the way you want. A flashlight beam is bright in the center and weaker around the edges, so if you shine it into plain paper, you may get one glowing hotspot instead of a smooth blade. That is where diffusion comes in. Adding parchment paper, tracing paper, or thin white paper spreads the light and makes the blade look more even. It is a tiny science lesson disguised as a craft project, which is the best kind because nobody announces, “Good news, we are learning physics.”
You also learn that design details matter. A plain foil-wrapped tube looks fine, but once you add black grip bands, a fake power button, and small panel shapes, the whole thing becomes more believable. This is the same reason movie props are covered in tiny textures, scratches, buttons, ridges, and layers. Your eye reads those details as function, even when the “function” is a sticker from the junk drawer. A good homemade prop does not need expensive materials; it needs smart visual signals.
Another useful experience is problem-solving. Maybe your blade leans to one side. Maybe the flashlight is too small and rattles inside the tube. Maybe the red tissue paper makes the blade look more like a festive holiday candle than a dramatic space weapon. Each problem has a simple fix: add tape, use a rubber band, change the paper, adjust the layers, or shorten the blade. The project rewards experimentation. You do not fail; you prototype. That word sounds much cooler and makes the mess on the table feel official.
This project is also great for groups. At a party, each person can choose a color and decorate a hilt differently. One person might build a sleek silver-and-black handle. Another might cover the entire thing in stickers and declare it an ancient artifact. Someone will absolutely make sound effects. Let them. The sound effects are part of the engineering process, probably.
Most importantly, a DIY light saber reminds you that creativity often starts with ordinary objects. A cardboard tube, flashlight, and piece of colored paper are not impressive by themselves. Put them together with a little intention, and suddenly you have a costume prop, a display piece, a story starter, and a reason to walk dramatically down a hallway. That is the real magic of everyday-item crafts: they turn “nothing special” into “look what I made.”
Conclusion
Learning how to make a light saber using everyday items is less about building a perfect movie replica and more about creating a fun, safe, glowing prop with materials you already have. With a cardboard tube, foil, tape, translucent paper, colored cellophane, and a small LED light, you can build a light saber that looks great, photographs well, and gives your costume or craft day instant personality.
The best part is flexibility. You can make it blue, green, red, purple, gold, or whatever color your inner space hero demands. You can keep the hilt clean and elegant or decorate it like it survived twelve battles and one very chaotic craft table. As long as it stays lightweight, soft-tipped, and safe for display or gentle pretend play, your homemade light saber has done its job beautifully.
Final note: This article is designed for a safe costume prop project only. Use lightweight materials, avoid heat and sharp parts, supervise younger crafters, and keep the finished light saber away from rough play.


