Table of Contents >> Show >> Hide
- Why Build a DIY Outdoor Canopy?
- Before You Start: Plan Like a Pro
- How to Make an Outdoor Canopy: 13 Steps
- 1. Measure Your Space Carefully
- 2. Choose the Canopy Shape and Size
- 3. Pick a Safe, Durable Support System
- 4. Check Utilities and Local Rules Before Digging
- 5. Mark the Post Locations
- 6. Dig the Post Holes
- 7. Set the Posts in Concrete
- 8. Add the Top Support Hardware
- 9. Cut or Order the Outdoor Fabric
- 10. Create a Slight Slope for Water Runoff
- 11. Attach the Fabric and Tension It Evenly
- 12. Test for Stability, Shade, and Clearance
- 13. Finish the Space So It Looks Intentional
- Common Mistakes to Avoid
- Maintenance Tips for a Longer-Lasting Backyard Canopy
- Final Thoughts
- Extra Experience: What Building an Outdoor Canopy Really Teaches You
If your backyard feels like a frying pan by noon, an outdoor canopy can fix that fast. A good canopy creates shade, defines your seating area, makes outdoor meals feel a little more “weekend retreat” and a lot less “why is the chair branding my legs,” and adds style without requiring a full-blown construction saga.
The best part is that a DIY outdoor canopy does not have to be overly complicated. For most homeowners, the sweet spot is a simple freestanding fabric canopy supported by posts and secured with weather-resistant hardware. It is practical, attractive, easier to customize than a store-bought setup, and flexible enough for patios, decks, garden lounges, grilling areas, and outdoor dining spaces.
This guide walks through how to make an outdoor canopy in 13 steps, with smart planning tips, material advice, and real-world lessons that can save you time, money, and one regrettable second trip to the hardware store.
Why Build a DIY Outdoor Canopy?
A backyard canopy gives you more than shade. It helps turn a patch of patio into a usable outdoor room. It can soften harsh sun, make dining areas more comfortable, and give your space a finished look without the cost of a full pergola or pavilion.
Compared with permanent patio roofs, a fabric canopy is usually more affordable and easier to adapt. You can choose a breezy, resort-style look with curtain panels, go modern with a taut rectangular shade, or keep things simple with durable outdoor fabric stretched between four sturdy posts. In other words, it is one of the rare home upgrades that can be functional, good-looking, and not wildly dramatic to build.
Before You Start: Plan Like a Pro
Before you cut fabric or dig anything, decide what kind of canopy you want. This article focuses on a freestanding outdoor canopy with four posts and a fabric top because it offers a great balance of stability, style, and DIY friendliness.
Best Places for an Outdoor Canopy
- Over a patio dining table
- Above a backyard lounge set
- Near a pool seating area
- On a deck with a separate seating zone
- In a garden corner that needs afternoon shade
Basic Materials You’ll Likely Need
- Four pressure-treated wood posts or metal posts
- Concrete mix for footings, if installing freestanding posts
- Outdoor-rated canopy fabric or shade cloth
- Rust-resistant eye bolts, pad eyes, turnbuckles, or hooks
- Exterior screws and washers
- Measuring tape, level, drill, saw, ladder, and post-hole digger
- Optional trim, outdoor curtains, or string lights for style
Choose fabric that is made for outdoor use, not leftover indoor curtain material pretending to be brave. UV-resistant and mildew-resistant fabric will last longer, look better, and complain less during summer.
How to Make an Outdoor Canopy: 13 Steps
-
1. Measure Your Space Carefully
Start by measuring the area you want to shade. Think about furniture placement, traffic flow, and where the sun hits during the hottest part of the day. A canopy that looks perfect on paper but blocks your grill path or bumps into tree branches is not a triumph. Give yourself enough clearance around the edges so the finished structure feels intentional, not squeezed in.
-
2. Choose the Canopy Shape and Size
Rectangular and square canopies are usually the easiest for patios and decks. A rectangle works especially well over dining tables and sectional seating. Keep the canopy large enough to provide useful shade, but not so oversized that it becomes hard to tension properly. A slightly generous footprint is smart because sunlight shifts throughout the day.
-
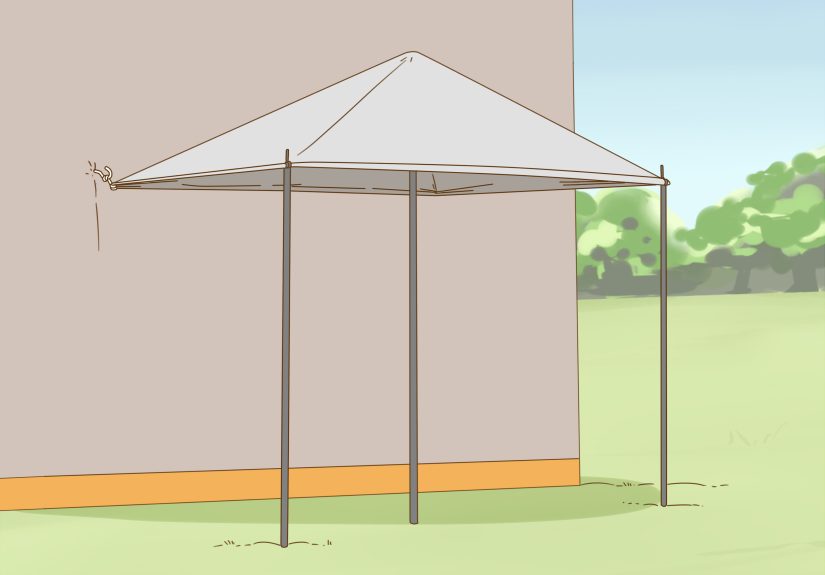
3. Pick a Safe, Durable Support System
You need strong anchor points. For a freestanding design, that usually means four posts installed in the ground or securely attached to a structurally sound deck or slab system. Pressure-treated wood is a common DIY favorite because it is sturdy and easy to work with. Metal posts can look sleek and modern, but they usually require more specialized hardware planning.
-
4. Check Utilities and Local Rules Before Digging
This step is not glamorous, but it is wildly important. Before digging post holes, check local code requirements and contact 811 to have underground utilities marked. Hitting a buried line is an expensive way to turn a shade project into a neighborhood story. Also review HOA rules, setback requirements, and any permit needs if your canopy will be semi-permanent or anchored with concrete footings.
-
5. Mark the Post Locations
Use stakes and string to outline the canopy footprint. Measure corner to corner diagonally to confirm the layout is square. This is one of those tiny setup steps that saves enormous frustration later. If your corners are off now, the fabric will remind you forever. While marking, think ahead about rain runoff and sun angle. A slightly higher side can help water shed more easily.
-
6. Dig the Post Holes
Dig holes appropriate for your post size, climate, wind exposure, and local code requirements. In many areas, deeper footings are needed for frost lines or stronger winds. The goal is a solid, stable support system that does not wobble every time a summer breeze decides to show personality. Keep hole diameters consistent and double-check spacing before you move on.
-
7. Set the Posts in Concrete
Place the posts in the holes, check them for plumb with a level, and brace them before pouring concrete. Work one or two posts at a time if that helps you keep everything aligned. Let the concrete cure fully before adding weight or tension. Rushing this step is like frosting a cake before it cools: technically possible, emotionally regrettable.
-
8. Add the Top Support Hardware
Once the posts are secure, install rust-resistant mounting hardware near the tops of the posts. Depending on your design, this may include eye bolts, pad eyes, hooks, or a combination of anchor fittings and turnbuckles. The hardware matters more than many first-time builders expect. Good fabric with weak hardware is still a weak canopy. Outdoor projects live outside full-time, so your fittings should be rated for weather and tension.
-
9. Cut or Order the Outdoor Fabric
You can either buy a ready-made shade panel or make your own canopy top from outdoor fabric. If sewing, leave room for hems and reinforced corners. If ordering a custom panel, measure twice and give yourself a little planning margin. The fabric should be taut when installed, not stretched to the point of panic. Reinforced corners or grommeted attachment points will help the canopy hold its shape better over time.
-
10. Create a Slight Slope for Water Runoff
Flat fabric and rain are not best friends. Build in a small slope by mounting one side slightly higher than the other, or by shaping the fabric so water can drain rather than puddle. Standing water adds weight, strains hardware, and ages the fabric faster. A canopy should provide cover, not become a backyard water balloon with trust issues.
-
11. Attach the Fabric and Tension It Evenly
Connect the canopy corners to the hardware using carabiners, hooks, rope, or turnbuckles, depending on your setup. Tighten gradually and evenly across all corners. The goal is a smooth, firm canopy surface with no dramatic sagging. Do not yank one corner fully tight while the others are loose. That is the outdoor equivalent of making one bed corner perfect and leaving the rest of the sheet in existential collapse.
-
12. Test for Stability, Shade, and Clearance
Step back and check the structure from every angle. Is the canopy centered? Is the shade falling where you need it? Are the posts solid? Is the fabric clear of sharp edges, branches, or anything that will rub and wear holes into it? This is the moment to adjust height, tension, or placement before you call it done and invite people over to admire your “effortless” backyard upgrade.
-
13. Finish the Space So It Looks Intentional
The canopy is the star, but the surrounding area is the supporting cast. Add outdoor curtains, lanterns, string lights, planters, or a weather-resistant rug to make the area feel complete. A few finishing touches can make a simple DIY canopy look custom. Even one well-placed table and a couple of comfortable chairs can turn the space from “shade structure” into “where everyone mysteriously wants to sit.”
Common Mistakes to Avoid
Using the Wrong Fabric
Indoor fabric may look cute for about five minutes outdoors. Then the sun fades it, moisture gets to it, and the whole thing starts aging like a banana left on a dashboard. Choose fabric designed for outdoor exposure.
Skipping Proper Anchoring
A canopy catches wind. That means your support system has to be strong. Lightweight posts, shallow footings, or bargain-bin hardware can turn a relaxing shade project into a weather-related life lesson.
Forgetting About Rain
Even if your main goal is sun protection, rain still exists and loves to test flat surfaces. Plan for drainage with slope and tension.
Making It Too Small
A canopy that technically shades one chair at 11:12 a.m. is not a victory. Think about real use, not just the structure itself.
Maintenance Tips for a Longer-Lasting Backyard Canopy
- Brush off leaves and debris regularly
- Clean the fabric according to manufacturer guidance
- Check hardware for rust, looseness, or wear
- Retighten the canopy if it starts to sag
- Remove or protect fabric during severe weather if the design allows
A little maintenance goes a long way. Outdoor canopies live through sun, wind, pollen, rain, and whatever mystery sticky stuff appears after family cookouts. Inspecting the setup a few times each season helps it stay safe and attractive.
Final Thoughts
Learning how to make an outdoor canopy is really a lesson in combining comfort, planning, and smart materials. The project is approachable for many DIY homeowners, especially when you keep the design simple and focus on strong posts, outdoor-rated fabric, and secure hardware. A well-built canopy adds shade, style, and structure to your outdoor living space without demanding a full renovation budget.
If you take your time with measurements, anchoring, and fabric tension, you can end up with a backyard canopy that looks polished, works hard, and makes summer afternoons far more enjoyable. That is a pretty solid return on a weekend project.
Extra Experience: What Building an Outdoor Canopy Really Teaches You
One of the most interesting things about building an outdoor canopy is that the project looks deceptively simple from a distance. Four posts, a piece of fabric, a few fittings, done. Then you actually start planning it and realize you are making dozens of small decisions that affect how the finished space feels. That is not a bad thing. It is actually why this kind of project can be so satisfying.
The first lesson most people learn is that shade is not just about coverage. It is about comfort. A canopy over the wrong spot can still leave your table in full afternoon sun. A slightly shifted layout, on the other hand, can completely change how often you use the space. Many homeowners discover that once the canopy goes up, they start eating outside more, reading outside more, and lingering outside longer because the space finally feels usable instead of decorative.
Another real-world lesson is that materials matter more outdoors than they do indoors. Inside, a lot of things can get by on good looks. Outside, everything has to work for a living. Fabric needs to handle UV exposure, hardware needs to resist corrosion, and posts need to stay stable through weather swings. People often begin the project thinking mostly about style, then finish it with a deep respect for bolts, brackets, and tensioning devices. It is a humbling journey.
There is also a design lesson hiding in this project. A canopy does more than create shade; it creates a ceiling effect in open air. That changes how a space feels. Suddenly your patio has definition. The furniture looks anchored. String lights look intentional instead of random. Even a small backyard starts to feel more layered and inviting. It is one of the easiest ways to create an outdoor room without major construction.
Many DIY builders also find that a canopy project improves their eye for proportion. A canopy that is too low feels cramped. Too high, and it loses intimacy and shade effectiveness. Too small, and it looks apologetic. Too large, and it can overpower the area. By the end of the project, you start noticing scale in a whole new way. That awareness often carries into later upgrades like planters, rugs, lighting, and privacy screens.
And then there is the emotional reward. A good outdoor canopy tends to become the place where things happen. Morning coffee feels better there. Kids or pets drift into the shade naturally. Friends gather under it during cookouts. It becomes the default seat in the yard. That is the sneaky magic of this project: you think you are building a structure, but really you are creating a destination.
Of course, there are also practical lessons. Wind will expose weak points. Rain will test your slope. Cheap hardware will reveal itself eventually. But those lessons are useful because they help you improve the setup over time. Maybe you add curtain ties, swap in better fasteners, or raise one side for better runoff. A canopy often gets smarter after its first season because you learn exactly how your yard behaves.
In the end, building an outdoor canopy is not just about making shade. It is about making outdoor life easier to enjoy. It teaches patience, planning, and respect for the unglamorous details that make beautiful spaces actually function. And once you sit underneath your finished canopy on a blazing afternoon with a cold drink and zero regrets, the whole project suddenly feels like a very good idea.


